Jump to content

  • Chat
  •  
  •  

Welcome to Formiculture.com!

This is a website for anyone interested in Myrmecology and all aspects of finding, keeping, and studying ants. The site and forum are free to use. Register now to gain access to all of our features. Once registered and logged in, you will be able to create topics, post replies to existing threads, give reputation points to your fellow members, get your own private messenger, post status updates, manage your profile and so much more. If you already have an account, login here - otherwise create an account for free today!

Photo

Designing Optimal Formicarium for Tiny Ants


  • Please log in to reply
24 replies to this topic

#1 Offline Major - Posted August 26 2018 - 11:47 AM

Major

    Advanced Member

  • Members
  • PipPipPip
  • 588 posts
  • LocationRochester, New York
Hi, so it's that time of year when you end up with 1 too many colony's and you just can't keep buying formicaria. Like many, I have decided to start entering the world of making formicaria. I am very inexperienced so my design wil obviously have multiple flaws. I am making a "budget Formicarium" designed towards tiny ants like; Solenopsis, Pheidole, Temnothorax, Tetramorium, etc. Some of these species grow at exponential rates, and may grow out of these very quickly. That's why I'm thinking about making these formicaria to be able to deliver the ability to interconnect. Something simple such as a small piece of vinyl tubing would work, or it could be as complex as them being modular in a way that they could "snap on" to each other.


Now a little explanation on the formicaria itself

As I stated before, I am working on a way to make them modular and have many units, any ideas would benefit me quite a bit and are highly appreciated.

While I was brainstorming sizes and containers to house a formicaria, eyes stumbled across a discarded Tic- Tac box lying on top of my kitchen counter. It hit me then, Formicarium making enlightenment. I didn't need a complex series of Formicariums, have to buy a 3D printer, order acrylic. The whole purpose of making something simple on a budget was to work what was around me/ and or easily accessible materials!

I thought that maybe if I poured some grout, hydrostone, or maybe even some ytong if I can find a supplier. I would carve out a series of interconnected tunnels similar to what ants perform in the wild. Then I started thinking of hydration. A little hole plugged with cotton that I would directly pour water in via a syringe? To simple and not as appealing to the eye. Plus, with the small ants I tend on housing ing these nests, their is always the risk of drowning. A one month giant water reservoir, (Drew's nests) I didn't have the room with such a small formicaria. After a bit of time spent thinking, I finally settled on a simple sponge hydration system. Grout and ytong a very absorbent and can spread the humidity through out the nest. All I would have to do would be just sticking a syringe in to hydrate it. Fairly simple and efficient.

I also really like the whole "ant hill entrance", I think some of Ants Australia outworld have entrances that lead from under to the top, like ants do in the wild. So I'd use a bit of carved grout, fashion a hole, and stick some vinyl tubing (which wouldn't be visible from the standard view.) And just shape everything into an ant hill as an entrance. I still recall when before I got into ant keeping, I thought that ants actually lived in the hill entrance part (really just extra dirt from tunnels dug under the surface.) Though, some ants creat big hills (Formica, Solenopsis, etc.) that they actually live in, but they also have a series of tunnels below the surface.

Three out of the four sides will be used as housing (not including the bottom and top.) This is because one side will have the back of the sponge, and it would be risky to make tunneling so close on top of it without hitting the sponge.

I also forgot to mention that these nests are an all in one outworld and Formicarium. If all goes well, I will probably sell these, not officially but over Formiculture. I was thinking somewhere around USD 10-15? I have no idea if that very overpriced or under priced, but please let me know a good price, haven't sold anything besides ants before.


Any criticism or advice would be happily taken. A now finally some pictures. The design is still very basic, a few measurements that's all.

DISCLAIMER: My handwriting is pretty bad. :lol:


Thanks you for taking the time to read this through!

Edited by Major, October 12 2018 - 11:43 AM.

  • Spamdy, StopSpazzing, DaveJay and 1 other like this

#2 Offline CoolColJ - Posted August 28 2018 - 4:42 AM

CoolColJ

    Advanced Member

  • Members
  • PipPipPip
  • 2,646 posts
  • LocationSydney, Australia

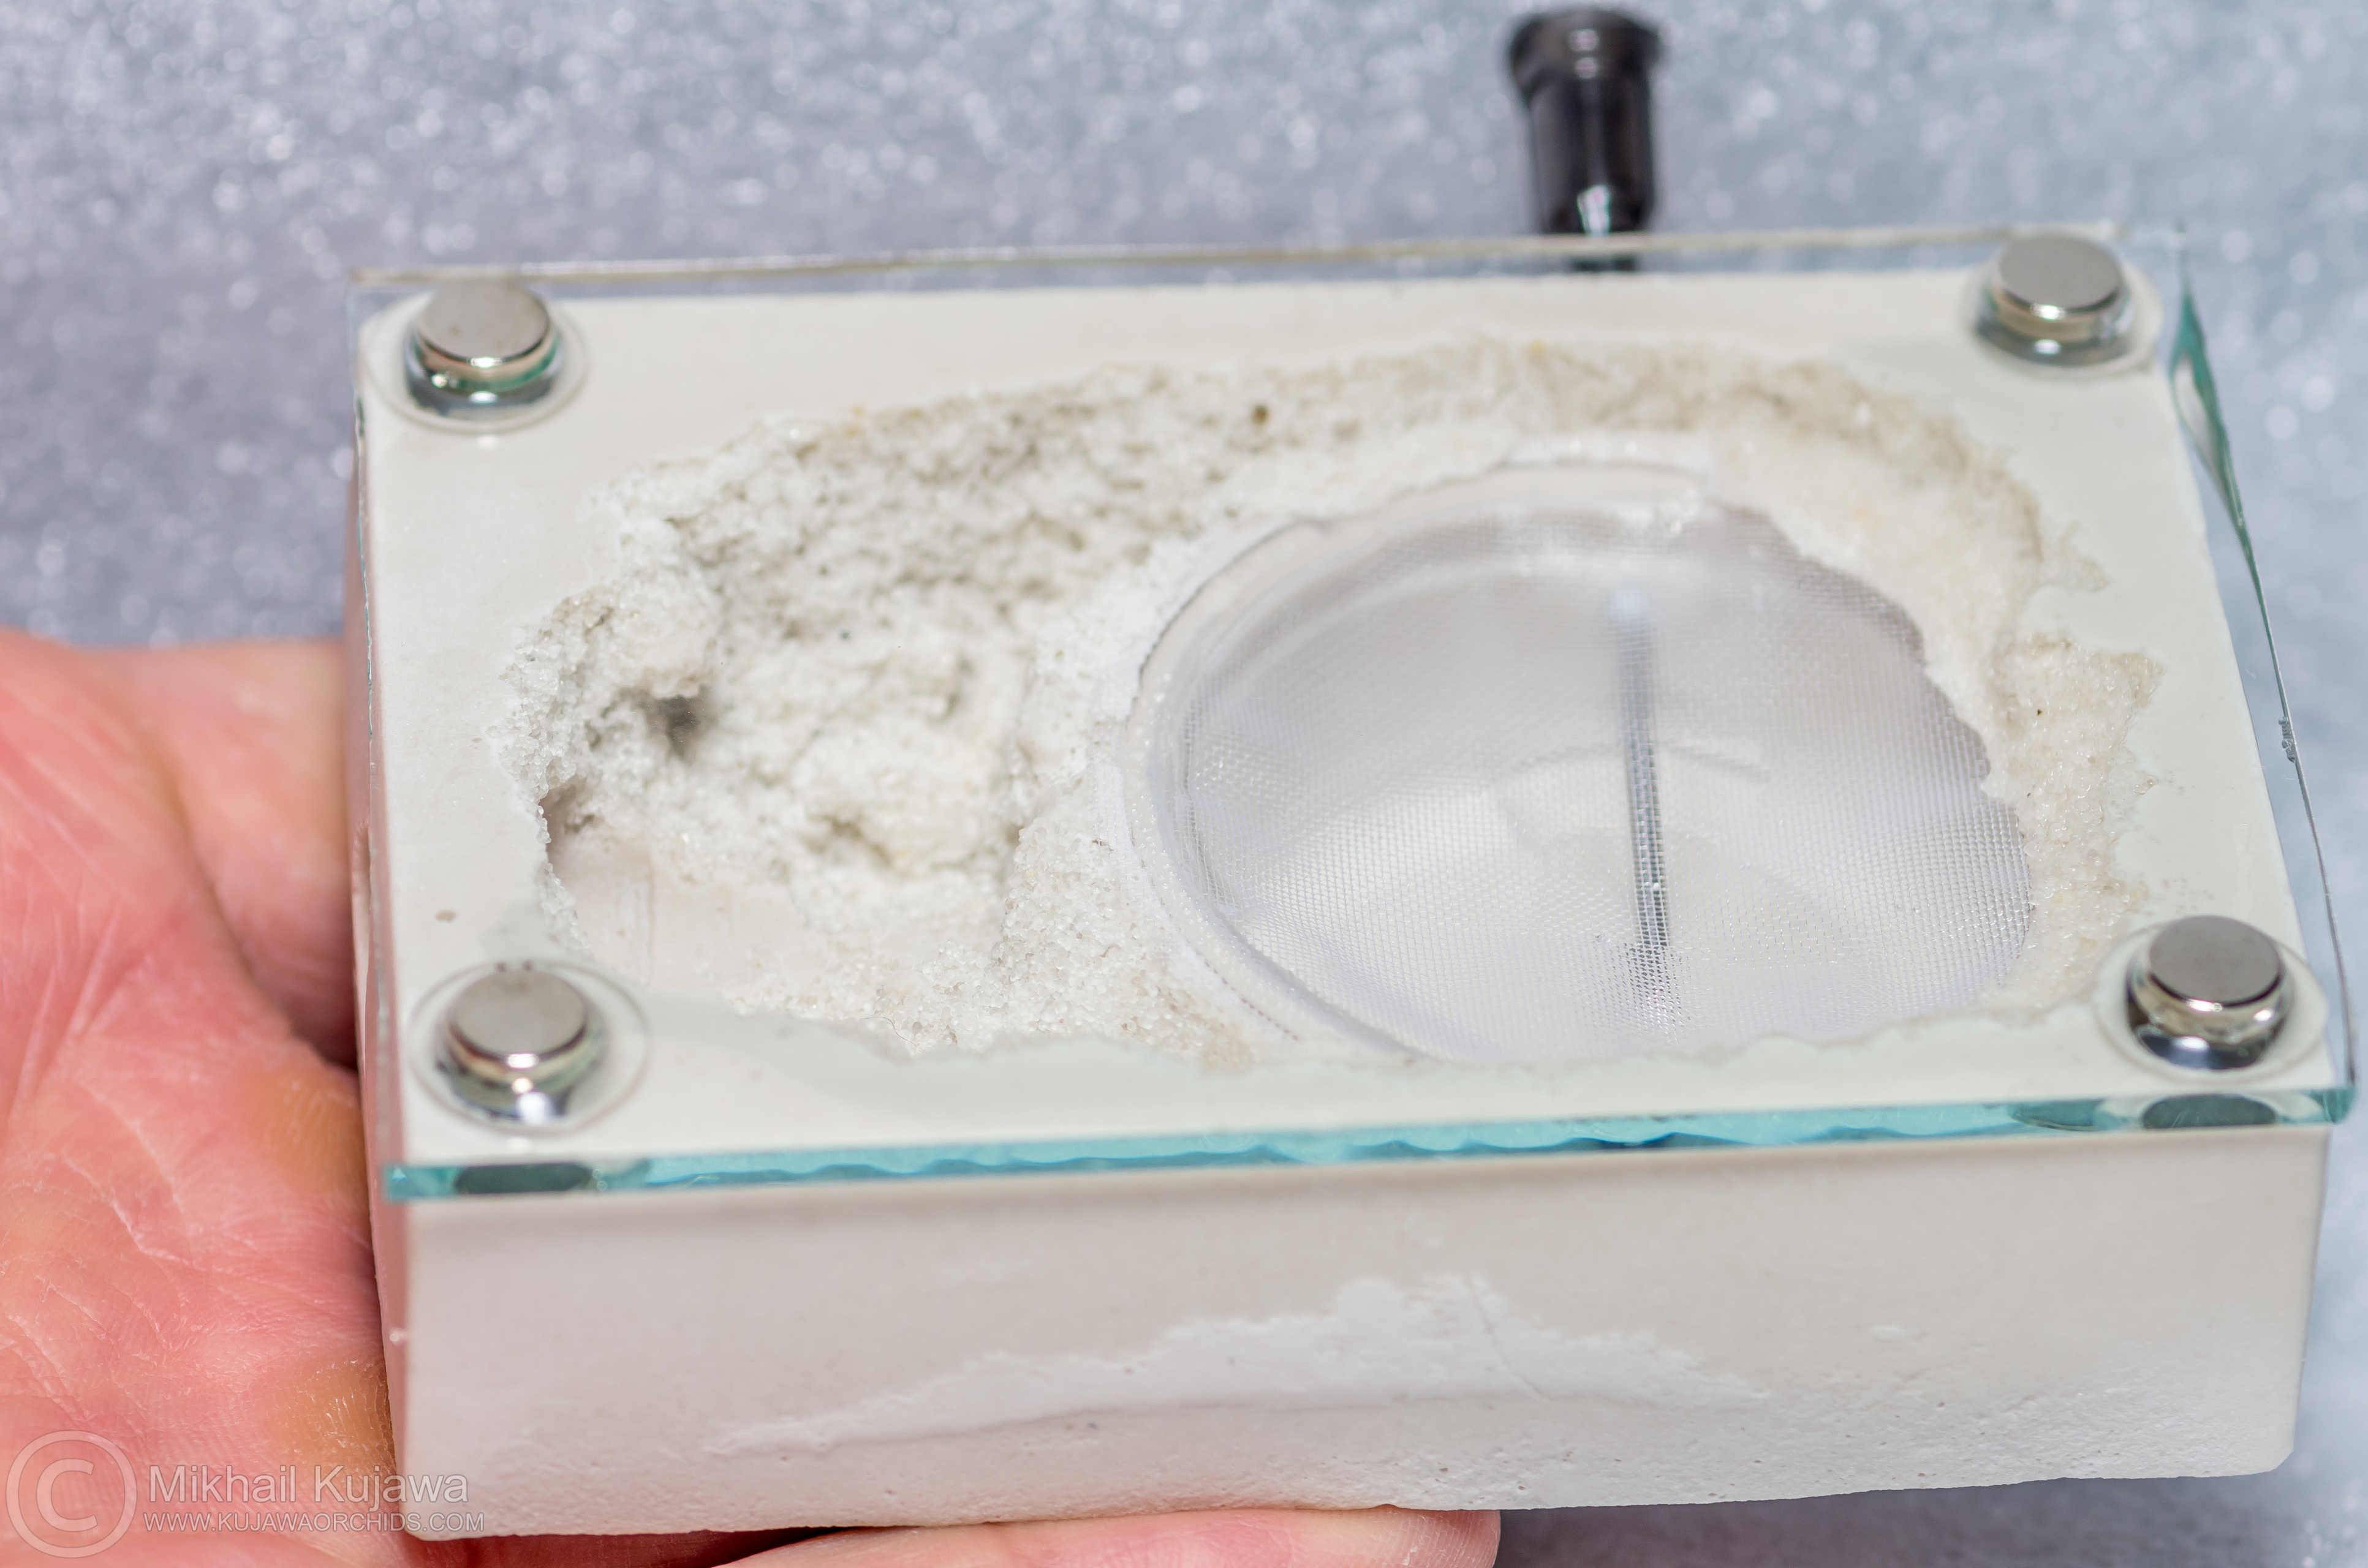
I came cross this page that sells founding formicariums for the US peeps only.

If I was in the US, I'd get a few....


Might give you some ideas

Made from hydrostone. Get some glass from small and cheap picture frames

magnets are dirt cheap, and come in various ratings of strength


http://www.kujawaorc...ormicarium.html


Edited by CoolColJ, August 28 2018 - 4:47 AM.

  • Ant Broski, Spamdy, Mettcollsuss and 2 others like this

Current ant colonies -
1) Opisthopsis Rufithorax (strobe ant), Melophorus sp2. black and orange, Pheidole species, Pheidole antipodum
Journal = http://www.formicult...ra-iridomyrmex/

Heterotermes cf brevicatena termite pet/feeder journal = http://www.formicult...feeder-journal/


#3 Offline Antking117 - Posted August 28 2018 - 4:55 AM

Antking117

    Advanced Member

  • Members
  • PipPipPip
  • 405 posts
  • LocationOmaha, Nebraska, USA

I came cross this page that sells founding formicariums for the US peeps only.

If I was in the US, I'd get a few....


Might give you some ideas

Made from hydrostone. Get some glass from small and cheap picture frames

magnets are dirt cheap, and come in various ratings of strength


http://www.kujawaorc...ormicarium.html


Oh wow, the Small Cave 02 is very nice.. Anyone know if these work well?


  • Major likes this

#4 Offline CoolColJ - Posted August 28 2018 - 4:58 AM

CoolColJ

    Advanced Member

  • Members
  • PipPipPip
  • 2,646 posts
  • LocationSydney, Australia


I came cross this page that sells founding formicariums for the US peeps only.

If I was in the US, I'd get a few....


Might give you some ideas

Made from hydrostone. Get some glass from small and cheap picture frames

magnets are dirt cheap, and come in various ratings of strength


http://www.kujawaorc...ormicarium.html


Oh wow, the Small Cave 02 is very nice.. Anyone know if these work well?


Similar to TarHeel ants nests so it should work just fine. I have two Atom C nests and they work great, with the water tower only for hydration evaporating into the air


Edited by CoolColJ, August 28 2018 - 5:01 AM.

  • Major likes this

Current ant colonies -
1) Opisthopsis Rufithorax (strobe ant), Melophorus sp2. black and orange, Pheidole species, Pheidole antipodum
Journal = http://www.formicult...ra-iridomyrmex/

Heterotermes cf brevicatena termite pet/feeder journal = http://www.formicult...feeder-journal/


#5 Offline Major - Posted August 28 2018 - 5:26 AM

Major

    Advanced Member

  • Members
  • PipPipPip
  • 588 posts
  • LocationRochester, New York
Looks good. Any criticism or advice on my design?

#6 Offline Antking117 - Posted August 28 2018 - 5:29 AM

Antking117

    Advanced Member

  • Members
  • PipPipPip
  • 405 posts
  • LocationOmaha, Nebraska, USA

Looks good. Any criticism or advice on my design?

Looks good, all your pictures show a different design tho, none of them light up, i get the jist of what you are trying to do though. I do not make formicariums so I can't say much but the water supply seems odd.


#7 Offline Major - Posted August 28 2018 - 9:18 AM

Major

    Advanced Member

  • Members
  • PipPipPip
  • 588 posts
  • LocationRochester, New York

Looks good. Any criticism or advice on my design?

Looks good, all your pictures show a different design tho, none of them light up, i get the jist of what you are trying to do though. I do not make formicariums so I can't say much but the water supply seems odd.

Yeah, the pictures don't standout, especially with my terrible handwriting and drawing skills. :lol:

What do you think is odd about the water supply? Many formicaria use a sponge for hydration, it's not a very complex method but it works. Some larger brands of formicaria use this method, Aus Ants, AC, etc.

#8 Offline Major - Posted August 28 2018 - 9:24 AM

Major

    Advanced Member

  • Members
  • PipPipPip
  • 588 posts
  • LocationRochester, New York
Just yesterday I was lucky enough to catch one of my dream species, Brachyamyrmex Depilis. Now, as I was making a standard test tube for her, I realized that it was MASSIVE compared to her body length. I really needed this at that point.
  • Skwiggledork and DaveJay like this

#9 Offline Trythis22 - Posted August 28 2018 - 4:48 PM

Trythis22

    Advanced Member

  • Members
  • PipPipPip
  • 96 posts
  • LocationPortland, Oregon
Hi Major, prepare yourself for a lengthy review. 
 
I’m always glad to see people step up to the plate when it comes to DIY stuff. You’re completely right as the number and size of the colonies you keep increase, the need for long-term investment strategies increase exponentially. Experience (self-education?) in designing and building your own formicariums is the #1 investment you can make in this regard. Breeding your own feeder insects takes a very close 2nd place. 
 
I believe I can give you some practical advice regarding design and construction as one of my businesses is land development. So I oversee a lot of this stuff. Now I’m not an architect or construction worker and all my designs are trash (which is why I hire architects!), but when it comes to critiquing other peoples’ work I can dish out the criticism if I want to. I have working experience with a variety of construction processes. So there’s my little speech… I will try to make everything relevant to your particular situation. 
 
Description of nest:
 
This formicarium sits on one of the 1-1/2" x 5/8" faces, standing up in a false vertical design. The only materials used for the nest and outworld consist of grout, sponge, 3/4" tubing and a rather large tic tac box. The outworld consists of a grout bottom, which is part of the holding chamber for the sponge, and the "anthill" portion, made of a specially shaped piece of grout mouded around 3/4" tubing leading downwards into the nesting area. The nesting area consists of a specially shaped piece of grout. Hydration chamber is separated from nesting area per diagram. Feeding can be achieved by opening up the tic tac box and dropping in food. 
 
Assumptions: 
 
1. Am I right in assuming you will use tweezers to place bowls of sugary liquids in the outworld? That is an extremely narrow space. Any clever ideas for feeding?
 
2. All sponge and grout is going to squeeze tight against the box, the effective thickness of the mould being that of the dimensions of the box minus the width of walls. 
 
3. You have three separate pieces of grout moulding that you will assemble to create the nest? One is the anthill piece, the other hydration box, and the last the nesting piece. 
 
Practical advice:
 
You want to use tic tac boxes no matter what and have many units. Okay, that's the game plan and we're gonna roll with it no matter how much work it is, how impractical the design, we're gonna get it done.  
 
1. You're going to carve out the nest shape in the grout, but how are you getting that inside the box? Are you removing the front face, pouring the grout, carving it, then re-attaching the cover? How do you propose you get a clean cut of that box? If you are creating a separate mould of the grout, what is the proposed method of assembly? All the parts must work together to fulfill the purpose intended of the whole. Ask yourself these questions because if you don't know the method of construction from A to Z or you will run into problems. I say get a second box of the same size, cut it up in a manner so you can "print" as many pieces you want, and keep using that mould to create the pieces and parts you need to assemble this formicarium. You may have to sacrifice two boxes to create everything you need - be clever. 
 
2. For the anthill, pour the grout around the tubing and skip the step of "fashioning a hole". You just evaded shooting yourself in the foot.
 
3. Sponge + grout method: If you have access to sandpaper, sanding down the grout on the contact points with the sponge will improve the absorption rate due to the increase in surface area. Use 150-220 grit sandpaper, as lower (more coarse) grits risk excessive damage to grout, especially if it hasn't had time to cure to full strength. Make sure the grout mix ratio is similar to 1:2:1 water, unsanded grout, crushed perlite. Make sure you crush the perlite until it's a fine powder. Make sure you mix for 10 minutes, let sit for 5, mix one more time. Pour the grout around the sponge, remove sponge, sand, reinsert sponge. If you want good wicking action, make sure the sponge is compressed as water can move faster that way. If you use PVA sponge, you're guaranteed to get 99% RH in that area. On that note, just swap out the mould sponge with a bigger piece that you can compress. 
 
4. You want to create a way to attach more of these to each other in the future. I suggest drilling a hole on the back side, sticking a tube (1/2" outer diameter at most..?) and sticking a cotton piece at the end. Yeah, you're losing some nesting area but they can nest in the tube if they want to. You want to be able to connect front to back instead of side to side because the stability of the nest will improve best that way. These are designed to stand up, and the foot is relatively small. If this was a bigger project I'd raise concerns about balancing issues but given that this entire thing would weigh less than 3 lbs I doubt there's a big balancing issue. 
 
Improvements:
 
1. Why have the tubing in the first place? Use a smaller tubing size to create the grout mould and remove after. Your ants can grip on grout better. There is absolutely no need for a piece of vinyl tubing to be present in the actual nest. Use one to initially create the shape, but don't leave it in there. If you use a smaller piece, you will save space in the outworld as well. 3/4" is overkill as you'd be hard pressed to find any ants wider than 1/4". Get a ruler and check that size, that's a monster ant. 
 
2. Have you thought about using something else for the outworld and using the entirety of the tic tac box as the nest? Remove the cap, expand your nest as you like. I've attached a concept design. The box on the left is not entirely to scale, but you'd be able to add more and more nests sideways without increasing the number of anthills or outworlds, which is a major flaw in my eyes involving multiple units. This design solves that problem very cleanly. You will have to do some precise measurements because the new nests will retain their cap and you want to glue that cap to the bottom of the outworld after you connect it to the existing nest or have some way to ensure it doesn't move around. 
 
3. Categorization is wrong on first pic. You have one top, one bottom, one front, one back, and 2 sides, right? The top and bottom are more or less the same dimensions – remember you’re working with x, y and z dimensions (1-1/2” x 5/8” x 2-1/2” LWH). Categorizing the wider side view (or front/back) as the top view is misleading and will definitely cause communication problems later down the road if you ever decide to add more features or increase complexity (since you’re working by yourself as opposed to a team, this means self-confusion. Even if you are talented at 3-D visualization, your prints and ideas are still being conveyed to other people so adhering to standards and having everyone draw the same conclusions from what you present is very, very important). I mean it’s basic and you might say I’m nitpicking, but you must have a solid foundation and build from there if you want to achieve anything of worth. That was just a pretense for me to say standards are important if you want people to replicate your work.  
 
4. You are more than welcome to try and sell these. Marketing is everything. Remember that a product is only worth as much or as little as your prospective buyers value it. What advantages does this offer over a comparable product? Why should they buy your product over someone else’s? Instead of making it themselves? Where and how are you going to advertise this product? To whom? Also take into account shipping and handling costs. 
 
How's that for a review? 
 
AMo31R4.jpg
 
Description of nest:
 
This formicarium sits on one of the 1-1/2" x 5/8" faces, standing up in a false vertical design. The only materials used for the nest and outworld consist of grout, sponge, 3/4" tubing and a rather large tic tac box. The outworld consists of a grout bottom, which is part of the holding chamber for the sponge, and the "anthill" portion, made of a specially shaped piece of grout mouded around 3/4" tubing leading downwards into the nesting area. The nesting area consists of a specially shaped piece of grout. Hydration chamber is separated from nesting area per diagram. Feeding can be achieved by opening up the tic tac box and dropping in food. 
 
Assumptions: 
 
1. Am I right in assuming you will use tweezers to place bowls of sugary liquids in the outworld? That is an extremely narrow space. Any clever ideas for feeding?
 
2. All sponge and grout is going to squeeze tight against the box, the effective thickness of the mould being that of the dimensions of the box minus the width of walls. 
 

  • Scrixx, Jamiesname, rbarreto and 1 other like this

#10 Offline brianhershey - Posted August 28 2018 - 10:02 PM

brianhershey

    Advanced Member

  • PipPipPip
  • 48 posts

Any criticism or advice would be happily taken.


I like the tic-tac idea a lot. If I understand your design correctly, the only downside I see is stability... wouldn't they topple easily?


Pouring the material seems pretty straight forward... I would first block off the sponge area, then coat the inside with a light layer of oil, pour the bottom section a little above the sponge area so you have a platform over it, let that dry, pop it out and carve it, put it back in to a brand new box that has the sponge in it, tilt the box 45 degrees and pour the mound, let that dry, then drill a hole (or leave a straw poking out when you pour) down through the mound to meet up with the existing hole in the bottom grout piece.


I could see a few of these connected with 3/8" tubing in a 3-triangle, 4-square, 5-pentagon type configuration sitting on a turntable platform (Turntables are cheap, a 4" one for $2 on amazon, a cheap piece of wood for a base).


It's awesome seeing someone else mega-brainstorming like this. Trythis22 and I have our heads filled with ideas hehe :) I got into this hobby last year, and I'm still gathering supplies and doing ant product dev and hope to open up an ebay store at some point.


Brian


  • Trythis22 likes this

#11 Offline drtrmiller - Posted August 28 2018 - 10:38 PM

drtrmiller

    Vendor

  • Members
  • PipPipPip
  • 2,714 posts

While I was brainstorming sizes and containers to house a formicaria, eyes stumbled across a discarded Tic- Tac box lying on top of my kitchen counter. It hit me then, Formicarium making enlightenment. I didn't need a complex series of Formicariums, have to buy a 3D printer, order acrylic. The whole purpose of making something simple on a budget was to work what was around me/ and or easily accessible materials!


When I saw Tic-Tac formicarium, I immediately thought of this...


Edited by drtrmiller, August 28 2018 - 10:39 PM.

  • brianhershey, smares, Major and 1 other like this


byFormica® is the manufacturer of the iconic nectar feeders and Sunburst Ant Nectar.
byFormica ant products always deliver consistent performance, convenience,
and reliability, making them among the most beloved ant foods and kit enjoyed by
ant keeping enthusiasts worldwide. For more information, visit www.byFormica.com.

#12 Offline CoolColJ - Posted August 29 2018 - 12:26 AM

CoolColJ

    Advanced Member

  • Members
  • PipPipPip
  • 2,646 posts
  • LocationSydney, Australia

related


https://www.flickr.c...N05/3863549481/


https://www.flickr.c...N05/3864333286/


  • Major likes this

Current ant colonies -
1) Opisthopsis Rufithorax (strobe ant), Melophorus sp2. black and orange, Pheidole species, Pheidole antipodum
Journal = http://www.formicult...ra-iridomyrmex/

Heterotermes cf brevicatena termite pet/feeder journal = http://www.formicult...feeder-journal/


#13 Offline Major - Posted August 29 2018 - 5:11 AM

Major

    Advanced Member

  • Members
  • PipPipPip
  • 588 posts
  • LocationRochester, New York

Hi Major, prepare yourself for a lengthy review.

I’m always glad to see people step up to the plate when it comes to DIY stuff. You’re completely right as the number and size of the colonies you keep increase, the need for long-term investment strategies increase exponentially. Experience (self-education?) in designing and building your own formicariums is the #1 investment you can make in this regard. Breeding your own feeder insects takes a very close 2nd place.

I believe I can give you some practical advice regarding design and construction as one of my businesses is land development. So I oversee a lot of this stuff. Now I’m not an architect or construction worker and all my designs are trash (which is why I hire architects!), but when it comes to critiquing other peoples’ work I can dish out the criticism if I want to. I have working experience with a variety of construction processes. So there’s my little speech… I will try to make everything relevant to your particular situation.


Description of nest:

This formicarium sits on one of the 1-1/2" x 5/8" faces, standing up in a false vertical design. The only materials used for the nest and outworld consist of grout, sponge, 3/4" tubing and a rather large tic tac box. The outworld consists of a grout bottom, which is part of the holding chamber for the sponge, and the "anthill" portion, made of a specially shaped piece of grout mouded around 3/4" tubing leading downwards into the nesting area. The nesting area consists of a specially shaped piece of grout. Hydration chamber is separated from nesting area per diagram. Feeding can be achieved by opening up the tic tac box and dropping in food.

Assumptions:

1. Am I right in assuming you will use tweezers to place bowls of sugary liquids in the outworld? That is an extremely narrow space. Any clever ideas for feeding?

2. All sponge and grout is going to squeeze tight against the box, the effective thickness of the mould being that of the dimensions of the box minus the width of walls.

3. You have three separate pieces of grout moulding that you will assemble to create the nest? One is the anthill piece, the other hydration box, and the last the nesting piece.


Practical advice:

You want to use tic tac boxes no matter what and have many units. Okay, that's the game plan and we're gonna roll with it no matter how much work it is, how impractical the design, we're gonna get it done.

1. You're going to carve out the nest shape in the grout, but how are you getting that inside the box? Are you removing the front face, pouring the grout, carving it, then re-attaching the cover? How do you propose you get a clean cut of that box? If you are creating a separate mould of the grout, what is the proposed method of assembly? All the parts must work together to fulfill the purpose intended of the whole. Ask yourself these questions because if you don't know the method of construction from A to Z or you will run into problems. I say get a second box of the same size, cut it up in a manner so you can "print" as many pieces you want, and keep using that mould to create the pieces and parts you need to assemble this formicarium. You may have to sacrifice two boxes to create everything you need - be clever.

2. For the anthill, pour the grout around the tubing and skip the step of "fashioning a hole". You just evaded shooting yourself in the foot.

3. Sponge + grout method: If you have access to sandpaper, sanding down the grout on the contact points with the sponge will improve the absorption rate due to the increase in surface area. Use 150-220 grit sandpaper, as lower (more coarse) grits risk excessive damage to grout, especially if it hasn't had time to cure to full strength. Make sure the grout mix ratio is similar to 1:2:1 water, unsanded grout, crushed perlite. Make sure you crush the perlite until it's a fine powder. Make sure you mix for 10 minutes, let sit for 5, mix one more time. Pour the grout around the sponge, remove sponge, sand, reinsert sponge. If you want good wicking action, make sure the sponge is compressed as water can move faster that way. If you use PVA sponge, you're guaranteed to get 99% RH in that area. On that note, just swap out the mould sponge with a bigger piece that you can compress.

4. You want to create a way to attach more of these to each other in the future. I suggest drilling a hole on the back side, sticking a tube (1/2" outer diameter at most..?) and sticking a cotton piece at the end. Yeah, you're losing some nesting area but they can nest in the tube if they want to. You want to be able to connect front to back instead of side to side because the stability of the nest will improve best that way. These are designed to stand up, and the foot is relatively small. If this was a bigger project I'd raise concerns about balancing issues but given that this entire thing would weigh less than 3 lbs I doubt there's a big balancing issue.

Improvements:

1. Why have the tubing in the first place? Use a smaller tubing size to create the grout mould and remove after. Your ants can grip on grout better. There is absolutely no need for a piece of vinyl tubing to be present in the actual nest. Use one to initially create the shape, but don't leave it in there. If you use a smaller piece, you will save space in the outworld as well. 3/4" is overkill as you'd be hard pressed to find any ants wider than 1/4". Get a ruler and check that size, that's a monster ant.

2. Have you thought about using something else for the outworld and using the entirety of the tic tac box as the nest? Remove the cap, expand your nest as you like. I've attached a concept design. The box on the left is not entirely to scale, but you'd be able to add more and more nests sideways without increasing the number of anthills or outworlds, which is a major flaw in my eyes involving multiple units. This design solves that problem very cleanly. You will have to do some precise measurements because the new nests will retain their cap and you want to glue that cap to the bottom of the outworld after you connect it to the existing nest or have some way to ensure it doesn't move around.

3. Categorization is wrong on first pic. You have one top, one bottom, one front, one back, and 2 sides, right? The top and bottom are more or less the same dimensions – remember you’re working with x, y and z dimensions (1-1/2” x 5/8” x 2-1/2” LWH). Categorizing the wider side view (or front/back) as the top view is misleading and will definitely cause communication problems later down the road if you ever decide to add more features or increase complexity (since you’re working by yourself as opposed to a team, this means self-confusion. Even if you are talented at 3-D visualization, your prints and ideas are still being conveyed to other people so adhering to standards and having everyone draw the same conclusions from what you present is very, very important). I mean it’s basic and you might say I’m nitpicking, but you must have a solid foundation and build from there if you want to achieve anything of worth. That was just a pretense for me to say standards are important if you want people to replicate your work.

4. You are more than welcome to try and sell these. Marketing is everything. Remember that a product is only worth as much or as little as your prospective buyers value it. What advantages does this offer over a comparable product? Why should they buy your product over someone else’s? Instead of making it themselves? Where and how are you going to advertise this product? To whom? Also take into account shipping and handling costs.

How's that for a review?

AMo31R4.jpg


Description of nest:

This formicarium sits on one of the 1-1/2" x 5/8" faces, standing up in a false vertical design. The only materials used for the nest and outworld consist of grout, sponge, 3/4" tubing and a rather large tic tac box. The outworld consists of a grout bottom, which is part of the holding chamber for the sponge, and the "anthill" portion, made of a specially shaped piece of grout mouded around 3/4" tubing leading downwards into the nesting area. The nesting area consists of a specially shaped piece of grout. Hydration chamber is separated from nesting area per diagram. Feeding can be achieved by opening up the tic tac box and dropping in food.

Assumptions:

1. Am I right in assuming you will use tweezers to place bowls of sugary liquids in the outworld? That is an extremely narrow space. Any clever ideas for feeding?

2. All sponge and grout is going to squeeze tight against the box, the effective thickness of the mould being that of the dimensions of the box minus the width of walls.


Well, that’s was a very interesting read on my side. Thank you for leaving such a detailed critique and review, it helped me quite a bit and put in view a lot of things I haven’t thought about before. I will do my best to reply in order to the best of my abilities. I’m still only just a teen and am learning quite a bit so please let me know if I have misunderstood anything or haven’t properly responded. Thanks you.

Description of nest:

Everything you have stated is correct. Though, the hydration chamber is in the same grout mold as the nest. Just separated with approx. 1/8 of an inch. This is to help prevent ants tunneling their way to the sponge and potentially drowning them selves. Most ants as small as the ants intended on being housed in this nest will not be able to dig their way there, but when ants set their minds to something, it’s scary what they can accomplish.


Assumptions:

1. You bring up a very good point, maneuvering tweezers through such a small gap may be difficult, areas of the nest would not be accessible to cleaning, the whole nest top would have to be taken off. I think that for the time being I could cut a larger hole in the lid, cut a piece to fit in it, and secure it via a “door hinge method.” I can’t seem to recall the actual name for what I like to call “the door hinge method” but it should be self explanatory to as what I am intending to say. If this is a success, I may know a place where I can rent put a 3D printer, investing in a decent printer is something I would consider in the future. Something else I could do is get a very small acrylic container to connect to the Formicaria and toss the all in one plan.

2. This is also true. When I hydrate the sponge it will expand too a slight degree and in the long term could cause stress on the flimsy plastic wall of a Tic- Tac box in the long term. The grout would become saturated after hydration and also expand. The only soulutionI can currently think of to answer this issue would be to sand the grout down and cut the sponge a tad bit smaller than to fill the chamber it was intended to be housed in.


3. Ther will not be sepperate pieces of grout. The hydration chamber and actual nest will be one block. The anthill portion will most probably be a sepperate piece to the actual nest chunk of the Formicarium. I'd would paint over it to help blend them together, not necessary but helps with the way it looks.

Practical Advice:

1. This was along the lines of what I was thinking of. Use a spare box as a mold to get the basic block shape. Pop it out or cut out the front face and pull it out. Now after I'd poured the block of grout I'd place the vinyl tubing in the correct position, and let the grout fully set. Now, the slightly more challenging part. Making the anthill would require me to pour the grout around the vinyl tubing, and keep it at a 45 degree angle to maintain the triangular shape. I'd have to come up with a simple method of keeping it in that 45 degree angle without having to hold it. Prop it up using some house hold item lying next to my "workstation." (Which actually is just my dining table.)

2. Will do. Thanks.

3. I was initially only going to sand the tunnels down a little to create a smooth look. I'll probably take a quick stop at the hard ware store and pickup some of the 150-220 sandpaper. I will sand downfall contact pints to create a larger surface area. Thank you for the grout ratios. Will definitely use them once I begin the construction of the actual Formicarium. I'll also make sure I remember to compress a sponge into a smaller hydration chamber.

4. Yes, going from the back a drilling from their would help improve the stability once further units are attached. I also realized my biggest flaw in this Formicarium well, it's a balancing act. Everything is being balanced on 0.938 sq in. Not a very large surface area, even a good vibration on a table could knock it over, stressing the ants and dumping them all over the outworld. Maybe if I weighted it down it could help with stability, I do not know yet how much the completed project would weigh.


Improvements:

1. The vinyl tubing was mostly their as structural support, but since it's leaning on 3 surfaces it wouldn't need that. You also have a good point with the anthill size, I'm housing tiny ants, not Camponotus Gigas! I'd try removing the vinyl tubing after I've poured the ant hill around it.

2. Yes I actually have considered using another outworld. The nest would only be in the Tic- Tac box, but an outworld that small just wouldn't be practical at all, now that you bring it up. Daily feeding, cleaning, maintenance pull be difficult. Attaching a separate out world would be easier for consumers. Now onto your point of multiple ant hills and out worlds. Your completely right. So many out worlds that you'd have to worry about, while the connected units full nesting space hasn't been used to its full potential. Perhaps I could use one small outworld+ nest (the original nest) and multiple interconnected units used only for nesting. I could also get a small box to use as the out world and throw away the all in one idea.

3. Now yes I don't think that I displayed the dimensions correctly. I used the largest surface as the top because initially I was drawing from a birds eye and imagining this nest as horizontal. I will fix it once I have time.

4. If this does become a success I will definitely brainstorm a better, shorter description, explain why consumers should purchases my products in comparison to larger brands. Yes, I will also take into account shipping,handling, and the price it costs me to make.

"How's that for a review?"

This was an awsome review and I had a lot of fun reading and replying to it. I didn't expect anyone to take this much time and effort to do something as detailed as this. Thank you for putting in spectrum multiple things I didn't think of.

Thank You!

-Major

Edited by Major, August 29 2018 - 9:13 AM.


#14 Offline Trythis22 - Posted August 29 2018 - 4:52 PM

Trythis22

    Advanced Member

  • Members
  • PipPipPip
  • 96 posts
  • LocationPortland, Oregon

Brian,


I know right? I had no idea the rabbit hole went this deep with ant keeping when I started 3 months ago. I’m not at all interested in doing any R&D or selling ant products personally but if you have such a plan for eBay, I can help you sort out a basic business framework? Even if you aren’t planning on selling a bunch of product, realize that even non-profit NGOs are run almost the same way as for-profit businesses are, so having a plan and deadlines help keep you organized.


Now that I revisit the balancing issue… yeah it’s certainly not a desirable trait. Maybe you can pour the excess grout (there are always leftovers) around the base of the foot to create a more stable structure? Once you’re ready to add more units to the side you could just take a nail and hammer to break off the pieces. Or break it off with your hands if it’s not too thick. I don’t think grout will adhere nicely to plastic – just the right amount to stay if you want it to stay and break off if you want it to break off. Originally I was thinking the box could just be wedged between two books or something like that.


Pouring the material into the tic tac box is no problem, but you may be underestimating how hard it will be to pop back out. Grout is intended to expand a bit as it cures since its application is meant to seal bathroom tiles – it would be a bad product if it shrank since that would defeat its purpose. So the olive oil will do a good job of chemically separating the grout from the plastic, but it’s no good if there’s a tight physical fit. The piece will not be bonded to the plastic, but it’ll be wedged in it - enclosed on 5 sides in a very narrow and tight container with no room to maneuver. My opinion is that it would be extremely hard not to break the still-fragile piece of grout as you are trying to pull it out. A workaround to this method is to place something thin, yet solid and able to be pulled out between the plastic and grout. Something like paperboard? However, this means the resulting piece would not fit tightly against the plastic. The narrow space is the confounding factor.


If you mean to cut out one of the wider sides of the box then that would make removal much easier as now there is one direction to push and one more for the block to come out. Hard to push and pull in the same direction. This is probably what you meant?


Major,


Haven't properly responded? Hahaha, that's a good one. No need to be so serious.


I suggest tossing the all-in-one plan. Once your queen gets past the founding stage, there will be so many ants crowding around it’s gonna be difficult to feed without getting escapees. I know this from personal experience, it’s hell to try and catch escapees. Plan for the long term – planning for the short term will not work out because to be brutally honest there are better ways to found a colony than this setup. You want standardized boxes that you can reproduce rapidly, that are scalable and offer expansion opportunities. On the other hand, I realize that you mean for this design to be only a temporary holding cell – feeding will work as long as there aren’t too many ants escaping.


Assumption#2: Uh, the sponge is not going to cause any damage to plastic. Later on I actually recommended you compress the sponge so it will absorb water quicker. The grout will stop expanding after its initial cure. All materials shrink and expand in response to temperature and pressure, but not in any meaningful real-world numbers in this case. Effectively, ignore it because this is overthinking the problem. Practical advice#1: You can do everything in one block if you want. The anthill portion will be a little more work if you’re doing everything in one block as you’ve said. Improvements#1: Structural support is not necessary because grout cures to a solid form? I would definitely revisit your mix ratios if your grout is collapsing after hardening.


I'm glad I could help. Good luck!


  • Major likes this

#15 Offline Major - Posted August 29 2018 - 5:06 PM

Major

    Advanced Member

  • Members
  • PipPipPip
  • 588 posts
  • LocationRochester, New York
Thanks!

#16 Offline Major - Posted September 4 2018 - 5:02 PM

Major

    Advanced Member

  • Members
  • PipPipPip
  • 588 posts
  • LocationRochester, New York
I have officially begun the building stage. I purchased 3 Tic- Tac boxes (Mint, if you were wondering), some super glue, and will be purchasing a few slabs of AAC. I cut the bottom lip off of the lid and sanded the jagged parts off. The super glue was intended to hold down the AAC once inserted.
  • DaveJay likes this

#17 Offline Rstheant - Posted January 13 2019 - 1:38 PM

Rstheant

    Advanced Member

  • Members
  • PipPipPip
  • 883 posts
  • LocationSan Jose, CA
You peeps write a LOT! ;)

#18 Offline rptraut - Posted November 28 2021 - 12:28 AM

rptraut

    Advanced Member

  • Members
  • PipPipPip
  • 514 posts
  • LocationOntario, Canada
Would it be possible to use sand to form your chambers? I use grout and vermiculite 50/50 in a fairly thick state that can be formed and as I am filling the space I use sand to fill hollows that I form in the grout for the chambers. I continue filling the nest area with grout making as many chambers as I want formed with sand. The tunnels to connect the chambers are a little more difficult to make but you can do it. Remember, anywhere that you put sand will not be filled with grout. I hope I have explained this well, it's sort of like sand casting on the inside of your project. When completed it will take a while for the whole thing to dry because the sand absorbs water from the grout. I speed up the drying by heating it slightly on top of my grow lights. Once the sand is dry you simply pour the sand out and you have your chambers and tunnels. You don't have to take the grout out of the container for shaping at all! At first I agonized about getting every single grain of sand out, but, I always make the nest bigger than the ants need so they can expand.... so now I only take out as much as they need immediately and let the ants clean out the sand as they need the space. This overcomes the garbage in the nest problem, gives the ants something to do and let's them expand into the space they need when they need it.

A couple of construction tips - Put everything in the formicarium that you want in there ie water tower, sponge, cotton etc before you start casting as there is no way to add it later.
Use clean sand or there will be dust on the glass, fine beach sand works well - no dust and it pours easily.
You should avoid grout smudges on the glass when you form the sand chambers as there is no way to clean them off later.
Use a thin piece of wire if needed to loosen sand in the tunnels and chambers to pour it out. Leave something for the ants to do.
Clear enough area for the ants to reach their water source and to be able to nest comfortably.

I use this method to form the nest against the side of a container and use the rest of the container as the outworld. Before I start I drill a couple of holes and install tubing for expansion later or to add a larger outworld when necessary.
I cover the nesting area with red cellophane and black felt so the ants feel safe, otherwise they can use sand to block out light or just not excavate to the glass and you won't be able to see them.

I hope this method works as well on a small scale as it does in my larger projects. I've often thought about the possibility of a "pocket" formicarium. What a great way to keep tabs on a founding queen.

I'm fairly new to this forum and I sincerely appreciate the time people take to answer questions as per previous posts. This type of information is pure gold to people like me as there are precious few books about ant husbandry and even fewer on constructing formicariums. I find half the fun of keeping ants is building the formicariums. Winter is the perfect time to take stock of the colonies you have, what their housing requirements will be next year, how they live in the natural world and then designing and building the perfect home for them that fulfils all their needs. Why would an ant want to escape that!
My father always said I had ants in my pants.

#19 Offline ANTdrew - Posted November 28 2021 - 4:04 AM

ANTdrew

    Advanced Member

  • Moderators
  • PipPipPip
  • 9,975 posts
  • LocationAlexandria, VA
Wow. None of these people even keep ants anymore or come on this forum.
  • Antkeeper01, Chickalo and PaigeX like this
"The ants are a people not strong, yet they prepare their meat in the summer." Prov. 30:25
Keep ordinary ants in extraordinary ways.

#20 Offline Antkeeper01 - Posted November 28 2021 - 10:30 AM

Antkeeper01

    Advanced Member

  • Members
  • PipPipPip
  • 1,392 posts
  • LocationA random state in the US

Would it be possible to use sand to form your chambers? I use grout and vermiculite 50/50 in a fairly thick state that can be formed and as I am filling the space I use sand to fill hollows that I form in the grout for the chambers. I continue filling the nest area with grout making as many chambers as I want formed with sand. The tunnels to connect the chambers are a little more difficult to make but you can do it. Remember, anywhere that you put sand will not be filled with grout. I hope I have explained this well, it's sort of like sand casting on the inside of your project. When completed it will take a while for the whole thing to dry because the sand absorbs water from the grout. I speed up the drying by heating it slightly on top of my grow lights. Once the sand is dry you simply pour the sand out and you have your chambers and tunnels. You don't have to take the grout out of the container for shaping at all! At first I agonized about getting every single grain of sand out, but, I always make the nest bigger than the ants need so they can expand.... so now I only take out as much as they need immediately and let the ants clean out the sand as they need the space. This overcomes the garbage in the nest problem, gives the ants something to do and let's them expand into the space they need when they need it.

A couple of construction tips - Put everything in the formicarium that you want in there ie water tower, sponge, cotton etc before you start casting as there is no way to add it later.
Use clean sand or there will be dust on the glass, fine beach sand works well - no dust and it pours easily.
You should avoid grout smudges on the glass when you form the sand chambers as there is no way to clean them off later.
Use a thin piece of wire if needed to loosen sand in the tunnels and chambers to pour it out. Leave something for the ants to do.
Clear enough area for the ants to reach their water source and to be able to nest comfortably.

I use this method to form the nest against the side of a container and use the rest of the container as the outworld. Before I start I drill a couple of holes and install tubing for expansion later or to add a larger outworld when necessary.
I cover the nesting area with red cellophane and black felt so the ants feel safe, otherwise they can use sand to block out light or just not excavate to the glass and you won't be able to see them.

I hope this method works as well on a small scale as it does in my larger projects. I've often thought about the possibility of a "pocket" formicarium. What a great way to keep tabs on a founding queen.

I'm fairly new to this forum and I sincerely appreciate the time people take to answer questions as per previous posts. This type of information is pure gold to people like me as there are precious few books about ant husbandry and even fewer on constructing formicariums. I find half the fun of keeping ants is building the formicariums. Winter is the perfect time to take stock of the colonies you have, what their housing requirements will be next year, how they live in the natural world and then designing and building the perfect home for them that fulfils all their needs. Why would an ant want to escape that!

NeCrOpOsT


1X Pogonomyrmex occidentalis 40-50 Workers

1X Solenopsis molesta 10 Workers (mono)

Ants I Want: Crematogaster sp, Camponotus Sp., Ponera Pennsylvanica, Mymercocystus sp.


My Youtube channel: https://www.youtube....kUjx-dPFMyVqOLw


 Join Our Fledgling Discord Server https://discord.com/...089056687423489


1 user(s) are reading this topic

0 members, 1 guests, 0 anonymous users