Jump to content

  • Chat
  •  
  •  

Welcome to Formiculture.com!

This is a website for anyone interested in Myrmecology and all aspects of finding, keeping, and studying ants. The site and forum are free to use. Register now to gain access to all of our features. Once registered and logged in, you will be able to create topics, post replies to existing threads, give reputation points to your fellow members, get your own private messenger, post status updates, manage your profile and so much more. If you already have an account, login here - otherwise create an account for free today!

Photo

Learning as I go 3D printing nests


  • Please log in to reply
148 replies to this topic

#81 Offline starcraftjunkie - Posted January 26 2018 - 7:38 PM

starcraftjunkie

    Advanced Member

  • Members
  • PipPipPip
  • 60 posts
  • LocationWillowbrook, Illinois

That's awesome. Wouldn't mind getting my hands on something like that. ;)

If I work out some kinks, and get some interested buyers, I might make a really good deal for an entire system. I just don't know how much I'd charge just yet. Most likely sub 100 dollars for 4 sides and the outworld.


Edited by starcraftjunkie, January 26 2018 - 7:39 PM.


#82 Offline T.C. - Posted January 26 2018 - 11:07 PM

T.C.

    Advanced Member

  • Members
  • PipPipPip
  • 3,102 posts

That's awesome. Wouldn't mind getting my hands on something like that. ;)

If I work out some kinks, and get some interested buyers, I might make a really good deal for an entire system. I just don't know how much I'd charge just yet. Most likely sub 100 dollars for 4 sides and the outworld.

If it looks good, has a clean print, acyrilic fits good, and hydration improvements from prior nests.... then it might be worth it. What are the dimensions?

sml_gallery_8437_2366_20715.png


#83 Offline dspdrew - Posted January 27 2018 - 4:21 AM

dspdrew
  • LocationSanta Ana, CA

That's actually a good idea, I casually thought about doing hydrostone in the small bay areas instead of cotton. I will probably implement this in a later revision.


This won't work in the long run. If water is constantly flowing through Hydrostone, it will dissolve and disperse it, eventually forming holes.


  • Kevin likes this

#84 Offline starcraftjunkie - Posted January 27 2018 - 5:06 AM

starcraftjunkie

    Advanced Member

  • Members
  • PipPipPip
  • 60 posts
  • LocationWillowbrook, Illinois

That's awesome. Wouldn't mind getting my hands on something like that. ;)

If I work out some kinks, and get some interested buyers, I might make a really good deal for an entire system. I just don't know how much I'd charge just yet. Most likely sub 100 dollars for 4 sides and the outworld.

If it looks good, has a clean print, acyrilic fits good, and hydration improvements from prior nests.... then it might be worth it. What are the dimensions?

Actual nesting area is 155mm x 45mm and the acrylic out world is a 120mm box 80 mm tall.

The print looks better than the ones I sent you. What do you mean hydration improvements, like adding hydrostone?

That's actually a good idea, I casually thought about doing hydrostone in the small bay areas instead of cotton. I will probably implement this in a later revision.

 
This won't work in the long run. If water is constantly flowing through Hydrostone, it will dissolve and disperse it, eventually forming holes.

What do you mean flow through it? I was figuring that a pipet full of water would rehydrate the hydrostone. I haven't used the stuff before.

#85 Offline dspdrew - Posted January 27 2018 - 12:45 PM

dspdrew
  • LocationSanta Ana, CA


That's actually a good idea, I casually thought about doing hydrostone in the small bay areas instead of cotton. I will probably implement this in a later revision.

 
This won't work in the long run. If water is constantly flowing through Hydrostone, it will dissolve and disperse it, eventually forming holes.

What do you mean flow through it? I was figuring that a pipet full of water would rehydrate the hydrostone. I haven't used the stuff before.


Water moving through Hydrostone.


#86 Offline starcraftjunkie - Posted January 27 2018 - 5:23 PM

starcraftjunkie

    Advanced Member

  • Members
  • PipPipPip
  • 60 posts
  • LocationWillowbrook, Illinois


That's actually a good idea, I casually thought about doing hydrostone in the small bay areas instead of cotton. I will probably implement this in a later revision.

 
This won't work in the long run. If water is constantly flowing through Hydrostone, it will dissolve and disperse it, eventually forming holes.

What do you mean flow through it? I was figuring that a pipet full of water would rehydrate the hydrostone. I haven't used the stuff before.


Water moving through Hydrostone.


Alright thanks, do you suggest anything other than cotton then?


#87 Offline Kevin - Posted January 27 2018 - 6:53 PM

Kevin

    Advanced Member

  • Members
  • PipPipPip
  • 833 posts
  • LocationSouth Jersey

Bisque ceramic tile. It's what drew uses.


Hit "Like This" if it helped.


#88 Offline dspdrew - Posted January 27 2018 - 10:53 PM

dspdrew
  • LocationSanta Ana, CA

Bisque ceramic tile. It's what drew uses.


Yup.


  • noebl1 likes this

#89 Offline noebl1 - Posted January 28 2018 - 8:14 AM

noebl1

    Advanced Member

  • Members
  • PipPipPip
  • 1,133 posts
  • LocationNorthern Massachusetts


Bisque ceramic tile. It's what drew uses.


Yup.


Guess I'll be spending some time rethinking my designs.  Thanks for posting this!  


Do you custom cut your tile pieces or get them precut?  I see a bunch off sizes when I look around.


#90 Offline noebl1 - Posted January 31 2018 - 1:27 PM

noebl1

    Advanced Member

  • Members
  • PipPipPip
  • 1,133 posts
  • LocationNorthern Massachusetts

Been following the r/ants subreddit for awhile in addition to here, and nice to see more and more people posting 3D printed designs.  Never ceases to amaze me how creative people are, glad this tech is catching on.  Between acrylic, plaster, 3D printer, dirt and epoxy nests, there's a nice collection of designs and ideas.


#91 Offline starcraftjunkie - Posted February 2 2018 - 7:16 PM

starcraftjunkie

    Advanced Member

  • Members
  • PipPipPip
  • 60 posts
  • LocationWillowbrook, Illinois

Been following the r/ants subreddit for awhile in addition to here, and nice to see more and more people posting 3D printed designs.  Never ceases to amaze me how creative people are, glad this tech is catching on.  Between acrylic, plaster, 3D printer, dirt and epoxy nests, there's a nice collection of designs and ideas.


I haven't been too active designing nests recently. I do have a few ideas such as vertical nests and new connection types however. I'm just not super motivated to design ant stuff while I'm in school and not designing stuff for other people.


My focus has shifted to building/printing my own 3d printer. If I can swing the funds with my girlfriend, I'm going to follow / modify a cubeXY design named hypercube. https://www.thingive...m/thing:1752766or https://www.thingive...m/thing:2254103 not sure which one yet. I've sourced most of the parts from China at around 300 dollars with about 30-50 dollars of overhead. I might post my build in this thread, but might go to off topic because it's not really related to ant keeping.


  • noebl1 likes this

#92 Offline noebl1 - Posted February 3 2018 - 8:46 AM

noebl1

    Advanced Member

  • Members
  • PipPipPip
  • 1,133 posts
  • LocationNorthern Massachusetts


I haven't been too active designing nests recently. I do have a few ideas such as vertical nests and new connection types however. I'm just not super motivated to design ant stuff while I'm in school and not designing stuff for other people.


My focus has shifted to building/printing my own 3d printer. If I can swing the funds with my girlfriend, I'm going to follow / modify a cubeXY design named hypercube. https://www.thingive...m/thing:1752766or https://www.thingive...m/thing:2254103 not sure which one yet. I've sourced most of the parts from China at around 300 dollars with about 30-50 dollars of overhead. I might post my build in this thread, but might go to off topic because it's not really related to ant keeping.


I can appreciate that, hehe.  I go thru periods as well where I don't design/print, then will be busy for a bit.  Right now since dspdrew's post, been getting in pieces of tile to experiment with, so in between designs.


This is the printer I built; the D-Bot CoreXY https://www.thingive.../thing:1001065 The stock 200x300mm build volume is pretty stable, but once you move to 300x300mm like I did, the Z-axis takes some TLC to get right, and that's been my biggest frustration with it.  Though I think I finally found a reasonable compromise that's working well.


The Hypercubes look interesting, and look similar in design to the first Solidoodle3 printer with a hybrid-CoreXY approach.  Also really similar to a design a buddy and I were going to produce, but did have enough time to finish.  Here's the SD3:

solidoodle-3-3d-printer-3.jpg


Couple points on that I found with the SD3.   The rods based designs for the x/y tend to have some challenges with rods not being perfectly straight/flexing (which messes up the x, y, or z), perfectly tensioned belts (that messes up circles), and linear bearings that wear out or into the tods.  These I found weren't a big deal, and had replaced my rods and belts, and x/y were in a pretty happy place.  The Hypercube Evolution looks like an interesting hybrid CoreXY approach to some of these issues where instead of using the linear rails like my D-Bot, uses the rods in addition to the CoreXY belts to solve some of the circle issues caused by belt tensioning imbalance.  I am curious to see if it will have the same issues with the rods flexing or not being aligned (may be a non-issue.)


The Z axis design was always a challenge, as they tend to wobble (z-wobble being really annoying) and can't take much weight on my SD3 if adding a MIC6 bed.  Looks like like the design on the Hypercube Evolution may using beefier vertical support rods to help with the some of the weight issues.  Check to see if an anti-backlash nut may be required to help with the z-wobble (usually a simple mod added later if required.) 


  • starcraftjunkie likes this

#93 Offline VoidElecent - Posted February 3 2018 - 9:48 AM

VoidElecent

    Advanced Member

  • Members
  • PipPipPip
  • 1,339 posts
  • LocationPhiladelphia, PA.

Thread was a great read. Very impressive, guys!


#94 Offline Bracchymyrmex - Posted February 3 2018 - 10:46 AM

Bracchymyrmex

    Vendor

  • Members
  • PipPipPip
  • 321 posts
  • LocationPhiladelphia, Pennsylvania
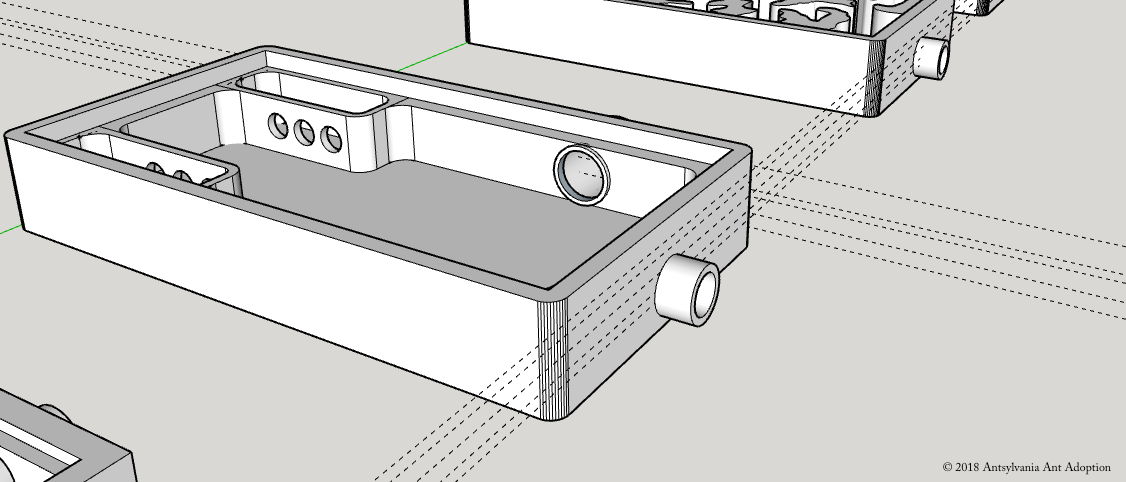
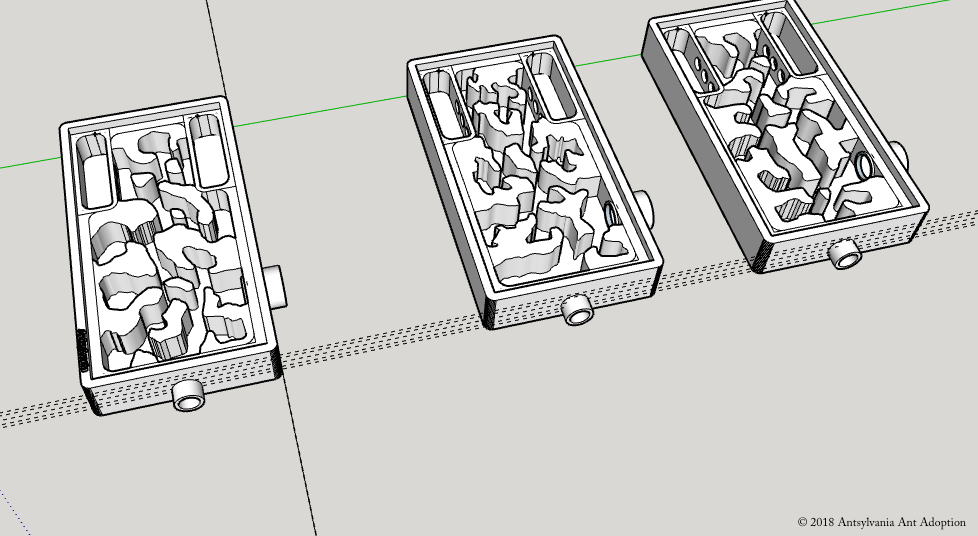
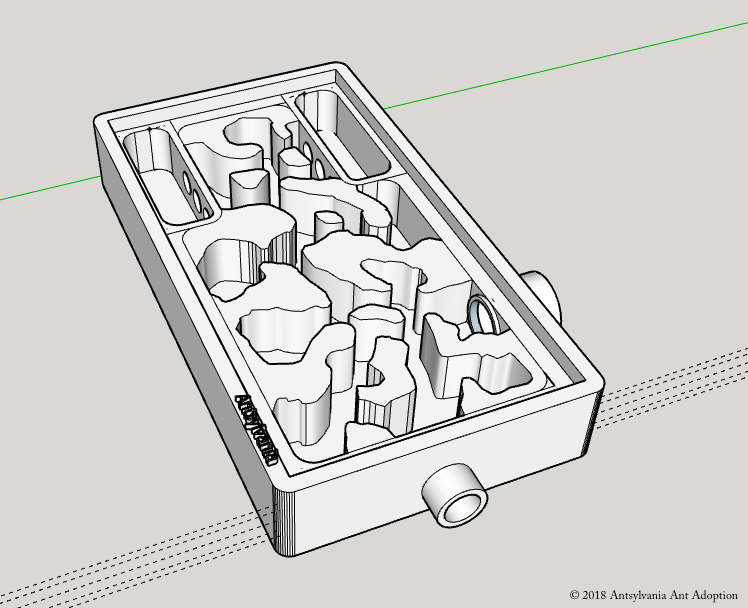
Made some new designs (trying a new hydration system out):
 
 
formicariumII(base)
 
formicariaII(variation)
 
formicariumII(top)

  • noebl1 likes this

#95 Offline Kevin - Posted February 3 2018 - 11:51 AM

Kevin

    Advanced Member

  • Members
  • PipPipPip
  • 833 posts
  • LocationSouth Jersey


Made some new designs (trying a new hydration system out):


What exactly are you planning to do with those big holes for hydration? I assume you are going to stuff them with cotton and fill it up with water, but what's creating a vacuum to keep the water from draining out? Also, cotton will spoil fast and be a pain to change often (you have to move out the entire colony). Add fillets to your tube connections for extra structural support and ease of tube installation.


Edited by Kevin, February 3 2018 - 11:51 AM.

Hit "Like This" if it helped.


#96 Offline Bracchymyrmex - Posted February 3 2018 - 5:13 PM

Bracchymyrmex

    Vendor

  • Members
  • PipPipPip
  • 321 posts
  • LocationPhiladelphia, Pennsylvania


Made some new designs (trying a new hydration system out):


What exactly are you planning to do with those big holes for hydration? I assume you are going to stuff them with cotton and fill it up with water, but what's creating a vacuum to keep the water from draining out? Also, cotton will spoil fast and be a pain to change often (you have to move out the entire colony). Add fillets to your tube connections for extra structural support and ease of tube installation.


Yeah, I was planning on the cotton ball route but you bring up a good point. I'm also considering lodging some wire mesh in the holes and testing that out as an alternative. Sorry, still new to this 3d printing thing, what do you mean by fillet?


#97 Offline Kevin - Posted February 3 2018 - 6:16 PM

Kevin

    Advanced Member

  • Members
  • PipPipPip
  • 833 posts
  • LocationSouth Jersey


Made some new designs (trying a new hydration system out):


What exactly are you planning to do with those big holes for hydration? I assume you are going to stuff them with cotton and fill it up with water, but what's creating a vacuum to keep the water from draining out? Also, cotton will spoil fast and be a pain to change often (you have to move out the entire colony). Add fillets to your tube connections for extra structural support and ease of tube installation.


Yeah, I was planning on the cotton ball route but you bring up a good point. I'm also considering lodging some wire mesh in the holes and testing that out as an alternative. Sorry, still new to this 3d printing thing, what do you mean by fillet?


A fillet is a curved or rounded off edge. A chamfer is a straight cut off an edge, for example you shave down a 90 degree angle to 45 degrees. A fillet on the inner edge around the formicarium and nest wall will improve structural strength because it thickens the edge where your tube connection sticks out. Another around the outside edge of the tube adapter also allows a tube to slide on easier because its a rounded edge and stretches over the curve as it's slid on.

Edge.Chamfer.Fillet.grey_okajtg.jpg


Edited by Kevin, February 3 2018 - 6:19 PM.

Hit "Like This" if it helped.


#98 Offline starcraftjunkie - Posted February 4 2018 - 10:01 AM

starcraftjunkie

    Advanced Member

  • Members
  • PipPipPip
  • 60 posts
  • LocationWillowbrook, Illinois


I haven't been too active designing nests recently. I do have a few ideas such as vertical nests and new connection types however. I'm just not super motivated to design ant stuff while I'm in school and not designing stuff for other people.


My focus has shifted to building/printing my own 3d printer. If I can swing the funds with my girlfriend, I'm going to follow / modify a cubeXY design named hypercube. https://www.thingive...m/thing:1752766or https://www.thingive...m/thing:2254103 not sure which one yet. I've sourced most of the parts from China at around 300 dollars with about 30-50 dollars of overhead. I might post my build in this thread, but might go to off topic because it's not really related to ant keeping.


I can appreciate that, hehe.  I go thru periods as well where I don't design/print, then will be busy for a bit.  Right now since dspdrew's post, been getting in pieces of tile to experiment with, so in between designs.


This is the printer I built; the D-Bot CoreXY https://www.thingive.../thing:1001065 The stock 200x300mm build volume is pretty stable, but once you move to 300x300mm like I did, the Z-axis takes some TLC to get right, and that's been my biggest frustration with it.  Though I think I finally found a reasonable compromise that's working well.


The Hypercubes look interesting, and look similar in design to the first Solidoodle3 printer with a hybrid-CoreXY approach.  Also really similar to a design a buddy and I were going to produce, but did have enough time to finish.  Here's the SD3:

solidoodle-3-3d-printer-3.jpg


Couple points on that I found with the SD3.   The rods based designs for the x/y tend to have some challenges with rods not being perfectly straight/flexing (which messes up the x, y, or z), perfectly tensioned belts (that messes up circles), and linear bearings that wear out or into the tods.  These I found weren't a big deal, and had replaced my rods and belts, and x/y were in a pretty happy place.  The Hypercube Evolution looks like an interesting hybrid CoreXY approach to some of these issues where instead of using the linear rails like my D-Bot, uses the rods in addition to the CoreXY belts to solve some of the circle issues caused by belt tensioning imbalance.  I am curious to see if it will have the same issues with the rods flexing or not being aligned (may be a non-issue.)


The Z axis design was always a challenge, as they tend to wobble (z-wobble being really annoying) and can't take much weight on my SD3 if adding a MIC6 bed.  Looks like like the design on the Hypercube Evolution may using beefier vertical support rods to help with the some of the weight issues.  Check to see if an anti-backlash nut may be required to help with the z-wobble (usually a simple mod added later if required.) 


I saw a huge pile of 3030 aluminum extrusions at my school a few weeks ago in front of the machine shop. I am tempted to contact them and see if I can buy them off of them, or do some kind of school project or something. It's just that my major has nothing to do with the welding and machine shop, so it might be difficult.


After looking through a lot of these designs, I'm really confused why no one is adding a second screw rod and motor on the opposite side of the bed. Maybe it has to do something with being easily misaligned, but the RAMPS 1.4 board has enough servo motor controllers for the extra Z screw rod stepper. It would make sense that the wobble in the z would be bad for this design, especially when the plastic starts building up, it becomes a cantilever statics problem and forces in the Z rod linearly multiply the further you go away from the rod.


  • noebl1 likes this

#99 Offline noebl1 - Posted February 4 2018 - 10:22 AM

noebl1

    Advanced Member

  • Members
  • PipPipPip
  • 1,133 posts
  • LocationNorthern Massachusetts

I saw a huge pile of 3030 aluminum extrusions at my school a few weeks ago in front of the machine shop. I am tempted to contact them and see if I can buy them off of them, or do some kind of school project or something. It's just that my major has nothing to do with the welding and machine shop, so it might be difficult.


After looking through a lot of these designs, I'm really confused why no one is adding a second screw rod and motor on the opposite side of the bed. Maybe it has to do something with being easily misaligned, but the RAMPS 1.4 board has enough servo motor controllers for the extra Z screw rod stepper. It would make sense that the wobble in the z would be bad for this design, especially when the plastic starts building up, it becomes a cantilever statics problem and forces in the Z rod linearly multiply the further you go away from the rod.


If you can get extruded aluminum for cheap, go for it :D  I got mine from here: http://openbuildspartstore.com/(watch for sales), and a bunch of free 2020 a few years ago from a promo a company did (who's promo failed obviously as I can't remember their name...)


So on my printer, it has *two* motors in parallel for Z, and that compromise I did after posting to reddit for help from others was adding a 3rd one, also wired in parallel to the back, and it stabilized it perfectly.  There's some risk in that though; overheating steppers, missing steps, etc.  Not sure there's a perfect solution, yet :) A lot of the inexpensive screws from China are a bit warped too or the nuts have some play due to inaccuracies so that doesn't help.  The height of the screws exaggerate this as well, when the build volume is around 315mm, that's a lot of room on mine for defects in lead screws/nuts to show up.


My big challenge now is the print head that's been frustrating me.  But as you mentioned, may be worth starting another thread here on printers as I could go on and on...


Also don't take my previous comments too negative though, that Hypercube Evolution looks like a really good printer and something I may have gone with instead of the D-Bot if I had seen it first.


Edited by noebl1, February 4 2018 - 10:23 AM.


#100 Offline starcraftjunkie - Posted February 7 2018 - 2:09 PM

starcraftjunkie

    Advanced Member

  • Members
  • PipPipPip
  • 60 posts
  • LocationWillowbrook, Illinois
Here are all my models I have made for all you guys to make.

https://www.thingive...m/thing:2784605
  • noebl1 and VoidElecent like this


4 user(s) are reading this topic

0 members, 4 guests, 0 anonymous users