Jump to content

  • Chat
  •  
  •  

Welcome to Formiculture.com!

This is a website for anyone interested in Myrmecology and all aspects of finding, keeping, and studying ants. The site and forum are free to use. Register now to gain access to all of our features. Once registered and logged in, you will be able to create topics, post replies to existing threads, give reputation points to your fellow members, get your own private messenger, post status updates, manage your profile and so much more. If you already have an account, login here - otherwise create an account for free today!

Photo

How to build a formicarium out of a bead storage container

crystals how to formicarium bead storage

  • Please log in to reply
86 replies to this topic

#1 Offline Crystals - Posted September 26 2014 - 7:23 PM

Crystals

    Advanced Member

  • Moderators
  • PipPipPip
  • 2,049 posts
  • LocationAthabasca, AB (Canada)

How to build a formicarium out of a bead storage container

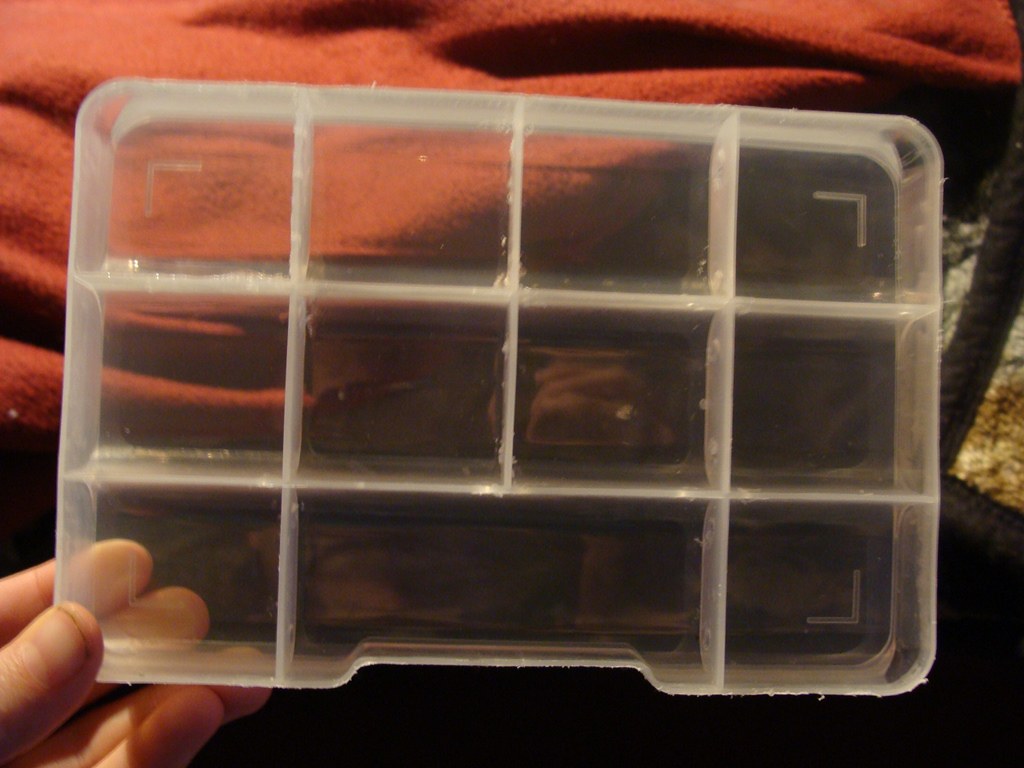
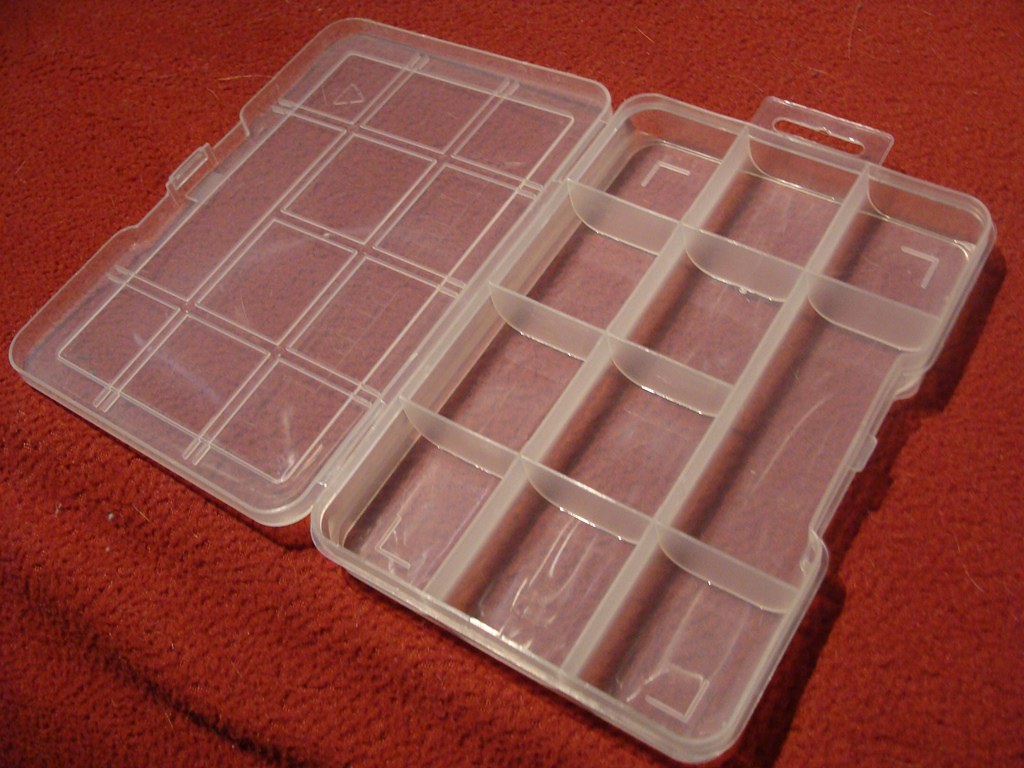
Materials:
Bead storage box (easily found in dollar stores)
Acrylic or glass to cover box
Piece of sponge
Aquarium silicone or 2 part epoxy
Drill
Grout (you won't need much)  Can substitute with hydrostone or gypsum.
 

35480890130_fdbef843d3_b.jpg


Take your bead storage box and remove the lid.  The lid is almost never clear enough for a good view of the ants.  I also used a dremel bit to smooth out the edges.

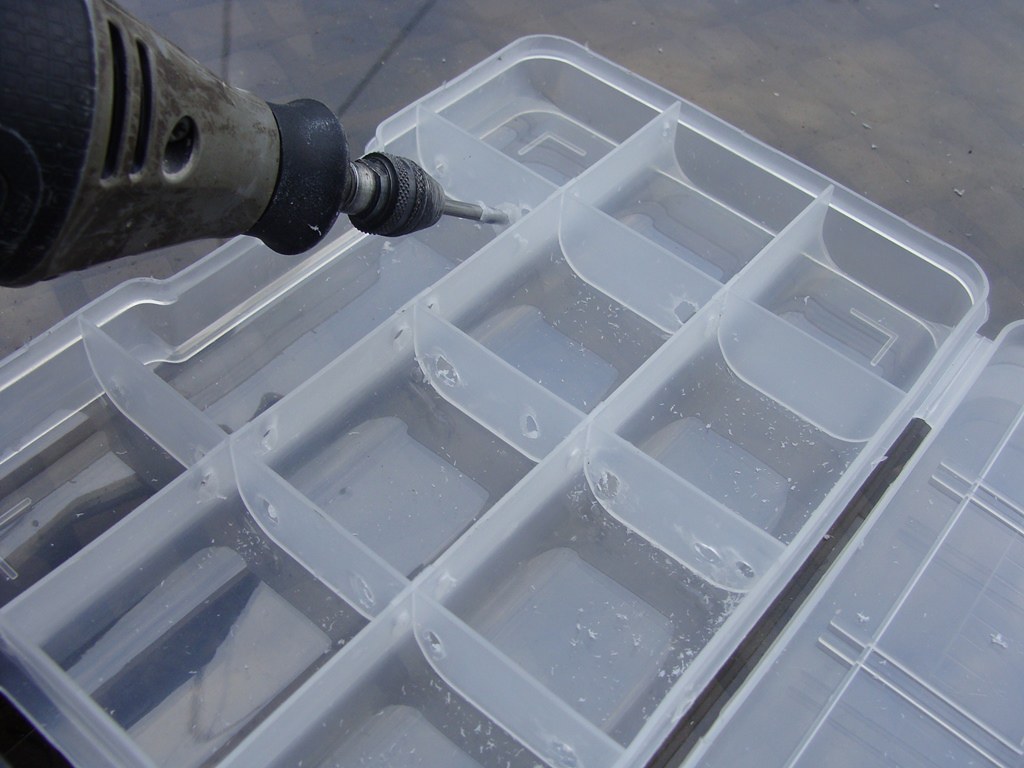
Take the drill and drill holes between the chambers (close to the floor).  For one chamber drill a few really small holes near the top - this will be your water chamber.  Drill a hole as large as the tubing you are planning on using (go slowly on these holes, the bigger bits tend to grab the plastic and can crack it if you go too fast).  If it cracks, you can epoxy or silicone it later.
 

35699589572_9f0c0dba6d_b.jpg

35699586562_6d6c0e4126_b.jpg

If you are using a glass lid, it is easier to drill a watering hole in the side of the plastic bead box.
If you are using an acrylic lid, you can drill the watering hole in the acrylic lid above the water chamber, or in the side of the watering chamber.

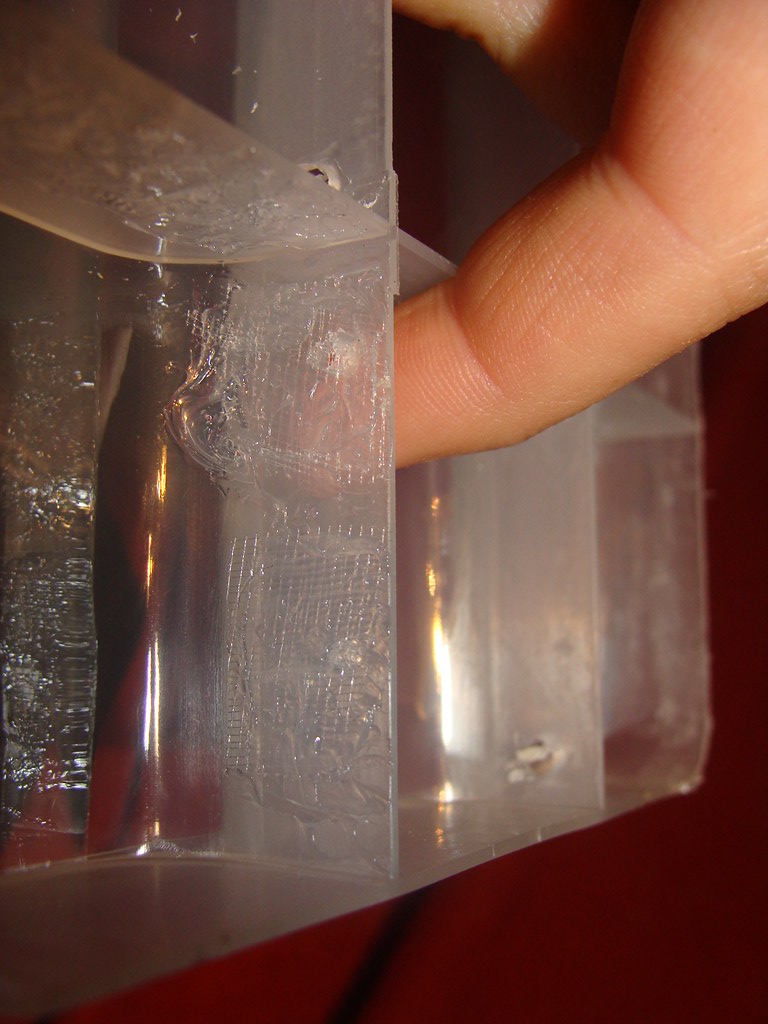
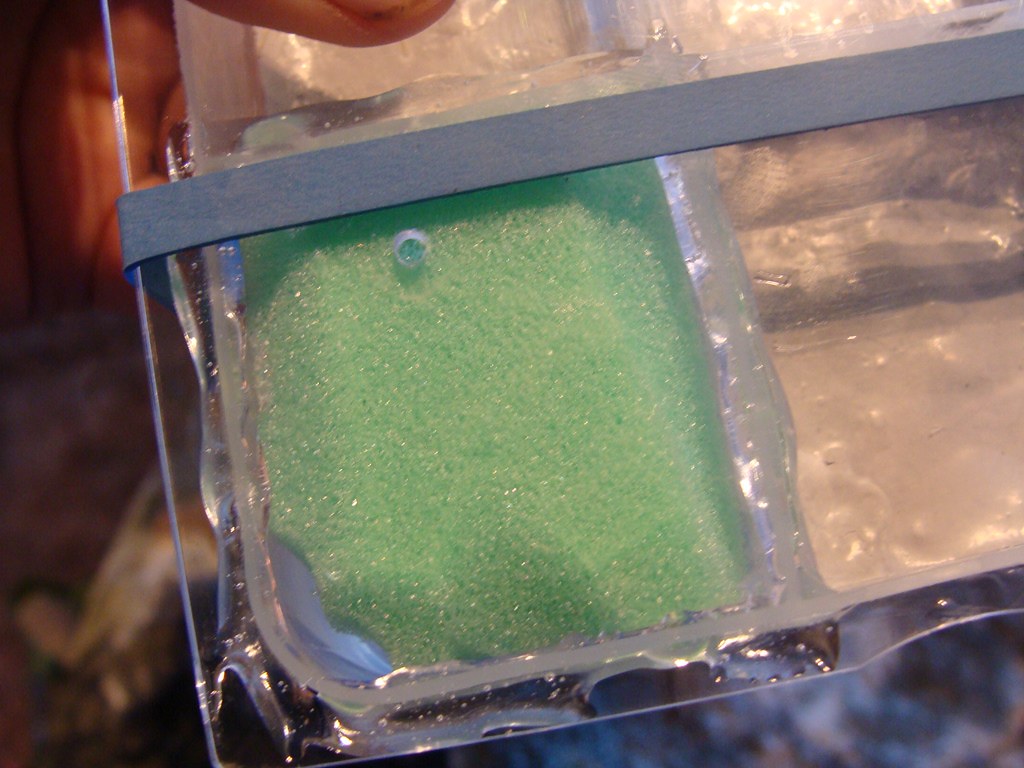
On your water chamber, if the holes are small enough for your ants to get into them, then silicone/epoxy some mesh over the holes (I used 3 layers of organza mesh even though my holes were very tiny).  Cut a piece of sponge so it snuggly fits into the chamber.  Trim the top edges of the sponge a bit so they don't touch the joint where the lid meets the chamber walls.

(Update: I found that running  piece of chamois cloth through the hole and to the bottom of both chambers allowed the moisture to travel very easily - I covered the chamois with a thin layer of grout. No pictures for this, sorry.)
 

35480891190_70d1a6db8e_b.jpg


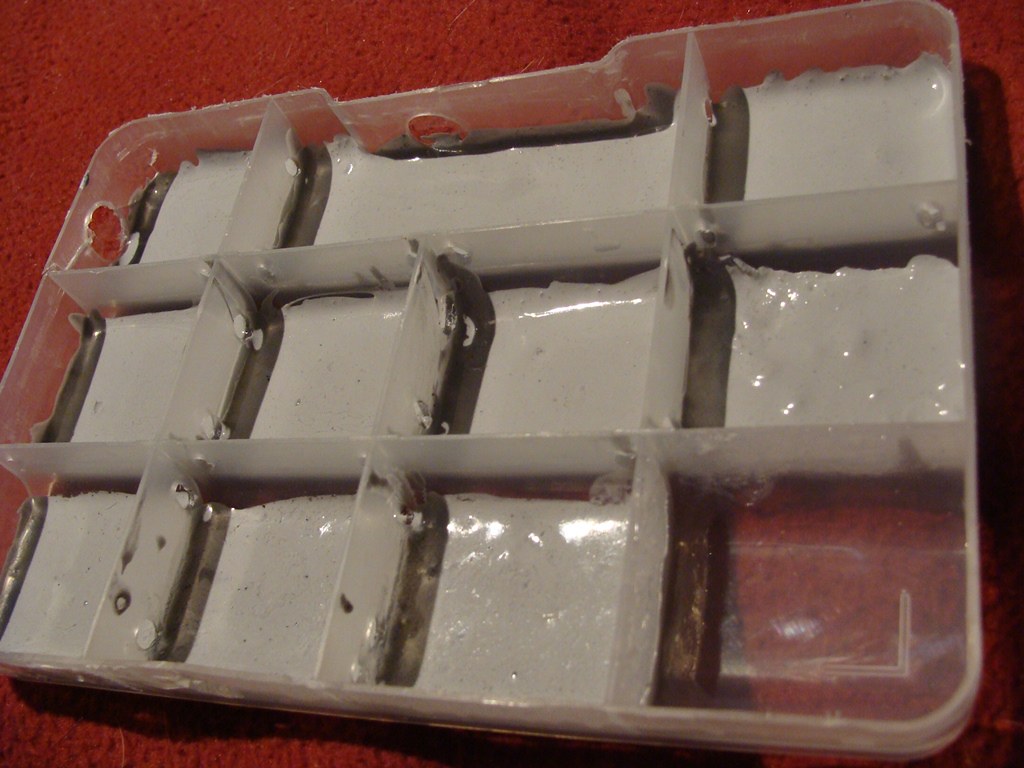
Take your grout (you will only need a couple of tablespoons).  Mix it into some water.  You will want it somewhat runny as it has to level itself.  Pour some grout into each of the chambers, just enough to cover the bottom. Do NOT put any in the water chamber. Shake side to side to level it out, you can also use a toothpick.
Let it dry for at least 2 days, we want it completely dry.
The reason I use grout is that it gives the ants more traction and will absorb any moisture that could cause small ants to drown.  Also very helpful with ants that produce formic acid as the grout will absorb it.  You can also sprinkle some sand on top of the grout if you want (My Aphaenogaster and Crematogaster loved this).
 

35480887590_017f93e4ae_b.jpg


Once the grout is dry, we will attach the lid.  (ensure your sponge is in the water chamber)
If you are using glass, you may want to sand the edges with sand paper to avoid cutting your self.
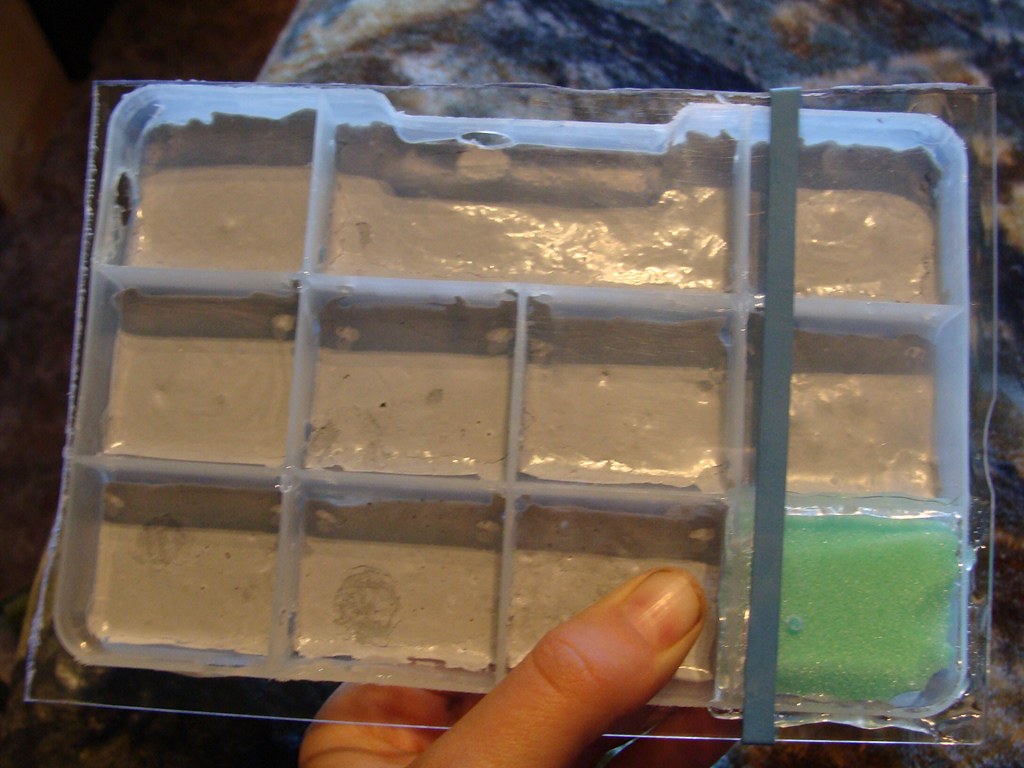
Take your silicone/epoxy and put a border on all 4 walls of the water chamber.  Put the lid on, and then take it off - you should see an exact outline of the water chamber.  Add more silicone/epoxy to the lid - we want a very good seal on this.  Then put the lid back on, check for a good solid seal.  If it is good, let it dry (silicone for 12 hours, epoxy until hard).  Then silicone the rest of the chambers.  With epoxy, use a toothpick.  With silicone, you can use the finger of a rubber glove or a piece of plastic to smooth the silicone into the joint.
Let dry for 48 hours.


35699587572_4d509a3b9b_b.jpg

35480888950_8de756f6d4_b.jpg


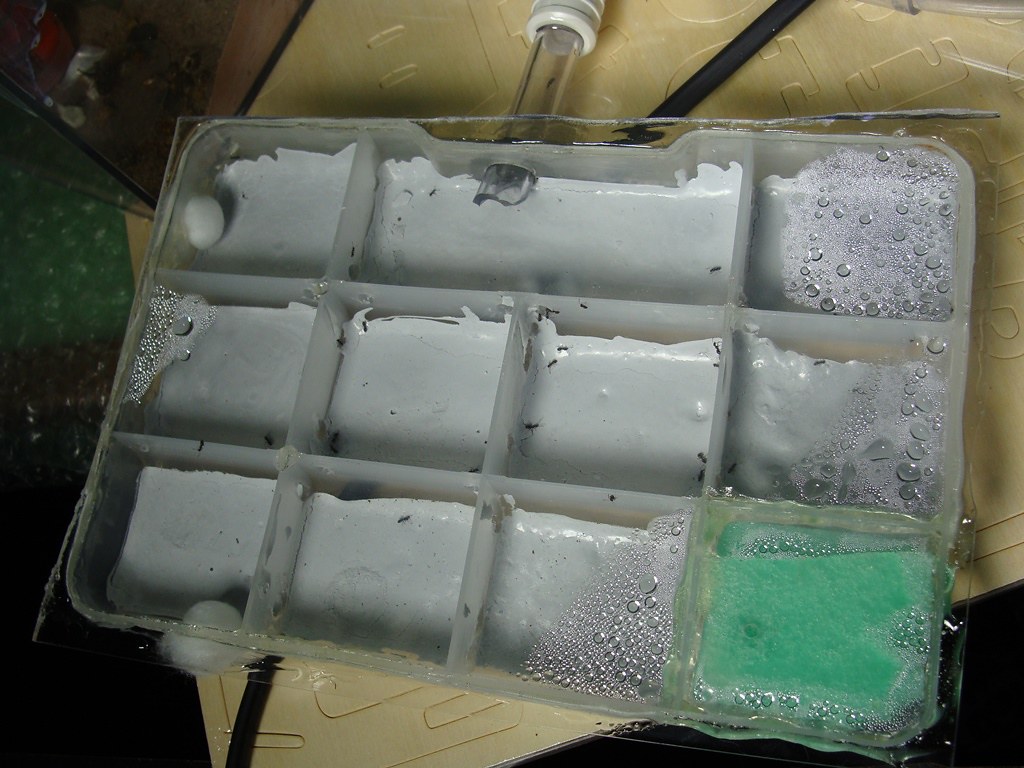
Add water to water chamber and you are ready to go.  The water chamber will humidify the formicarium just like a test tube does.


35699588612_9113886382_b.jpg


Optional:
If you have larger ants and want to be able to remove the lid, you can just use bolts in the 4 corners to attach the lid (easier with acrylic lid).  If you wanted, you could apply a very light layer of silicone (which would be easy to cut with an exacto blade later)

Instead of just drilling a hole for tubing, I have debated permanently attaching a tubing connector for easy attaching/detaching.
I plug extra holes with cotton (also acts as ventilation)

I find some of the dremel tips also work well for drilling some types of holes, although drills and drill bits work too.

Notes:
I add heat to my nests, if I place the heating cable in the opposite corner from the water chamber I get no condensation on the lid.  Just like a test tube.  You want the grout in most chambers to remain dry relying on the humidity from the water chamber, while some should be damp for brood requiring more moisture.

My Tapinoma, Aphaenogaster, and Crematogaster enjoy this setup.  It was the only nest they have ever moved into without any pressure from me.


Here are some other ways I have built formicariums:

Grout Formicarium: http://forum.formicu...ut +formicarium

Firebrick Formicarium: http://forum.formicu...ut +formicarium

For other tutorials, please see the List of Handy Links: http://www.formicult...of-handy-links/


Edited by Crystals, August 2 2017 - 4:47 PM.

  • CrazyLegs, rdurham02, AntsBC and 1 other like this

"Always do right. This will gratify some people, and astound the rest." -- Samuel Clemens


List of Handy Links   (pinned in the General section)

My Colonies


#2 Offline dspdrew - Posted September 26 2014 - 8:17 PM

dspdrew
  • LocationSanta Ana, CA

Nice. Looks like a good amount of moisture in there.


#3 Offline Alza - Posted September 26 2014 - 8:20 PM

Alza

    Advanced Member

  • Members
  • PipPipPip
  • 864 posts
  • LocationThe Village

does this work for argentine ants ?


#4 Offline dspdrew - Posted September 26 2014 - 8:30 PM

dspdrew
  • LocationSanta Ana, CA

Even a trashcan would be good for Argentine ants. I don't think there's anything they won't live in.


  • Foogoo, LC3, littlebandicoot and 1 other like this

#5 Offline Alza - Posted September 26 2014 - 8:55 PM

Alza

    Advanced Member

  • Members
  • PipPipPip
  • 864 posts
  • LocationThe Village

lol they have been feeding off maggots in my neighbors trash can (in-the-wild)


  • Spamdy likes this

#6 Offline Gregory2455 - Posted September 26 2014 - 9:05 PM

Gregory2455

    Advanced Member

  • Members
  • PipPipPip
  • 3,286 posts
  • LocationCalifornia

This was the first formicarium I ever made back a year or so ago! :D


#7 Offline Crystals - Posted September 27 2014 - 7:34 AM

Crystals

    Advanced Member

  • Moderators
  • PipPipPip
  • 2,049 posts
  • LocationAthabasca, AB (Canada)

does this work for argentine ants ?

I originally built it to house higher volumes of smaller ants.  I have Tapinoma sessile in it and it works fine. Mine is attached as an expansion to their original firebrick nest, so they have their choice of where they want to live, and some seem to prefer this one.

Just make sure all of your joints are well sealed with smaller ants.  :D


"Always do right. This will gratify some people, and astound the rest." -- Samuel Clemens


List of Handy Links   (pinned in the General section)

My Colonies


#8 Offline dermy - Posted September 29 2014 - 11:51 AM

dermy

    Advanced Member

  • Members
  • PipPipPip
  • 1,392 posts
  • LocationCanada

Nice, if I ever get something like grout to use for Formicariums this will be the first one I make for one of my colonies.


Great work Crystals! Hope which ever colony you keep in this does good for you!


#9 Offline Crystals - Posted September 29 2014 - 12:05 PM

Crystals

    Advanced Member

  • Moderators
  • PipPipPip
  • 2,049 posts
  • LocationAthabasca, AB (Canada)

Thanks dermy.

Grout is usually found in any home improvement store that carries floor tiles.  You can also substitute grout with hydrostone, gypsum or other pourable materials.  I bet you could even use a 2-part epoxy or resin and cover it in sand as it sets.


With the grout flooring, I can see this doing well with species that have formic acid like Formica and Camponotus.  Doesn't look very natural, but it provides lots of space and is easy and cheap to build.


"Always do right. This will gratify some people, and astound the rest." -- Samuel Clemens


List of Handy Links   (pinned in the General section)

My Colonies


#10 Offline dermy - Posted September 29 2014 - 5:48 PM

dermy

    Advanced Member

  • Members
  • PipPipPip
  • 1,392 posts
  • LocationCanada

Cool, i'll have to have a look in the next 2 weeks when I leave my house again :D.


#11 Offline Gregory2455 - Posted September 29 2014 - 6:06 PM

Gregory2455

    Advanced Member

  • Members
  • PipPipPip
  • 3,286 posts
  • LocationCalifornia

Looks like a good amount of moisture in there.


May be good for Acomyrmex versicolor... Although I would like to keep mine in a more professional looking setup.


Edited by Gregory2455, September 29 2014 - 6:07 PM.


#12 Offline Crystals - Posted September 29 2014 - 6:19 PM

Crystals

    Advanced Member

  • Moderators
  • PipPipPip
  • 2,049 posts
  • LocationAthabasca, AB (Canada)

May be good for Acomyrmex versicolor... Although I would like to keep mine in a more professional looking setup.

That could be an idea, dip the entire inside in really runny grout and then pour sand on it.  Once dry just take it to a belt sander to get a smooth/flat top for the glass to sit on.

You could block the water chamber off when dipping and that would be fine.


"Always do right. This will gratify some people, and astound the rest." -- Samuel Clemens


List of Handy Links   (pinned in the General section)

My Colonies


#13 Offline Gregory2455 - Posted September 29 2014 - 6:20 PM

Gregory2455

    Advanced Member

  • Members
  • PipPipPip
  • 3,286 posts
  • LocationCalifornia

Nice... The poor man's omni nest!


Edited by Gregory2455, September 29 2014 - 6:20 PM.


#14 Offline dermy - Posted September 29 2014 - 6:22 PM

dermy

    Advanced Member

  • Members
  • PipPipPip
  • 1,392 posts
  • LocationCanada

Ha ha that's what I was thinking when I made mine.


I Can't wait to get grout and make them a proper nest so they won't keep plotting escape.


#15 Offline Michaelofvancouver - Posted February 10 2015 - 6:46 PM

Michaelofvancouver

    Advanced Member

  • Members
  • PipPipPip
  • 222 posts
  • LocationVancouver

Do I have permission to add this to my website? With full credit to you, of course.


Here's my leopard gecko/ant youtube: https://goo.gl/cRAFbK


My ant website.

It contains a lot of information about ants, guides, videos, links, and more!

If you have any feedback, please post here or PM me, don't be shy!


I currently keep:

Camponotus modoc

Formica podzolica


#16 Offline Crystals - Posted February 13 2015 - 3:46 AM

Crystals

    Advanced Member

  • Moderators
  • PipPipPip
  • 2,049 posts
  • LocationAthabasca, AB (Canada)

Sure, feel free to share any of my tutorials or videos.  I post them to help others.


"Always do right. This will gratify some people, and astound the rest." -- Samuel Clemens


List of Handy Links   (pinned in the General section)

My Colonies


#17 Offline Michaelofvancouver - Posted February 13 2015 - 4:05 PM

Michaelofvancouver

    Advanced Member

  • Members
  • PipPipPip
  • 222 posts
  • LocationVancouver

Alright, thanks!  (y)


Here's my leopard gecko/ant youtube: https://goo.gl/cRAFbK


My ant website.

It contains a lot of information about ants, guides, videos, links, and more!

If you have any feedback, please post here or PM me, don't be shy!


I currently keep:

Camponotus modoc

Formica podzolica


#18 Offline Crystals - Posted March 27 2016 - 7:33 AM

Crystals

    Advanced Member

  • Moderators
  • PipPipPip
  • 2,049 posts
  • LocationAthabasca, AB (Canada)

Well, my Crematogaster love this setup when there is sand pressed into the grout.  I also used chamois cloth to link the watering chamber with the nearby chambers so the floor is damp, and they love it.

They moved into it without me doing anything, and I have not found it easy to convince this species to move.


"Always do right. This will gratify some people, and astound the rest." -- Samuel Clemens


List of Handy Links   (pinned in the General section)

My Colonies


#19 Offline Turbulince - Posted June 17 2016 - 5:49 PM

Turbulince

    Newbie

  • Members
  • Pip
  • 1 posts
Would sanded grout work for the bottom instead of normal grout?

#20 Offline Crystals - Posted June 17 2016 - 5:51 PM

Crystals

    Advanced Member

  • Moderators
  • PipPipPip
  • 2,049 posts
  • LocationAthabasca, AB (Canada)

I don't see why not.  It is a bit more water resistant, so watch that when hydrating it, but sanded grout is still more absorptive and ant-friendly than bare plastic.


"Always do right. This will gratify some people, and astound the rest." -- Samuel Clemens


List of Handy Links   (pinned in the General section)

My Colonies


Also tagged with one or more of these keywords: crystals, how to, formicarium, bead storage

2 user(s) are reading this topic

0 members, 2 guests, 0 anonymous users