Jump to content

  • Chat
  •  
  •  

Welcome to Formiculture.com!

This is a website for anyone interested in Myrmecology and all aspects of finding, keeping, and studying ants. The site and forum are free to use. Register now to gain access to all of our features. Once registered and logged in, you will be able to create topics, post replies to existing threads, give reputation points to your fellow members, get your own private messenger, post status updates, manage your profile and so much more. If you already have an account, login here - otherwise create an account for free today!

Photo

How to build a formicarium out of clay

clay bisque how to formicarium crystals tutorial guide

  • Please log in to reply
15 replies to this topic

#1 Offline Crystals - Posted March 8 2016 - 8:00 PM

Crystals

    Advanced Member

  • Moderators
  • PipPipPip
  • 2,049 posts
  • LocationAthabasca, AB (Canada)
How to build a formicarium out of clay


Please keep in mind I use local clay that has been refined by the local pottery club, so my results may differ from yours depending on the clay you are using and how you fire it.


Materials:

Container

clay

vinyl tubing

rolling pin

clay carver

silicone

grout

drill and bits


Take your clay and work it in your hands a bit (to get rid of any air bubbles and make it more workable).  Kneading it like bread works well.

Use a rolling pin to roll a flat section about 2.5+ cm thick.  Cut out a piece big enough to fit in your container.  Keep in mind clay will shrink as it dries, my clay shrinks by 5-15% depending on the batch and moisture level. 


I used two techniques for carving:

1. I carved the tunnels/holes right after rolling it out and laid it on a flat tray, covered it lightly in plastic and put a light book on it to keep it flat while it dried for the next 4 weeks.

2. I put a book on the rolled clay and let it dry for 2 weeks to a "leather" state (faintly damp, but much harder/stiffer).  Then I carved the tunnels and drilled the holes.  I lightly covered it in plastic and put the back on top to let it dry for 2 more weeks. 


Obviously, the second technique worked much better as the first one had a tendency to warp while drying.


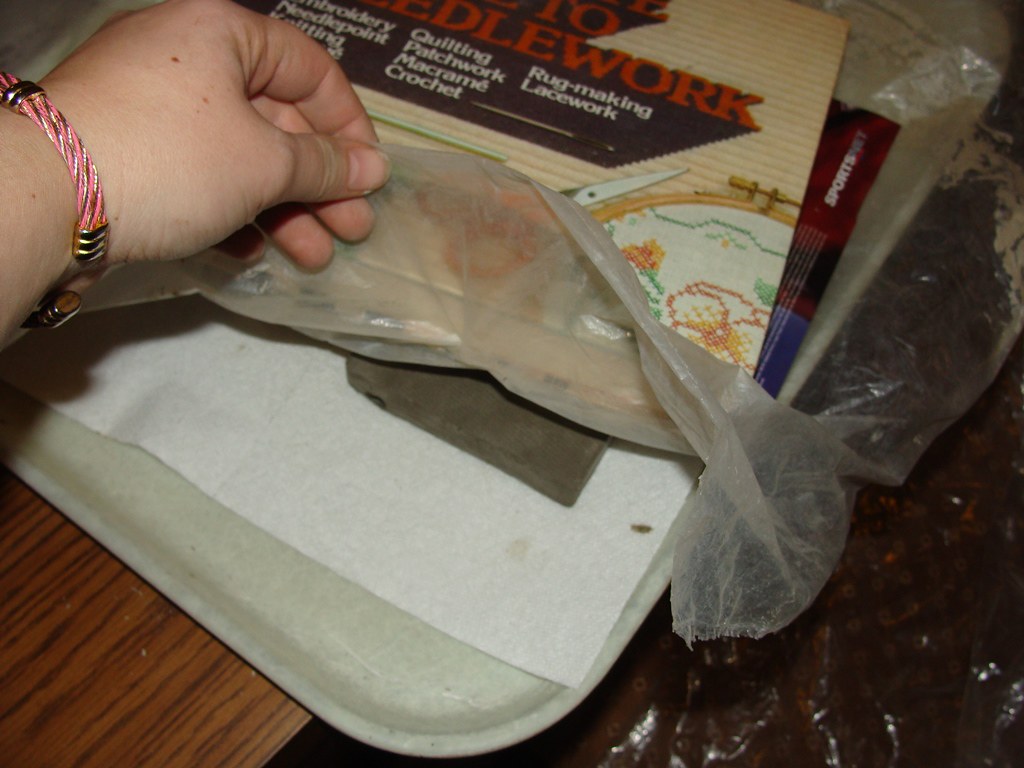
Here it is drying while wrapped in plastic with a book on top:
35059590653_4c5a3527b6_b.jpg


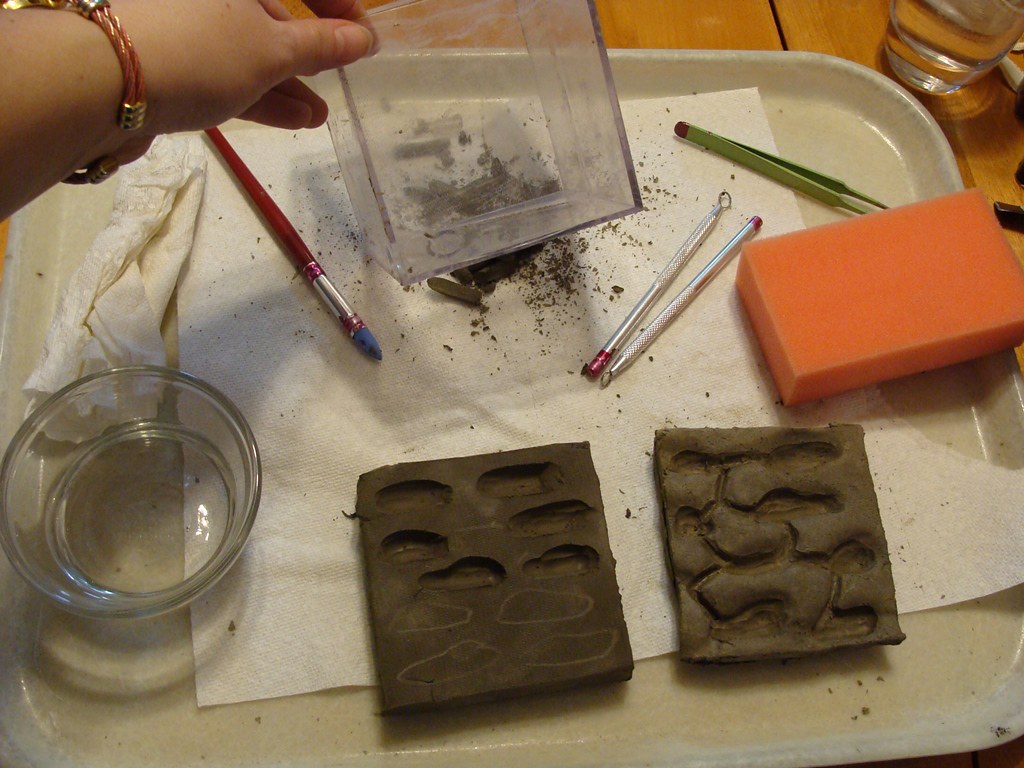
Here is the 2 week mark:  #1 technique does not look very good as the clay shrinks as it dries (it originally looked as good as #2 did when it started to dry).  I am currently carving the #2 technique.
 

35868881765_dec9ee537d_b.jpg


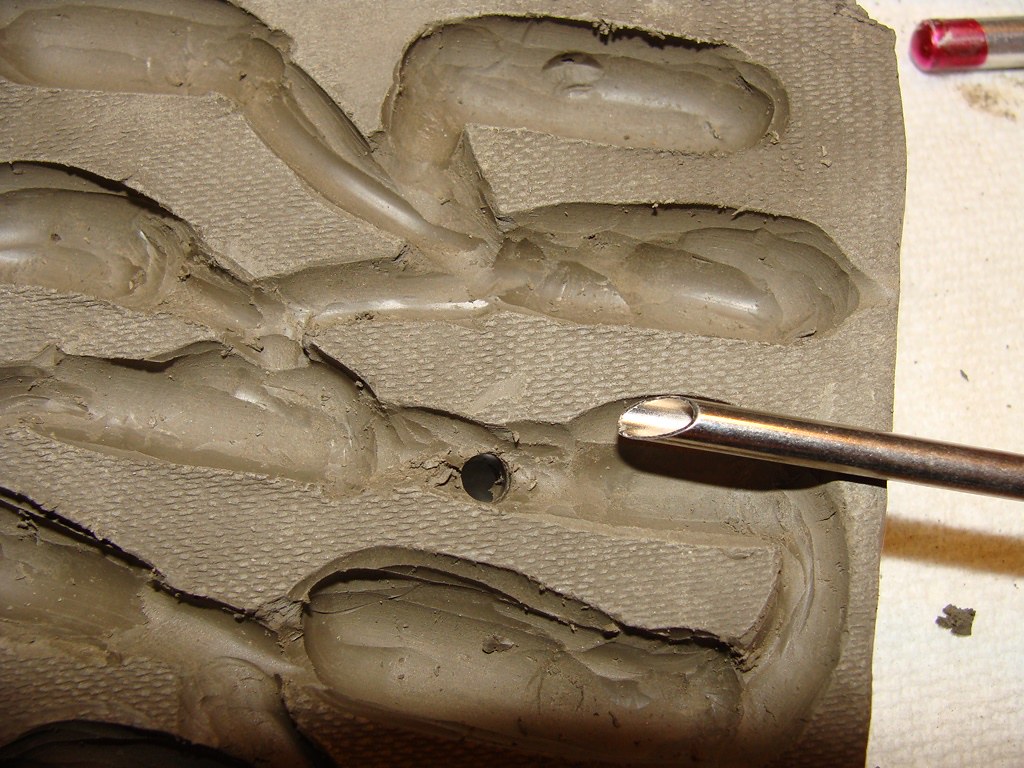
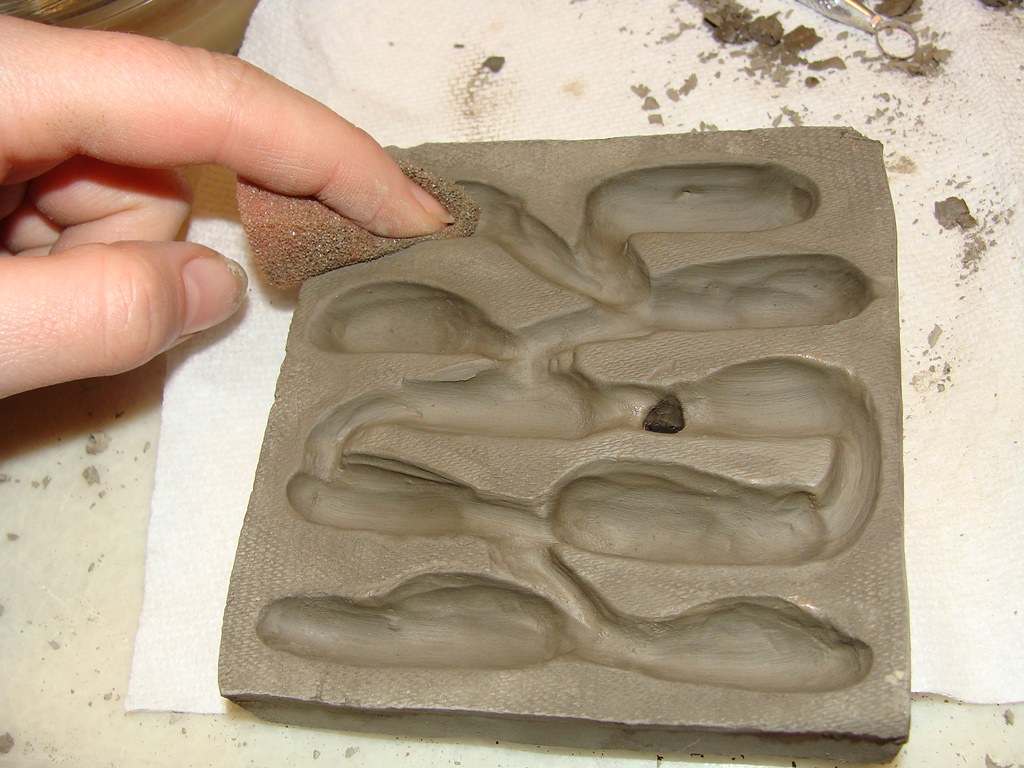
Here is how I carved #2 technique.  I carved out room and tunnels and smoothed them out with a damp sponge (Use a damp sponge, and do not "sand" it - the dust is extremely dangerous to breathe in). 

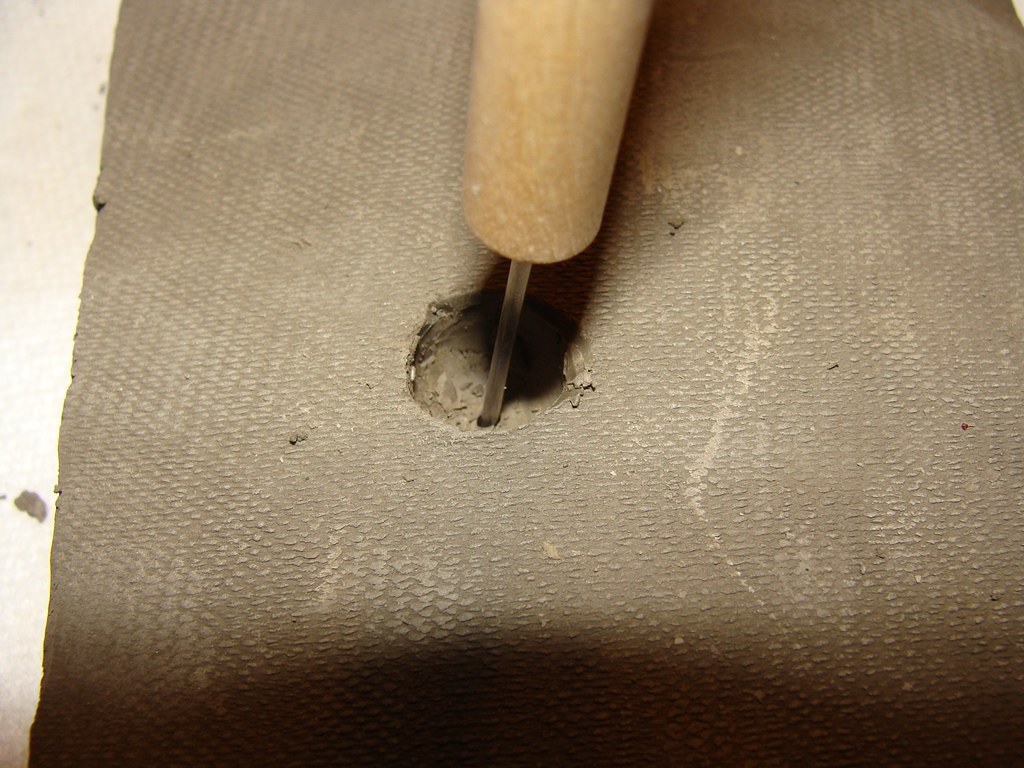
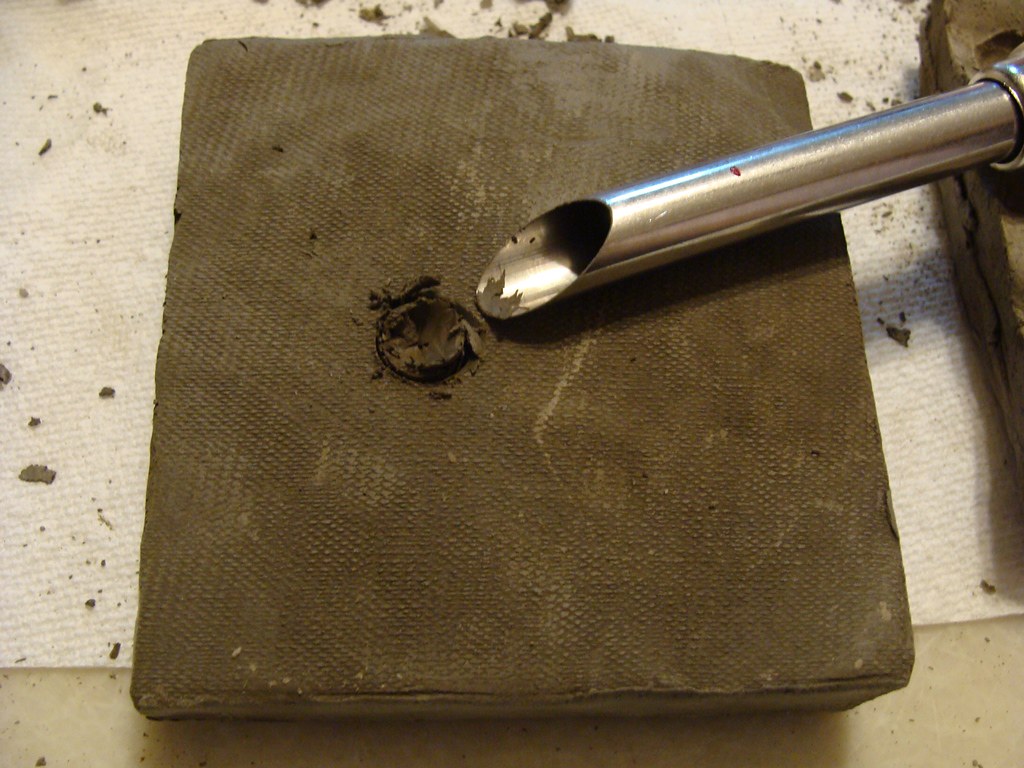
I used an awl to make a hole in the back to connect an additional tunnel. I used two different sized awls for different sized holes.  You can use whatever tool works for you.  The outer edge was large enough for my tubing, but I used a pin to check depth so I only had a smaller hole actually leading to the main tunnels. 
 

35737217351_b970dbdb1a_b.jpg

35059589493_7f66e45288_b.jpg

35737215451_bfac33dba0_b.jpg

35059593803_9141551e68_b.jpg


After the clay has dried, re-carve the hole for the silicone tubing as it may have shrunk with the drying.  Go carefully as the dry clay is quite fragile.

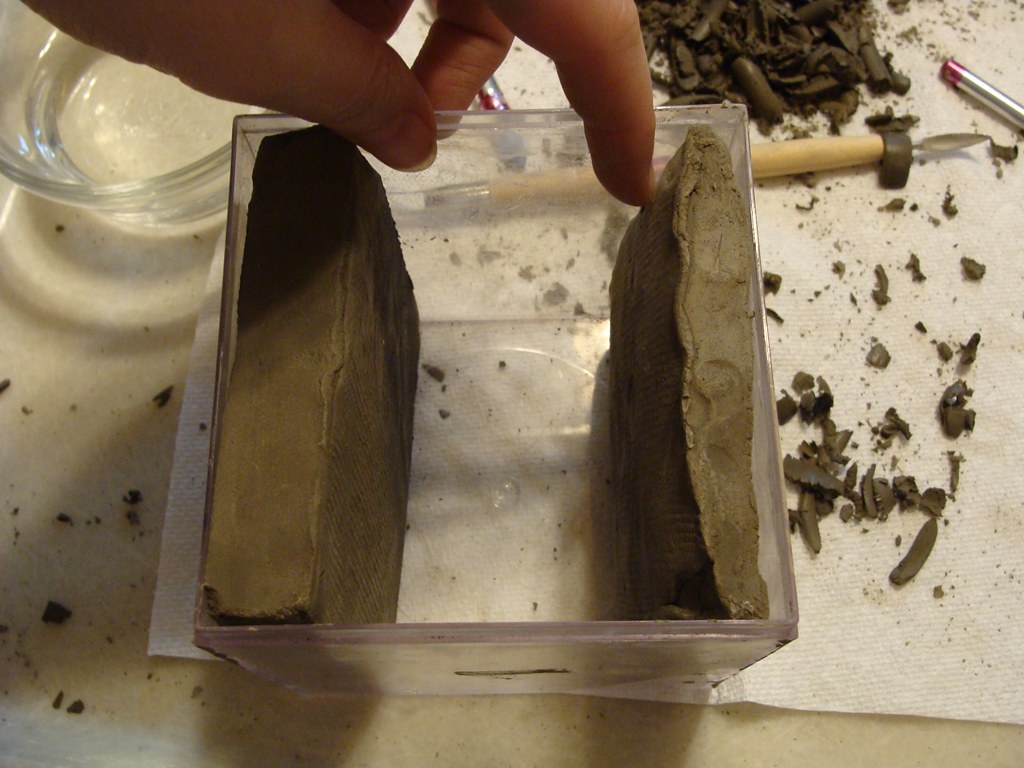
Use a damp sponge to smooth any sharp edge.  Also ensure that it fits inside of your container, if not, scrape the edge away until it does fit.  Once fired, it is very hard to make any changes.


Well, they fit, albeit snuggly.  Make sure you mark on the back which way faces up.
35699676472_7b6ed10fb8_b.jpg


Let it dry again and fire it into bisque.  Use a low or mid firing (Cone 08-1  depending on your specific clay - ask the manufacturer if it was purchased, or a local pottery club if using local clay), avoid firing it above cone 7.  If you don't understand the kilning process, get someone experienced to do it for you.


This will give you a clay that is more absorbent than the typical cheap clay terracotta flower pot.


Note: clay that is air dried, or just baked in an oven will easily re-hydrate into wet clay that ants will easily dig through - it is not true pottery bisque.  It needs to actually be fired to the point where clay changes into bisque.  This is at least 900-1000C (1652-1832F).  Some places will fire your clay for a fee, or you can buy a small kiln.  I have seen clay fired inside of a long burning bonfire, but this is not feasible for most.  Many places have pottery clubs with kilns.

Here is another chart showing kiln temperatures and important notes about then (a simpler version than the link above).


Soak the bisque for a few minutes and let it dry until it is no longer cold/cool to the touch.  (If you skip this step, most glue/silicone will not bond to the clay for some reason)


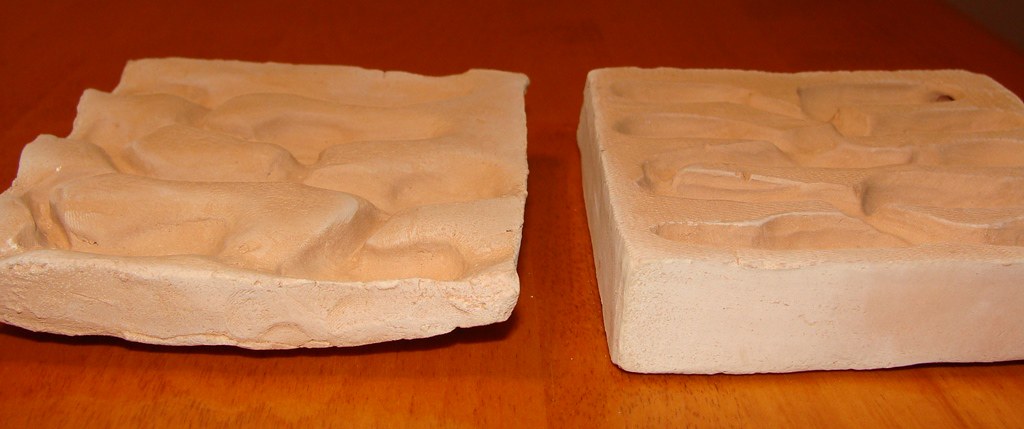
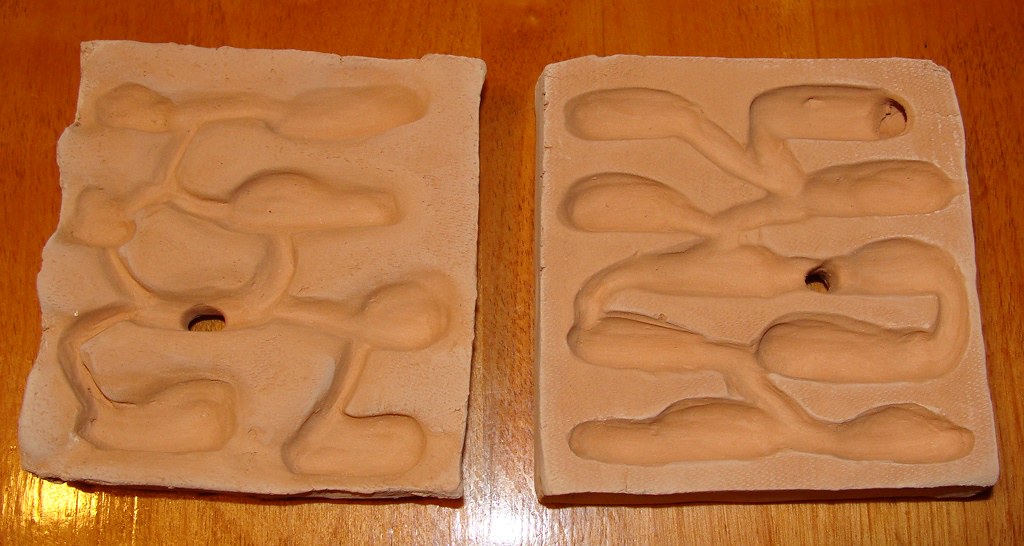
Notice the final difference between technique 1 & 2 in the end:  #1 is on the left, #2 on the right.  Believe it or not, they started out almost the same thickness when rolled.
35699671662_2826296793_b.jpg
35868877315_f9ef93cb02_b.jpg


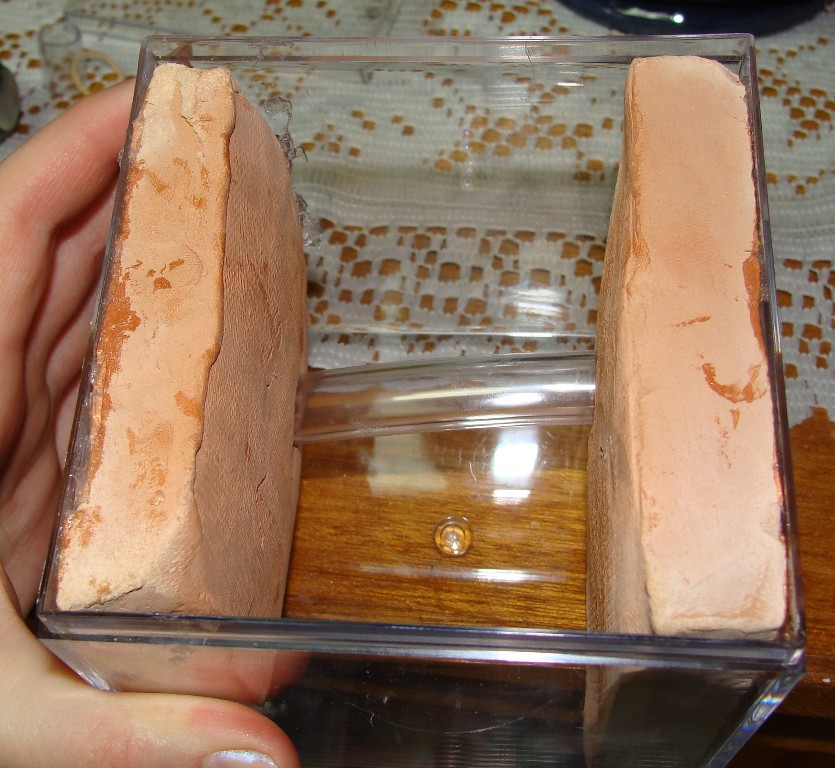
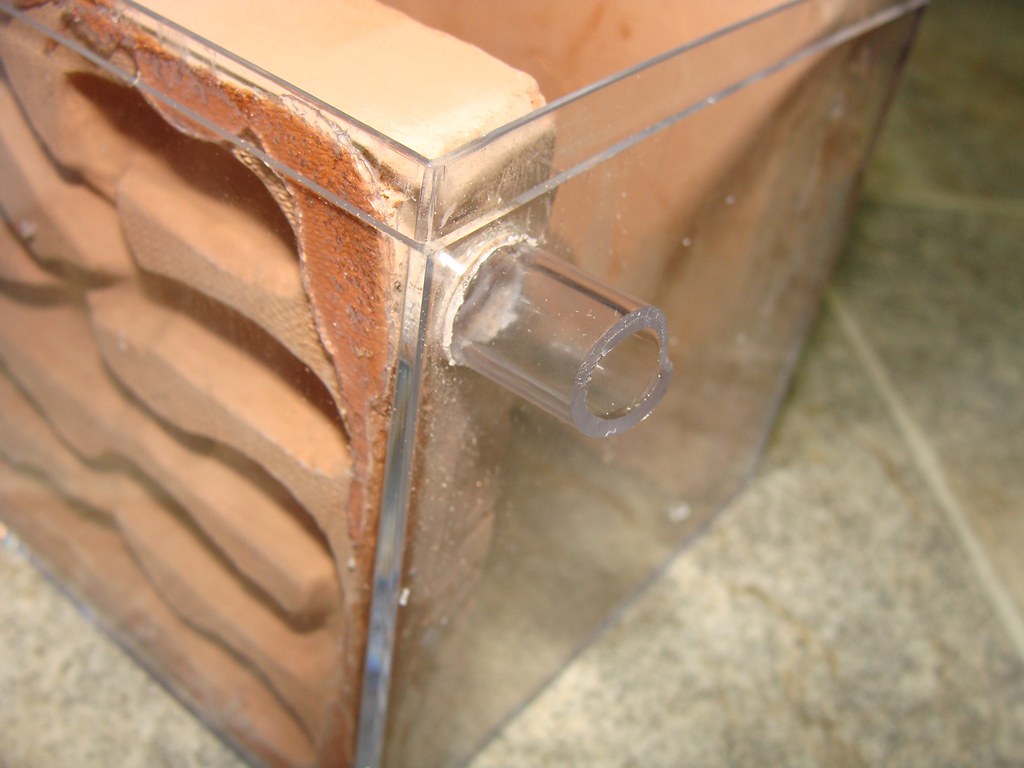
I ensured that my vinyl tubing fit as it was supposed to and was cut to size. 

You can drill a hole into the nest, or if it is a vertical nest, ensure the opening will be where it is needed.

I decided to connect 2 of mine through the backs, it would be easy to do this to all 4 sides with an external foraging area.
35699674162_936a458afa_b.jpg

35868880315_4340f63da3_b.jpg


Take your bisque and silicone it against the wall.  If there is a water chamber, ensure there is silicone between it and the other tunnels to avoid floods.  For technique 1, I siliconed all points that were supposed to touch the wall since it warped so badly.  I did not want ants or brood getting stuck between the nest and wall.  This was not necessary with the #2 technique.
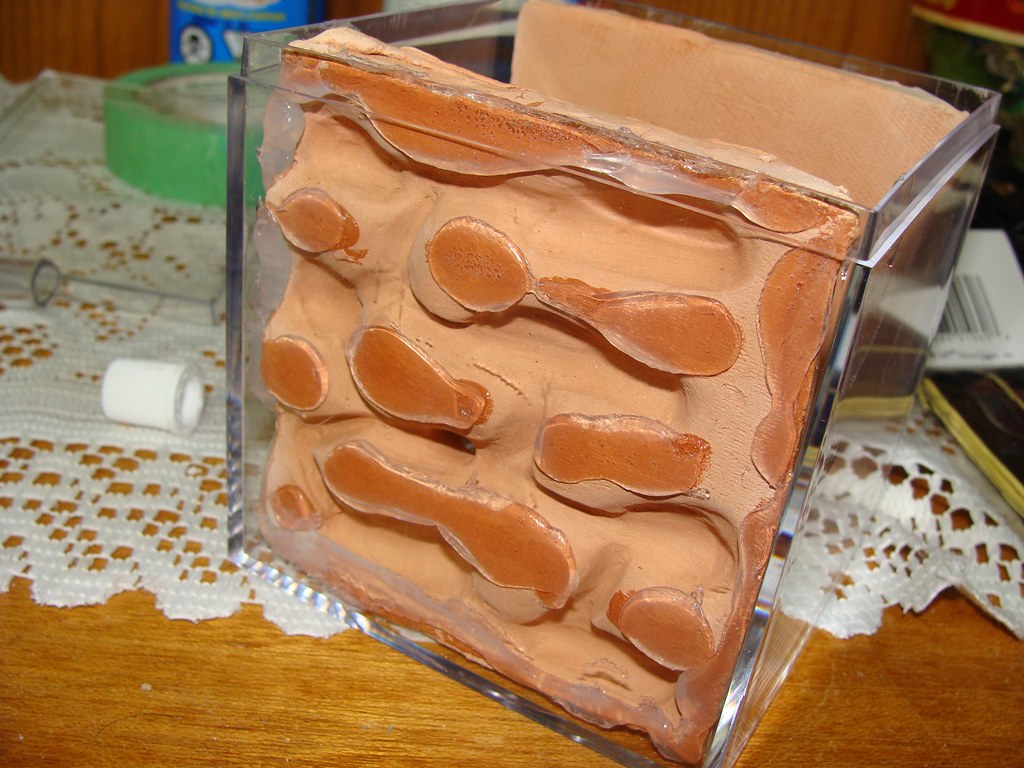
35699672932_c937e4a535_b.jpg
35868878965_0721dd0f83_b.jpg


If needed, ensure any other vinyl tubing fits correctly, epoxy it in place if possible.  (Silicone has too much give).


Backfill with grout (sanded or unsanded would work, mix 2 grout:1sand).  Can also back fill with sand or gravel as long as ants can not get to it.  Even adding stuff like styrofoam pieces to reduce amount of grout would work and make it lighter.  Hydrostone may expand and crack the container when curing, and Plaster of Paris may mold, so avoid these two.

Ensure you do not forget to add a tunnel to water the nest.  I used a piece of vinyl tubing.


One with as much grout as mine will take a long time to cure.  I plan to put it on a shelf for a couple of months to ensure it is totally cured.  (If the grout is not cured, it can kill ants and I prefer to play it safe).
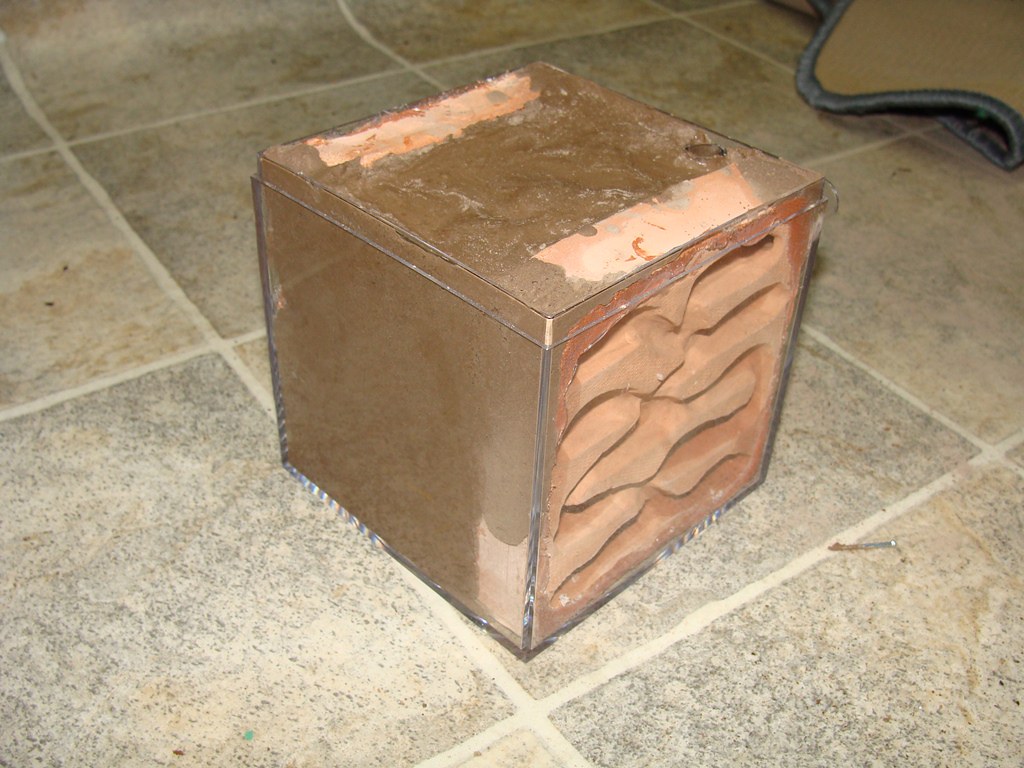
 

35699675192_8af0405119_b.jpg


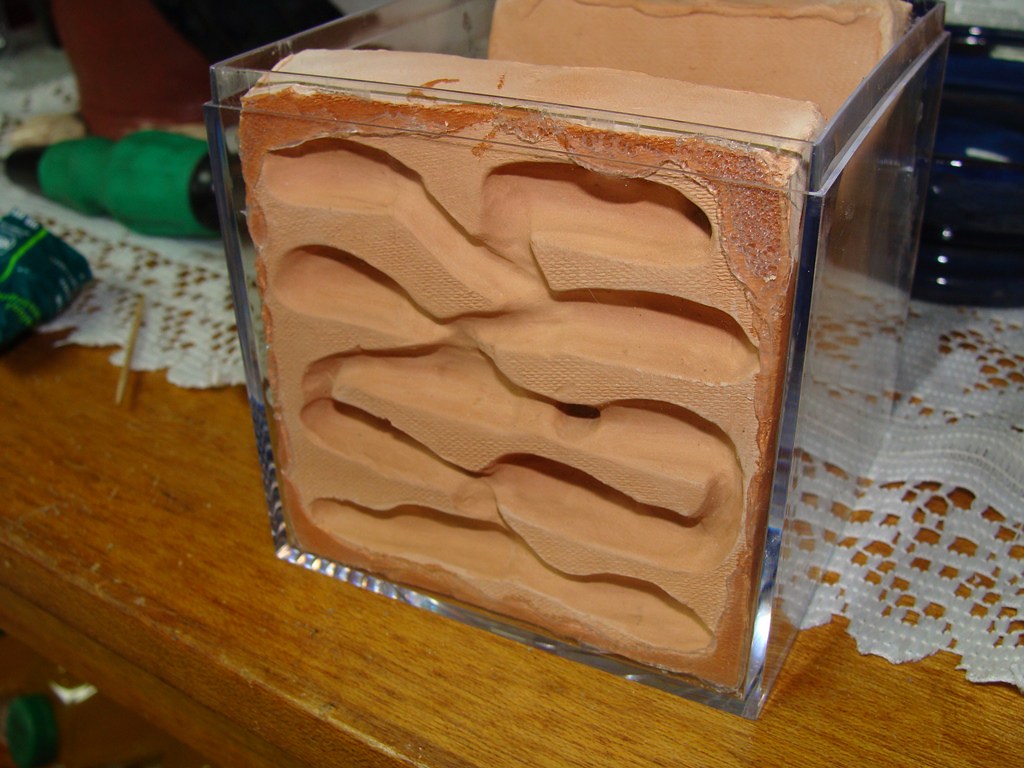
This is a different one, done by someone else - it was made out of clay, siliconed to the side, had gravel added behind and topped with plaster.  I would probably use grout instead of plaster to avoid mold. 


Edited by Crystals, August 1 2017 - 6:08 PM.

  • Ants4fun, Barristan, ferhat and 3 others like this

"Always do right. This will gratify some people, and astound the rest." -- Samuel Clemens


List of Handy Links   (pinned in the General section)

My Colonies


#2 Offline Crystals - Posted March 8 2016 - 8:01 PM

Crystals

    Advanced Member

  • Moderators
  • PipPipPip
  • 2,049 posts
  • LocationAthabasca, AB (Canada)

I plan on trying this with picture frame style formicariums next.


I also posted the link to this in the List of Handy Links


"Always do right. This will gratify some people, and astound the rest." -- Samuel Clemens


List of Handy Links   (pinned in the General section)

My Colonies


#3 Offline dspdrew - Posted March 8 2016 - 8:27 PM

dspdrew
  • LocationSanta Ana, CA

Very nice. So it's much better to let the clay air-dry first before carving it? Did you think about sanding down the face of the deformed one until it was perfectly flat again before firing it?


#4 Offline Crystals - Posted March 8 2016 - 8:47 PM

Crystals

    Advanced Member

  • Moderators
  • PipPipPip
  • 2,049 posts
  • LocationAthabasca, AB (Canada)

Yes, letting it air dry until it is a leather consistency then carving it worked much better.  It wasn't 100% dry, but faintly damp.


I thought about sanding it down, but it would have to dry 100% and clay dust is very dangerous to breathe in.  That is why you use a damp sponge to fix clay.  Besides, towards the end, it wasn't thick enough to sand down properly.

It is actually somewhat easier to carve semi-dried clay as it doesn't move with every bit of light pressure.


I probably should have mentioned how dangerous dry clay dust is to inhale.  In most pottery clubs out there, if you sand dry pottery inside the club you get one warning then you get kicked out.

It can cause silicosis quite quickly, and some other lung problems as well.


"Always do right. This will gratify some people, and astound the rest." -- Samuel Clemens


List of Handy Links   (pinned in the General section)

My Colonies


#5 Offline TKD102 - Posted August 1 2017 - 5:04 PM

TKD102

    Advanced Member

  • Members
  • PipPipPip
  • 41 posts
  • LocationIndiana, USA

Could you please switch the photos on here. The photos aren't working here either.


Currently Keeping:

Tetramorium Immigrans


#6 Offline Crystals - Posted August 1 2017 - 6:10 PM

Crystals

    Advanced Member

  • Moderators
  • PipPipPip
  • 2,049 posts
  • LocationAthabasca, AB (Canada)

Could you please switch the photos on here. The photos aren't working here either.

I updated it.  Sorry for the slow updates. Summer is just so busy.


"Always do right. This will gratify some people, and astound the rest." -- Samuel Clemens


List of Handy Links   (pinned in the General section)

My Colonies


#7 Offline sgheaton - Posted August 2 2017 - 4:46 AM

sgheaton

    Advanced Member

  • Members
  • PipPipPip
  • 933 posts
  • LocationMinnesota

Summer? We are entering fall time! What happened to summer?!?!?


"I'm the search bar! Type questions into me and I'll search within the forums for an answer!"


#8 Offline Crystals - Posted August 2 2017 - 5:32 AM

Crystals

    Advanced Member

  • Moderators
  • PipPipPip
  • 2,049 posts
  • LocationAthabasca, AB (Canada)

Summer? We are entering fall time! What happened to summer?!?!?

It is the second day of August. My garden is in full swing and the days are warm enough that I don't need a coat. Aka. Summer.  :D


  • dermy and Spamdy like this

"Always do right. This will gratify some people, and astound the rest." -- Samuel Clemens


List of Handy Links   (pinned in the General section)

My Colonies


#9 Offline sgheaton - Posted August 2 2017 - 6:37 AM

sgheaton

    Advanced Member

  • Members
  • PipPipPip
  • 933 posts
  • LocationMinnesota

But there are 4 months until Christmas!! 


"I'm the search bar! Type questions into me and I'll search within the forums for an answer!"


#10 Offline Crystals - Posted August 2 2017 - 8:48 AM

Crystals

    Advanced Member

  • Moderators
  • PipPipPip
  • 2,049 posts
  • LocationAthabasca, AB (Canada)

But there are 4 months until Christmas!! 

Four months ago I still had snow.

I will not proclaim it fall until the leaves turn yellow and fall down, as frost touches the grass in the morning.  :D


  • lucas3431 likes this

"Always do right. This will gratify some people, and astound the rest." -- Samuel Clemens


List of Handy Links   (pinned in the General section)

My Colonies


#11 Offline AntsVietnam - Posted August 13 2017 - 3:32 AM

AntsVietnam

    Member

  • Members
  • PipPip
  • 13 posts
Dumb question: Can I use my little sister's Play-Dol for this?

#12 Offline Crystals - Posted August 13 2017 - 5:46 AM

Crystals

    Advanced Member

  • Moderators
  • PipPipPip
  • 2,049 posts
  • LocationAthabasca, AB (Canada)

Dumb question: Can I use my little sister's Play-Dol for this?

Very doubtful.

Ants would be able to chew through it and if you tried to hydrate it, it would remain soft.

Not many have the means or access to a kiln to try the clay pottery route, but I did and since some were thinking about it, I did it.

I find the grout nests much easier to make.


"Always do right. This will gratify some people, and astound the rest." -- Samuel Clemens


List of Handy Links   (pinned in the General section)

My Colonies


#13 Offline dspdrew - Posted August 13 2017 - 8:33 AM

dspdrew
  • LocationSanta Ana, CA

I finally bought a kiln. Can't wait to start experimenting with it.


#14 Offline Crystals - Posted August 13 2017 - 2:15 PM

Crystals

    Advanced Member

  • Moderators
  • PipPipPip
  • 2,049 posts
  • LocationAthabasca, AB (Canada)

I finally bought a kiln. Can't wait to start experimenting with it.

Nice.

Can't wait to see how your pieces turn out.


"Always do right. This will gratify some people, and astound the rest." -- Samuel Clemens


List of Handy Links   (pinned in the General section)

My Colonies


#15 Offline Hunter - Posted November 29 2017 - 7:56 AM

Hunter

    Advanced Member

  • Members
  • PipPipPip
  • 565 posts
  • LocationWaterboro Maine

does airdry work


#16 Offline Crystals - Posted November 29 2017 - 8:35 PM

Crystals

    Advanced Member

  • Moderators
  • PipPipPip
  • 2,049 posts
  • LocationAthabasca, AB (Canada)

does airdry work

Unfortuantely, no.

Airdry will re-hydrate with water and become soft again.


"Always do right. This will gratify some people, and astound the rest." -- Samuel Clemens


List of Handy Links   (pinned in the General section)

My Colonies


Also tagged with one or more of these keywords: clay, bisque, how to, formicarium, crystals, tutorial, guide

1 user(s) are reading this topic

0 members, 1 guests, 0 anonymous users