Jump to content

  • Chat
  •  
  •  

Welcome to Formiculture.com!

This is a website for anyone interested in Myrmecology and all aspects of finding, keeping, and studying ants. The site and forum are free to use. Register now to gain access to all of our features. Once registered and logged in, you will be able to create topics, post replies to existing threads, give reputation points to your fellow members, get your own private messenger, post status updates, manage your profile and so much more. If you already have an account, login here - otherwise create an account for free today!

Photo

Dspdrew's Formicarium 05 Research and Design (Updated 11-22-2023)

formicarium container out world enclosure how-to diy design dspdrew nest tutorial

  • Please log in to reply
237 replies to this topic

#181 Offline dspdrew - Posted April 6 2015 - 4:38 PM

dspdrew
  • LocationSanta Ana, CA

I was wondering about that while writing the last post. I thought I remembered reading somewhere that it was fly ash, but I probably just assumed it was once I started searching around. I read the study you posted, and yeah I guess wood ash does increase the absorbancy, but only a very very small amount.


#182 Offline firehalk - Posted April 6 2015 - 5:28 PM

firehalk

    Newbie

  • Members
  • Pip
  • 5 posts

you should come up with a product to sell I'm sure you would get lots of buyers


#183 Offline dspdrew - Posted April 7 2015 - 10:40 AM

dspdrew
  • LocationSanta Ana, CA
I finished upgrading prototype number 3 that's just been sitting for a while now. This was the one I used to make the silicone mold of the nest.
 
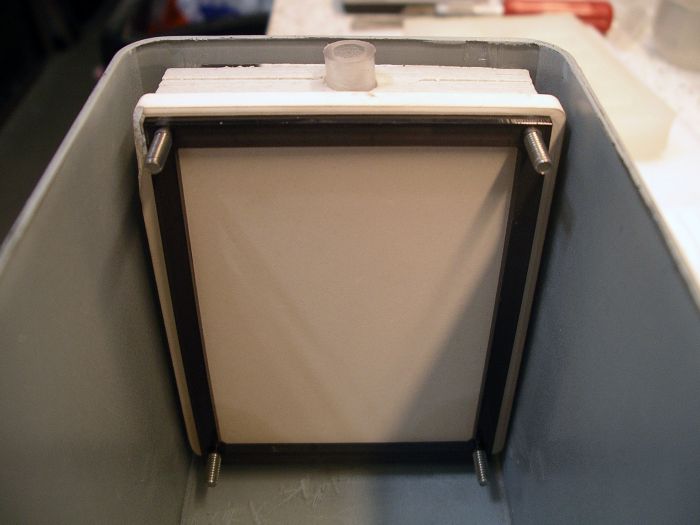
Here you can see the ceramic tile mounted to the back of the chambers, in case you haven't seen my previous posts showing how the pieces are bolted together.
 
med_gallery_2_131_213934.jpg
 
 
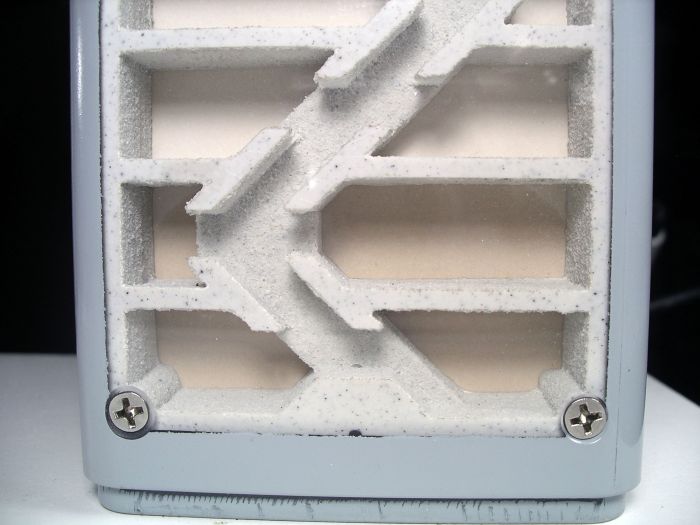
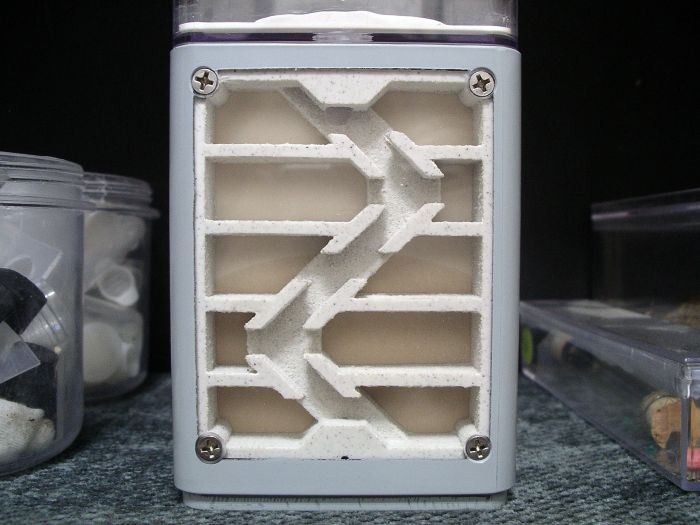
If you look closely, you can see the water starting to soak in.
 
med_gallery_2_131_32617.jpg
 
med_gallery_2_131_808295.jpg
 
 
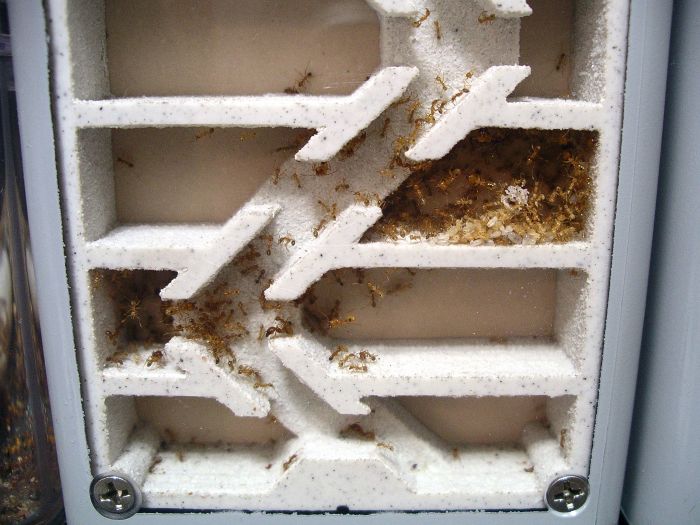
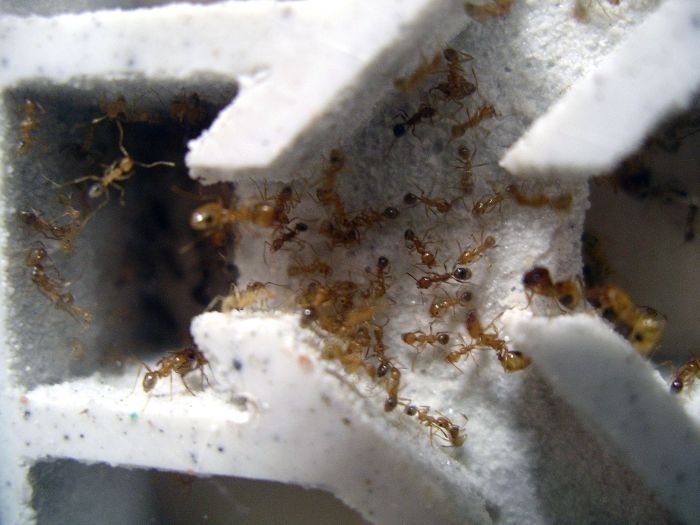
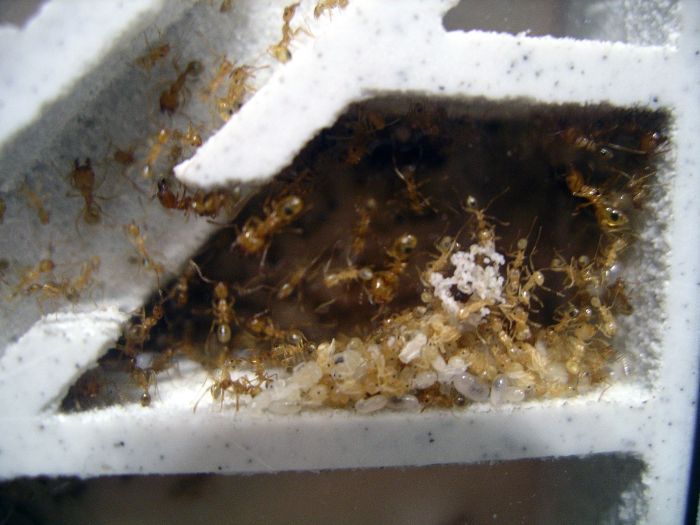
I decided to try this one out with one of my Pheidole hyatti colonies. Normally this particular nest/chamber design would be for medium to large sized ants, but since I'm just testing it out, it's not a big deal. A lot of smaller ants would do just fine in larger chambers, it just doesn't make the best use of space. The bigger issue would normally be the size of this colony, which is a little small for the amount of room they have in this nest.
 
I set their test tube in the out world, and within four hours they were completely moved in.
 
med_gallery_2_131_374688.jpg
 
med_gallery_2_131_101914.jpg
 
med_gallery_2_131_57196.jpg

#184 Offline PTAntFan - Posted April 8 2015 - 7:40 AM

PTAntFan

    Advanced Member

  • Members
  • PipPipPip
  • 495 posts
  • LocationBurbank, CA

Looks like they are pretty happy, got the gradient going, hopefully the ceramic holds up.  Where did you come by it?


PTAntFan----------------------------------Pogonomyrmex Californicus*****************************<p>I use the $3 Tower I made up. See it here.

#185 Offline dspdrew - Posted April 8 2015 - 1:06 PM

dspdrew
  • LocationSanta Ana, CA

I got the ceramic from Michael's. You can also get unglazed ceramic tiles on Amazon. They are sometimes called bisque tiles.


There isn't really much of a gradient in something this small.


#186 Offline dspdrew - Posted May 24 2015 - 3:42 AM

dspdrew
  • LocationSanta Ana, CA
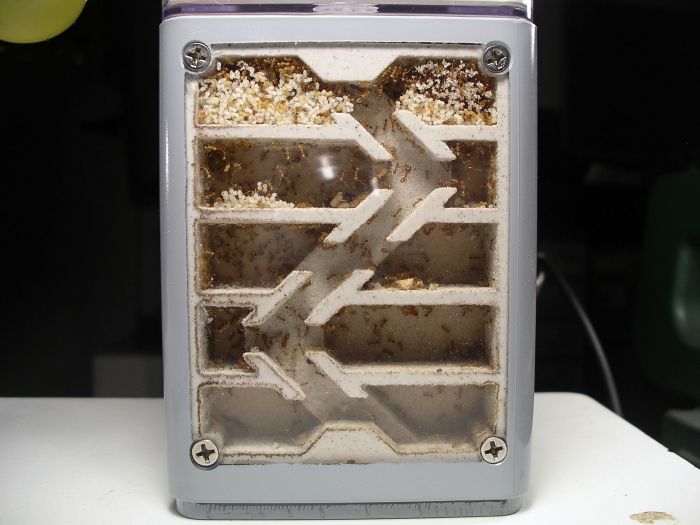
I'm still testing out the prototypes. Both colonies in the prototypes are doing really well. The Veromessor pergandei colony has been in one for two and a half months, and the Pheidole hyatti have been in one for a month and a half so far. Here you can see how much the Pheidole colony has grown since I put them in it.
 
med_gallery_2_131_197683.jpg
 
 
The prototype I'm keeping the Veromessor in for some reason keeps building up a little water on the very bottom, and I really can't figure out why. It might have something to do with the angle of the bottom. When it was being cast, it might have pushed out slightly, making the bottom angle downward toward the front just a tiny bit. The other prototype doesn't have this problem.
 
One thing I found out because of this problem, is how much the ants prefer a very specific moisture level. Since it floods slightly, I've been having to pull the tank away from the backing for a while, and once it starts drying out, I have to put it back on it for a while. Every time I do this, there is a time frame of about 8 hours that almost every single one of the 1500 or so ants are inside the nest. Every time, shortly after this, the ants all start piling out of the nest and start streaming up the sides of the out world. The ones left in the nest are mostly all in the bottom chambers, where they also start moving all of their brood. They go through this cycle every single time, so I know for sure there is a very specific moisture level that they prefer. Because of this, I think I'm going to look into some sort of simple way to adjust the moisture level.
 
At this point, I still need to get the nest digitally drawn out so I can have a high resolution 3D print made of it.


#187 Offline drtrmiller - Posted May 24 2015 - 3:48 AM

drtrmiller

    Vendor

  • Members
  • PipPipPip
  • 2,714 posts

At this point, I still need to get the nest digitally drawn out so I can have a high resolution 3D print made of it.


What the hell are you talking about!?  I did this for you already, per your request.


byFormica® is the manufacturer of the iconic nectar feeders and Sunburst Ant Nectar.
byFormica ant products always deliver consistent performance, convenience,
and reliability, making them among the most beloved ant foods and kit enjoyed by
ant keeping enthusiasts worldwide. For more information, visit www.byFormica.com.

#188 Offline dspdrew - Posted May 24 2015 - 3:57 AM

dspdrew
  • LocationSanta Ana, CA

You don't remember? You didn't understand exactly what I wanted, so it wasn't right. I think I've also changed my mind a little bit on the design. I also need a file that has been drawn up correctly, instead of imported from Illustrator for the reasons that you made clear to me. I need something that can be worked on, not just printed. Why on Earth do you think I've been talking about learning how to use a program for this?


#189 Offline PTAntFan - Posted May 24 2015 - 1:08 PM

PTAntFan

    Advanced Member

  • Members
  • PipPipPip
  • 495 posts
  • LocationBurbank, CA

Do you have a shot of how you get to the water reservoir?  Is the back open on the bottom container?


PTAntFan----------------------------------Pogonomyrmex Californicus*****************************<p>I use the $3 Tower I made up. See it here.

#190 Offline dspdrew - Posted May 24 2015 - 3:11 PM

dspdrew
  • LocationSanta Ana, CA

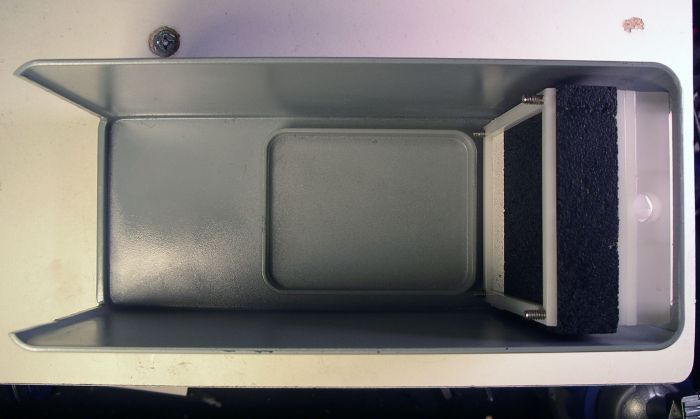
This is the closest. It's just like this, but with a piece across the top.


med_gallery_2_131_125829.jpg


#191 Offline dermy - Posted May 24 2015 - 3:37 PM

dermy

    Advanced Member

  • Members
  • PipPipPip
  • 1,392 posts
  • LocationCanada

That colony has really taken off in your Formicarium, great work Drew.


  • dspdrew likes this

#192 Offline dspdrew - Posted June 12 2015 - 12:12 PM

dspdrew
  • LocationSanta Ana, CA

Okay, I still haven't done anything with this since the last update, but I have thought of a way to adjust the moisture level, and even create a controlled moisture gradient. This might be difficult to make, but I think I could probably come up with a way to do it without it being too much work. This will certainly raise the price if I decide to sell these, but it doesn't mean I can't easily make them without this option too.


Here's how it will work. Instead of a solid ceramic tile backing, it will be a ceramic tile array, separated by resin. This allows targeted tiles to be moisturized without the moisture soaking through the rest of the backing. I will then have precut reinforced PVA sponges (chamois) that will be placed on the back of the ceramic and resin backing, and then sandwiched between another thick, very solid and flat piece of acrylic. The PVA chamois will wrap under the very back acrylic plate, and up the back side of it about an inch, creating the pad that the water tank sponge presses against to transfer the water to the nest. Each of these precut chamois will be cut to send water to specific tiles, creating different moisture gradients. Some may only send water to the lower half, or maybe even just the bottom one inch of them. This might also solve the problem with the slight build up of water in the bottom chamber, because there will not be any water flowing downward through the backing. All water will flow up from the very bottom of the backing because of the chamois wrapping underneath the acrylic back plate.


I'll build a prototype of this piece and get some pictures of it as soon as I can.


#193 Offline dspdrew - Posted June 17 2015 - 1:17 PM

dspdrew
  • LocationSanta Ana, CA
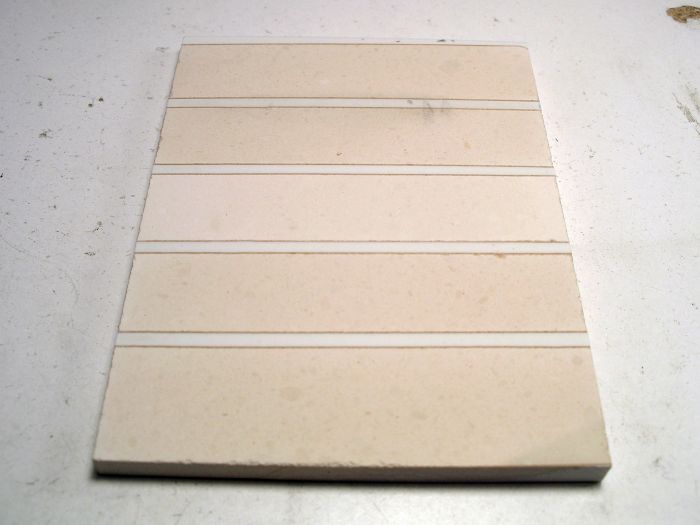
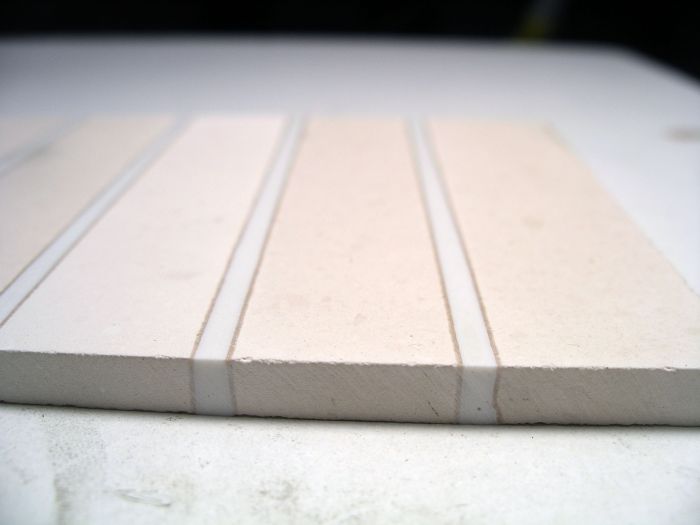
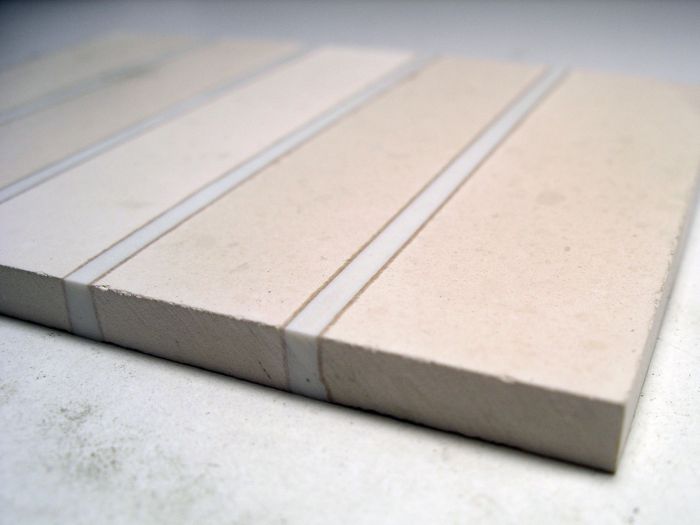
Here's a sample of what I explained in the previous post. Since the exact process I had in mind isn't really going to be doable, I changed this to just strips of tile for each level of chambers instead of an array. Varying levels of moisture up and down is really what's most important anyway.
 
I basically just cut the tile into strips the exact size of the back of each level of chambers, and stuck them down to a surface temporarily, spaced exactly 2 mm from each other. Two millimeters is probably a large enough distance to ensure that no moisture will jump the gap and hydrate a tile that I don't intend to hydrate. It's also small enough to stay hidden behind the walls of the chambers. I built a fence around the whole thing and poured resin in between all the gaps.
 
Once the resin cured, I had one solid piece again. After cutting and sanding it down to size, this is what I ended up with. This thing feels very strong. The resin apparently bonds very well to unglazed ceramics.
 
med_gallery_2_131_200046.jpg
 
med_gallery_2_131_342471.jpg
 
med_gallery_2_131_404141.jpg

#194 Offline BrittonLS - Posted June 29 2015 - 5:59 AM

BrittonLS

    Advanced Member

  • Members
  • PipPipPip
  • 284 posts
  • LocationFt. Worth, Texas
I think this is still my favorite best design of yours. Also if you still need help making a computer model, I consider myself pretty handy with CAD.

#195 Offline dspdrew - Posted June 29 2015 - 8:05 AM

dspdrew
  • LocationSanta Ana, CA

Yeah, the computer model is pretty much my next step. I need to learn a good 3D program myself though.


#196 Offline dspdrew - Posted April 12 2016 - 11:33 PM

dspdrew
  • LocationSanta Ana, CA
Still working on this formicarium. It took me a while, but I finally learned how to use a CAD program.  :P
 
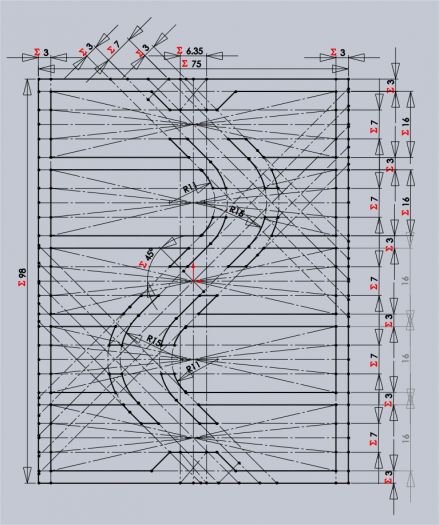
Anyway, I created an intelligent sketch of the nest. This allows me to change the measurements of certain aspects of the nest and automatically have the rest of it adjust to the changes. This should save me a lot of time in the long run.
 
med_gallery_2_131_19689.jpg
 
 
Intelligent sketch in action


#197 Offline drtrmiller - Posted April 12 2016 - 11:40 PM

drtrmiller

    Vendor

  • Members
  • PipPipPip
  • 2,714 posts

Still working on this formicarium. It took me a while, but I finally learned how to use a CAD program.  :P


Kids...they grow up so quick.  I'm proud of you, son  :*(


  • dspdrew, ctantkeeper, LC3 and 1 other like this


byFormica® is the manufacturer of the iconic nectar feeders and Sunburst Ant Nectar.
byFormica ant products always deliver consistent performance, convenience,
and reliability, making them among the most beloved ant foods and kit enjoyed by
ant keeping enthusiasts worldwide. For more information, visit www.byFormica.com.

#198 Offline dspdrew - Posted April 13 2016 - 6:29 AM

dspdrew
  • LocationSanta Ana, CA

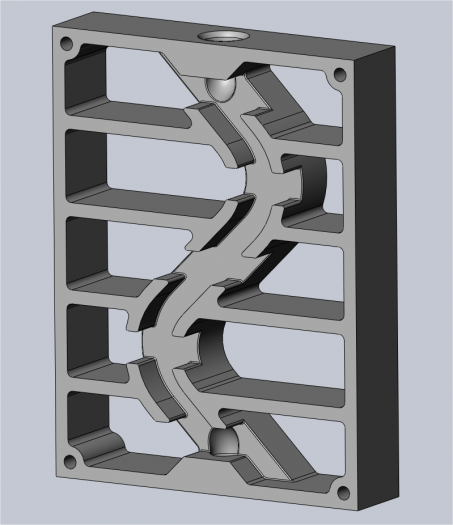
I also added some curve to the tunnel, as you can see. I'll see how that looks once modeled and then decide if I want to go with that, or just keep it angled. I might even make it both ways, but I doubt it.


#199 Offline dspdrew - Posted April 19 2016 - 9:32 PM

dspdrew
  • LocationSanta Ana, CA
med_gallery_2_131_31768.png

#200 Offline Foogoo - Posted April 20 2016 - 7:19 AM

Foogoo

    Advanced Member

  • Members
  • PipPipPip
  • 1,161 posts
  • LocationLos Angeles, CA

Still working on this formicarium. It took me a while, but I finally learned how to use a CAD program.  :P


Anyway, I created an intelligent sketch of the nest. This allows me to change the measurements of certain aspects of the nest and automatically have the rest of it adjust to the changes. This should save me a lot of time in the long run.


Whoa what program did you use? Looks nice!


  • dspdrew likes this

Camponotus vicinus, Crematogaster 1, Crematogaster 2, Formica francoeuri, *, *, Myrmecocystus testaceus, Novomessor cockerelli, Pheidole hyatti, Pogonomyrmex californicus, Pogonomyrmex rugosus, Solenopsis invicta


Also tagged with one or more of these keywords: formicarium, container, out world, enclosure, how-to, diy, design, dspdrew, nest, tutorial

5 user(s) are reading this topic

0 members, 5 guests, 0 anonymous users