Jump to content

  • Chat
  •  
  •  

Welcome to Formiculture.com!

This is a website for anyone interested in Myrmecology and all aspects of finding, keeping, and studying ants. The site and forum are free to use. Register now to gain access to all of our features. Once registered and logged in, you will be able to create topics, post replies to existing threads, give reputation points to your fellow members, get your own private messenger, post status updates, manage your profile and so much more. If you already have an account, login here - otherwise create an account for free today!

Photo

Sleepy's Builds and DIY

build formicariums diy nest

  • Please log in to reply
23 replies to this topic

#1 Offline SleepyAsianAnter - Posted November 11 2020 - 1:19 AM

SleepyAsianAnter

    Advanced Member

  • Members
  • PipPipPip
  • 388 posts
  • LocationLos Angeles (SoCal)

Hi all!


So I've been making a lot of nests and projects, and I've decided this is as good a place to document them as any. 


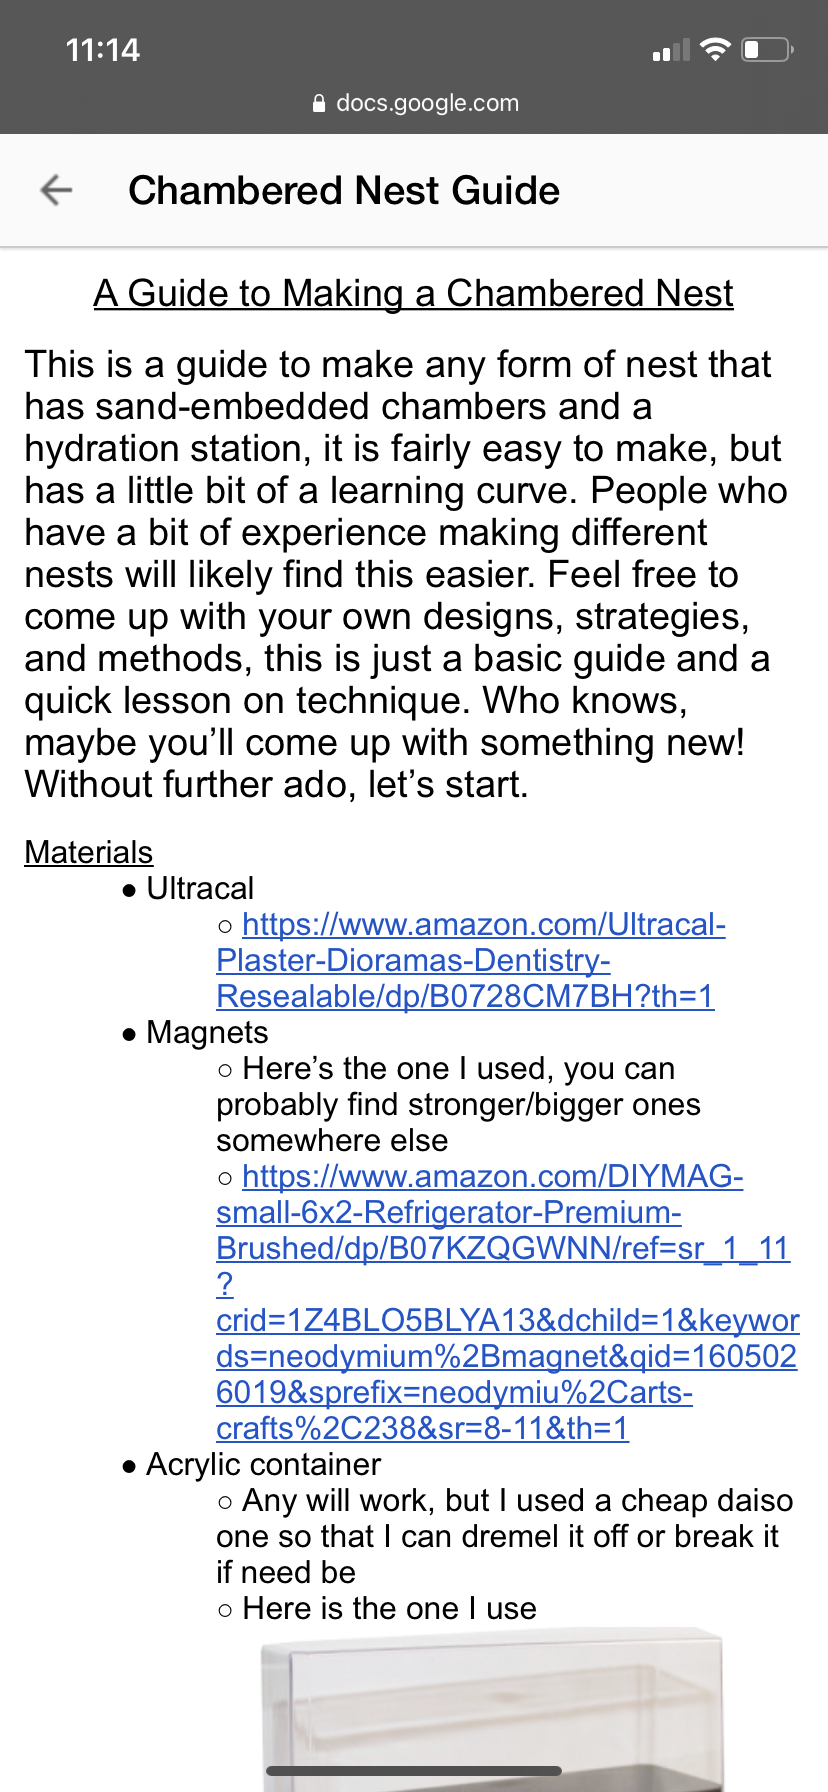
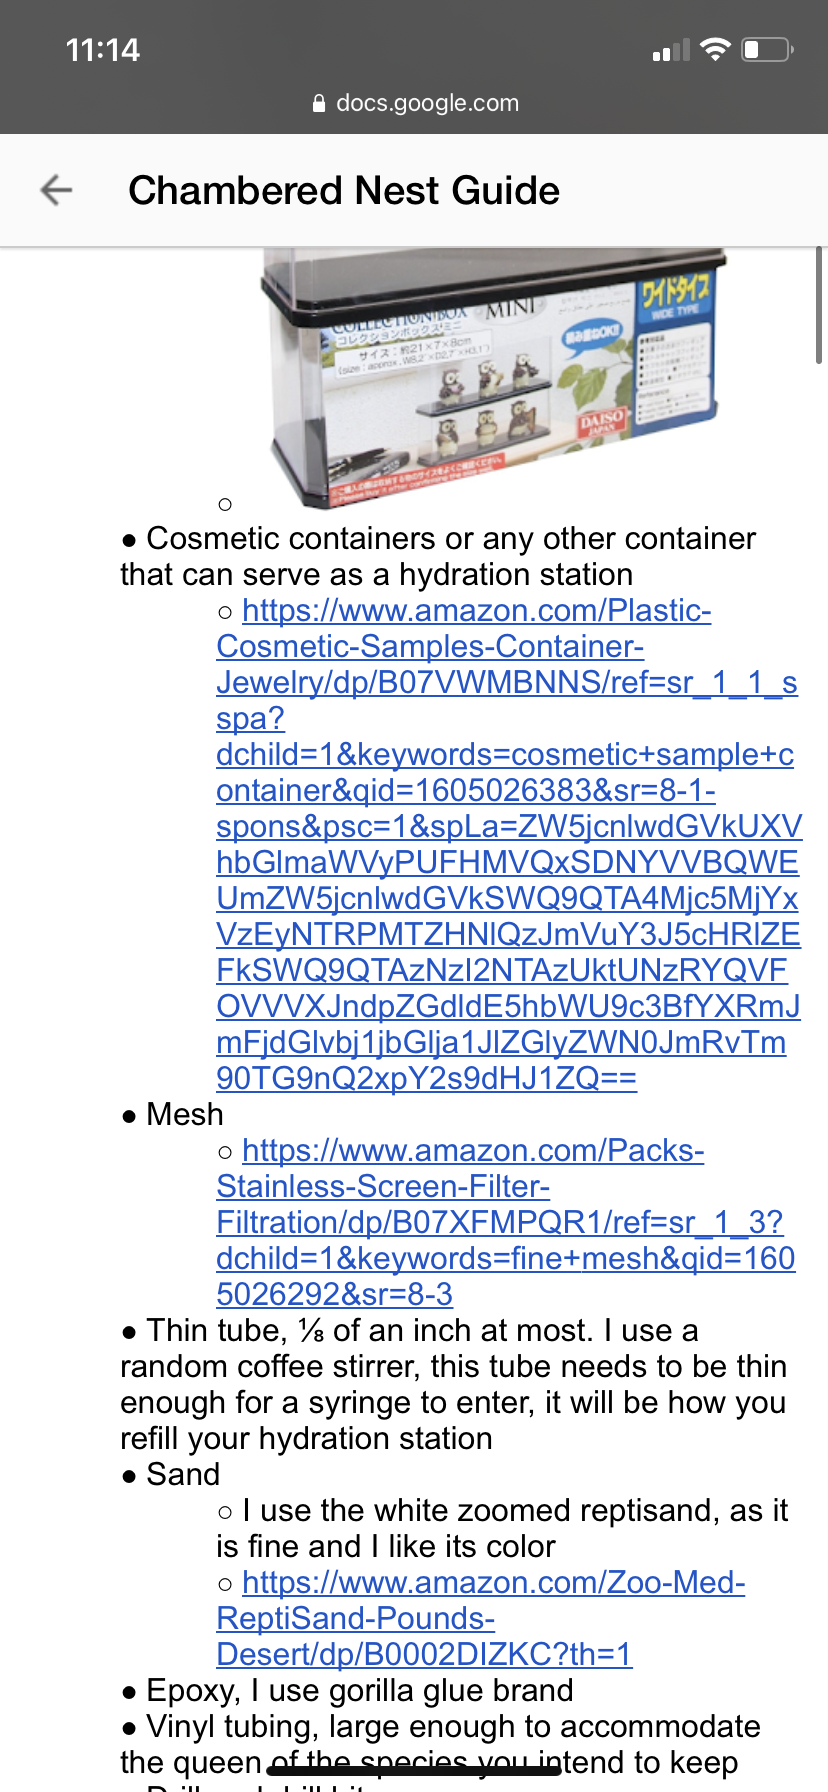
I also have written a guide as to how to make a chambered nest, I would appreciate it if you take a quick look!

https://docs.google....dit?usp=sharing


My first attempt at a nest:


lnFwvNv1qrCc96EDjVTwQoIPp_nK9q29C0FG54tX


My first heating thing, a heating cable ran underneath the sand.

2RdnD8jrufinXXHKOk_1jo16MW4R0SYzNHgir81E


Some nests that I made more recently 


hzLYfTuNB8t-4GFGacC8_yJBHMALsvbkV9n53pI7ecV3XlWmT_wwW1_eZVlCDmzN6lsoEQNk37xXqOLzEl_RhhaKtSa522K7KA6ilT40mKNyvg5XR6GvqhXbTVupTb9tuNO7JzaCcDSJ_LMyXD81pjp98VewTlMK


And a bunch more, I'll update this post whenever I find time to take more pics


Edited by SleepyAsianAnter, November 11 2020 - 8:14 AM.

  • YsTheAnt, ANTdrew, Swirlysnowflake and 4 others like this

#2 Offline steelplant - Posted November 11 2020 - 2:42 AM

steelplant

    Advanced Member

  • Members
  • PipPipPip
  • 146 posts
Love them! What are they made of and how do you hydrate them please?

Edit: am now reading the doc to find out. Really excellent guide thanks 👍

Edited by steelplant, November 11 2020 - 2:59 AM.

  • SleepyAsianAnter likes this

#3 Offline ANTdrew - Posted November 11 2020 - 5:13 AM

ANTdrew

    Advanced Member

  • Moderators
  • PipPipPip
  • 9,972 posts
  • LocationAlexandria, VA

Magisterial!

Melting the mesh onto the water towers is pure genius.


  • M_Ants and SleepyAsianAnter like this
"The ants are a people not strong, yet they prepare their meat in the summer." Prov. 30:25
Keep ordinary ants in extraordinary ways.

#4 Offline KitsAntVa - Posted November 11 2020 - 6:09 AM

KitsAntVa

    Advanced Member

  • Members
  • PipPipPip
  • 1,254 posts
  • LocationRichmond, Virginia
A hearth, a phalanx, a atrium, and then a phalanx that had surgery done to it. I like them all the material looks so natural but so good looking.
  • SleepyAsianAnter likes this
We don’t talk about that

#5 Offline KitsAntVa - Posted November 11 2020 - 6:11 AM

KitsAntVa

    Advanced Member

  • Members
  • PipPipPip
  • 1,254 posts
  • LocationRichmond, Virginia
Why do you have sand underneath those, do they heat up faster that way or get hotter than normal?
We don’t talk about that

#6 Offline SleepyAsianAnter - Posted November 11 2020 - 8:14 AM

SleepyAsianAnter

    Advanced Member

  • Members
  • PipPipPip
  • 388 posts
  • LocationLos Angeles (SoCal)

Why do you have sand underneath those, do they heat up faster that way or get hotter than normal?

It was my first heating setup, the idea was that the sand would conduct the heat evenly and then that heat would warm up the entrance of the tube. Wayyy more complicated than it should've been


#7 Offline KitsAntVa - Posted November 11 2020 - 8:29 AM

KitsAntVa

    Advanced Member

  • Members
  • PipPipPip
  • 1,254 posts
  • LocationRichmond, Virginia
That’s what I was thinking since sand and other materials of duct heat more easily than others such as metal, slate sand or rock. If you want to heat the sand more so it works better get a heat light since that will mimic the sun which makes sand at beaches hot.
  • SleepyAsianAnter likes this
We don’t talk about that

#8 Offline cocdeshijie - Posted November 11 2020 - 9:12 AM

cocdeshijie

    Advanced Member

  • Members
  • PipPipPip
  • 545 posts
  • LocationCalifornia/Ohio

Awesome guide (y)


  • SleepyAsianAnter likes this

誰でも大好き!well.....except a few


cocdeshijie’s Formicarium Guides: https://cocdeshijie....cfe2df393b517f7

Ants API: https://ants-api.qwq.xyz/


#9 Offline FSTP - Posted November 11 2020 - 9:49 AM

FSTP

    Advanced Member

  • Members
  • PipPipPip
  • 1,032 posts
  • Location36.7378° N, 119.7871° W

Looks really great! 


#10 Offline Guest_StrickyAnts_* - Posted November 11 2020 - 2:23 PM

Guest_StrickyAnts_*
  • Guests

very good guide  :D


#11 Offline ANTdrew - Posted November 11 2020 - 2:59 PM

ANTdrew

    Advanced Member

  • Moderators
  • PipPipPip
  • 9,972 posts
  • LocationAlexandria, VA
A good source for the straws leading to the water tower is from the ink straw in a cheap ball point pen. These are sturdier than coffee straws.
"The ants are a people not strong, yet they prepare their meat in the summer." Prov. 30:25
Keep ordinary ants in extraordinary ways.

#12 Offline Ants_Dakota - Posted November 12 2020 - 7:59 AM

Ants_Dakota

    Advanced Member

  • Members
  • PipPipPip
  • 2,391 posts
  • LocationSioux Falls, South Dakota

i cannot access the google doc. and i REALLY want to read it. can someone correct that please!!!


Go to the ant, you sluggard; consider its ways and be wise! It has no commander, no overseer or ruler, yet it stores its provisions in summer and gathers its food at harvest. -Proverbs 6: 6-8

My Nationwide Ant Shop Here I have PPQ-526 permits to ship ants nationwide

Attention Ant-Keepers in South Dakota! Join the SoDak(Society Of Dakotan Ant Keepers)

My Formica sp. Journal

My Lasius sp. Journal

My Micro Ants Journal

My Pogonomyrmex occidentalis Journal


#13 Offline KitsAntVa - Posted November 12 2020 - 7:59 AM

KitsAntVa

    Advanced Member

  • Members
  • PipPipPip
  • 1,254 posts
  • LocationRichmond, Virginia
Try using your phone.
We don’t talk about that

#14 Offline Ants_Dakota - Posted November 12 2020 - 8:01 AM

Ants_Dakota

    Advanced Member

  • Members
  • PipPipPip
  • 2,391 posts
  • LocationSioux Falls, South Dakota

Try using your phone.

i don't have one.


Go to the ant, you sluggard; consider its ways and be wise! It has no commander, no overseer or ruler, yet it stores its provisions in summer and gathers its food at harvest. -Proverbs 6: 6-8

My Nationwide Ant Shop Here I have PPQ-526 permits to ship ants nationwide

Attention Ant-Keepers in South Dakota! Join the SoDak(Society Of Dakotan Ant Keepers)

My Formica sp. Journal

My Lasius sp. Journal

My Micro Ants Journal

My Pogonomyrmex occidentalis Journal


#15 Offline KitsAntVa - Posted November 12 2020 - 8:04 AM

KitsAntVa

    Advanced Member

  • Members
  • PipPipPip
  • 1,254 posts
  • LocationRichmond, Virginia

Try using your phone.

i don't have one.
When you click on it does it say you don’t own it or what? If so reload the page or try again when you aren’t logged into a google account, or maybe that’s the problem you aren’t logged in.
  • Ants_Dakota likes this
We don’t talk about that

#16 Offline Ants_Dakota - Posted November 12 2020 - 8:06 AM

Ants_Dakota

    Advanced Member

  • Members
  • PipPipPip
  • 2,391 posts
  • LocationSioux Falls, South Dakota


Try using your phone.

i don't have one.
When you click on it does it say you don’t own it or what? If so reload the page or try again when you aren’t logged into a google account, or maybe that’s the problem you aren’t logged in.


it says i need to ask for access. 


Go to the ant, you sluggard; consider its ways and be wise! It has no commander, no overseer or ruler, yet it stores its provisions in summer and gathers its food at harvest. -Proverbs 6: 6-8

My Nationwide Ant Shop Here I have PPQ-526 permits to ship ants nationwide

Attention Ant-Keepers in South Dakota! Join the SoDak(Society Of Dakotan Ant Keepers)

My Formica sp. Journal

My Lasius sp. Journal

My Micro Ants Journal

My Pogonomyrmex occidentalis Journal


#17 Offline KitsAntVa - Posted November 12 2020 - 8:13 AM

KitsAntVa

    Advanced Member

  • Members
  • PipPipPip
  • 1,254 posts
  • LocationRichmond, Virginia
Oof try logging out of your google account that seems to always be the problem for me.
We don’t talk about that

#18 Offline KitsAntVa - Posted November 12 2020 - 8:18 AM

KitsAntVa

    Advanced Member

  • Members
  • PipPipPip
  • 1,254 posts
  • LocationRichmond, Virginia
7101613C-459E-4746-B997-232F09FEF6F5.png 0EF885CD-0BCA-4835-AF4D-FF8EF34F5A25.png BF9211C6-9BDF-417D-A5A9-BB25E6995924.png 10D3247A-3742-488F-B8C4-232E06596D58.png 5F5A3400-331E-4C42-A96A-755D9FE0DA8F.png B84C9AC2-5488-46D6-992D-AC7BE3242096.png 09BDAEDB-4750-4E36-8F39-692B2B1F4DC1.png 267EA857-998B-4A2A-9920-1B17780EB32A.png 4DC08013-AC2C-4DCF-9338-B14127540CC5.png
Hopefully that helps.
  • OhNoNotAgain, Ants_Dakota and KadinB like this
We don’t talk about that

#19 Offline Ants_Dakota - Posted November 12 2020 - 8:23 AM

Ants_Dakota

    Advanced Member

  • Members
  • PipPipPip
  • 2,391 posts
  • LocationSioux Falls, South Dakota

thanks so much!


  • KitsAntVa likes this

Go to the ant, you sluggard; consider its ways and be wise! It has no commander, no overseer or ruler, yet it stores its provisions in summer and gathers its food at harvest. -Proverbs 6: 6-8

My Nationwide Ant Shop Here I have PPQ-526 permits to ship ants nationwide

Attention Ant-Keepers in South Dakota! Join the SoDak(Society Of Dakotan Ant Keepers)

My Formica sp. Journal

My Lasius sp. Journal

My Micro Ants Journal

My Pogonomyrmex occidentalis Journal


#20 Offline AleeGuy - Posted November 12 2020 - 9:56 AM

AleeGuy

    Advanced Member

  • Members
  • PipPipPip
  • 383 posts
  • LocationNorthern Virginia

thanks so much!

A Guide to Making a Chambered Nest


This is a guide to make any form of nest that has sand-embedded chambers and a hydration station, it is fairly easy to make, but has a little bit of a learning curve. People who have a bit of experience making different nests will likely find this easier. Feel free to come up with your own designs, strategies, and methods, this is just a basic guide and a quick lesson on technique. Who knows, maybe you’ll come up with something new! Without further ado, let’s start.


Materials


  1. hydration stations

    1. hydration stations are a must-have in a lot of nests, they are easy to make and provide the ants a good spot to place their brood. Through evaporation, the brood will receive moisture by being placed on top of the mesh.


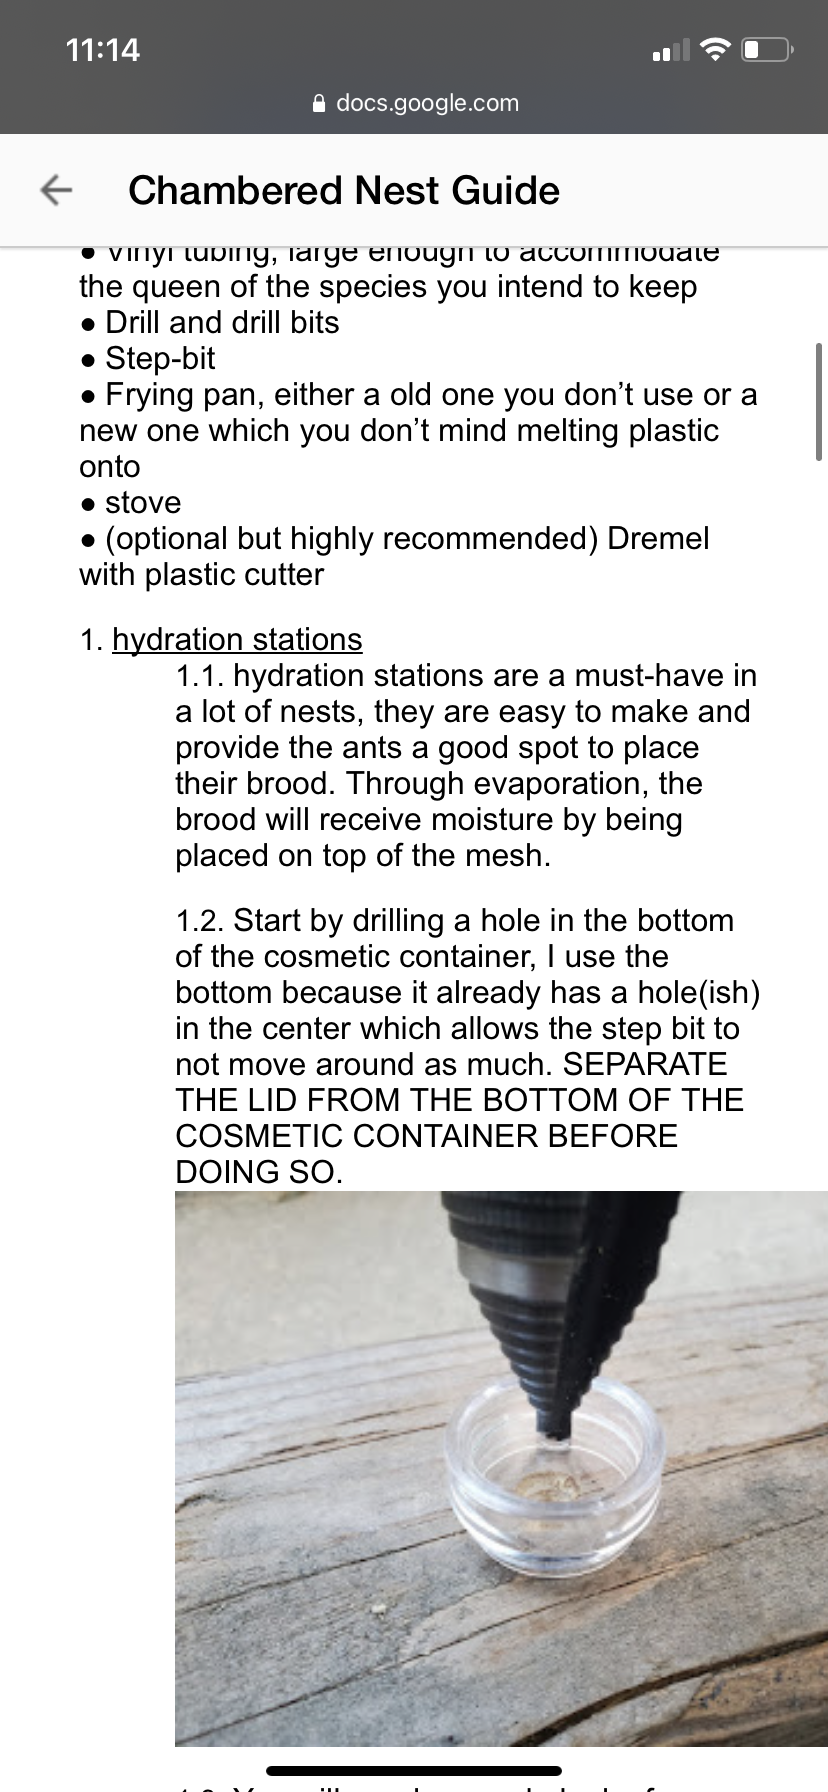
  1. Start by drilling a hole in the bottom of the cosmetic container, I use the bottom because it already has a hole(ish) in the center which allows the step bit to not move around as much. SEPARATE THE LID FROM THE BOTTOM OF THE COSMETIC CONTAINER BEFORE DOING SO. aoYEJgPOMlRRmV6tdSLliKkPrqCmCYisho0WNjwn


    1. You will need a wood plank of some sort, because most step bits will exceed the height of the container, and you don’t want to drill your table or floor. Make the hole as big as possible without damaging the walls of the container


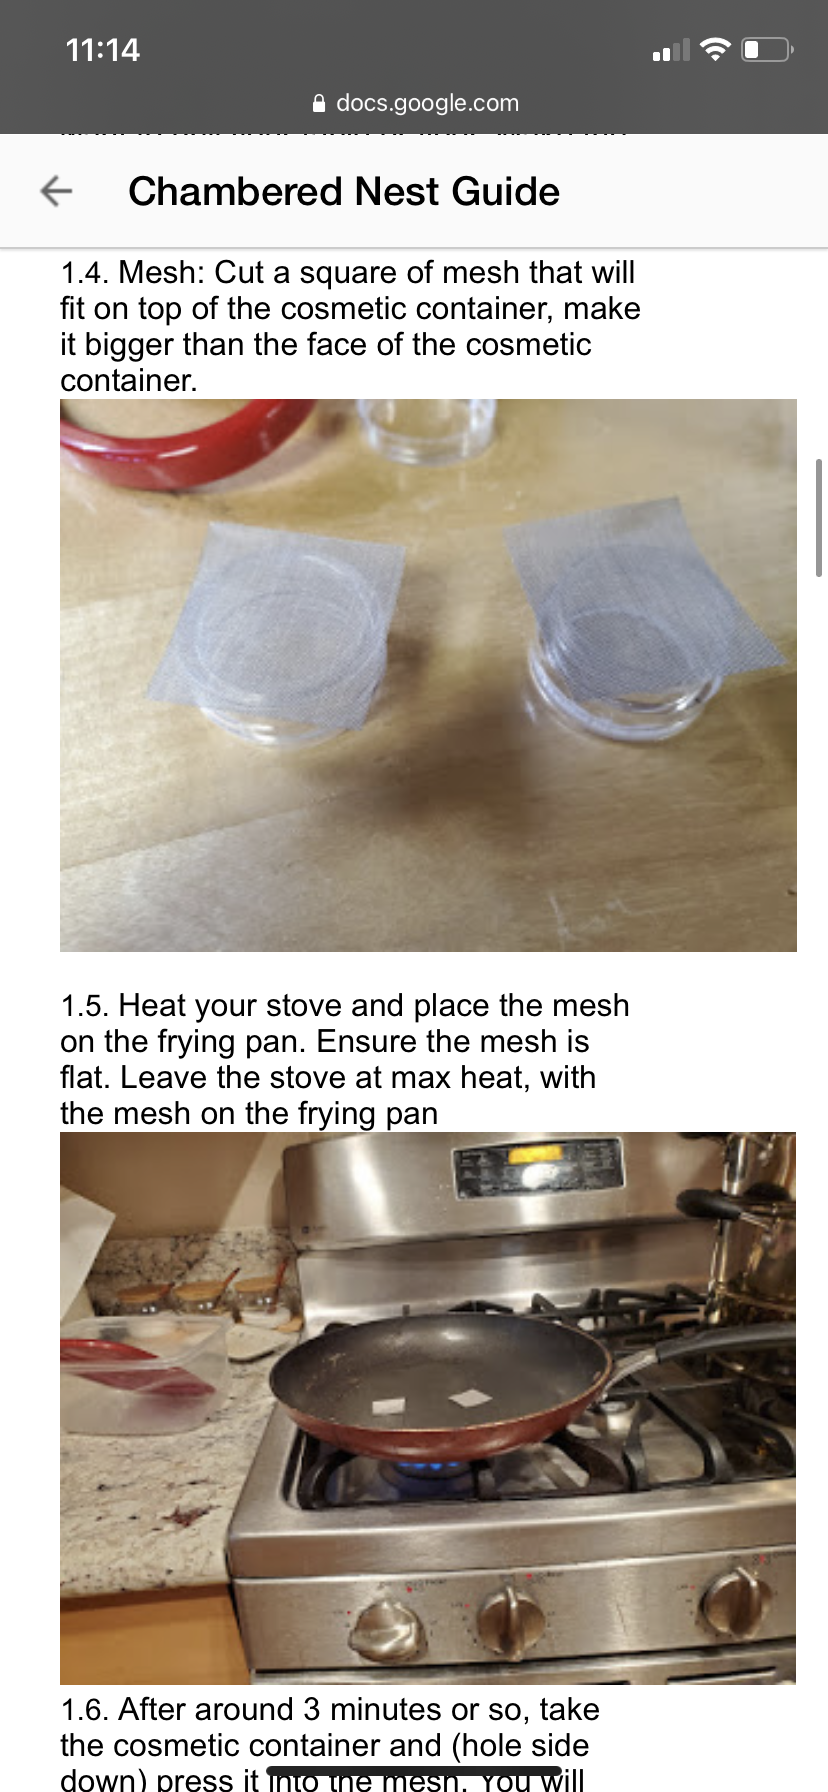
    1. Mesh: Cut a square of mesh that will fit on top of the cosmetic container, make it bigger than the face of the cosmetic container. gaF6mlGYhOEgd4FuRr7SsMcmIjR4F20NthBIMX9x


    1. Heat your stove and place the mesh on the frying pan. Ensure the mesh is flat. Leave the stove at max heat, with the mesh on the frying pan 

CYPUKRVyjYMsdPpgnYEkJnSKHTOBgO5MEQZ2Elua

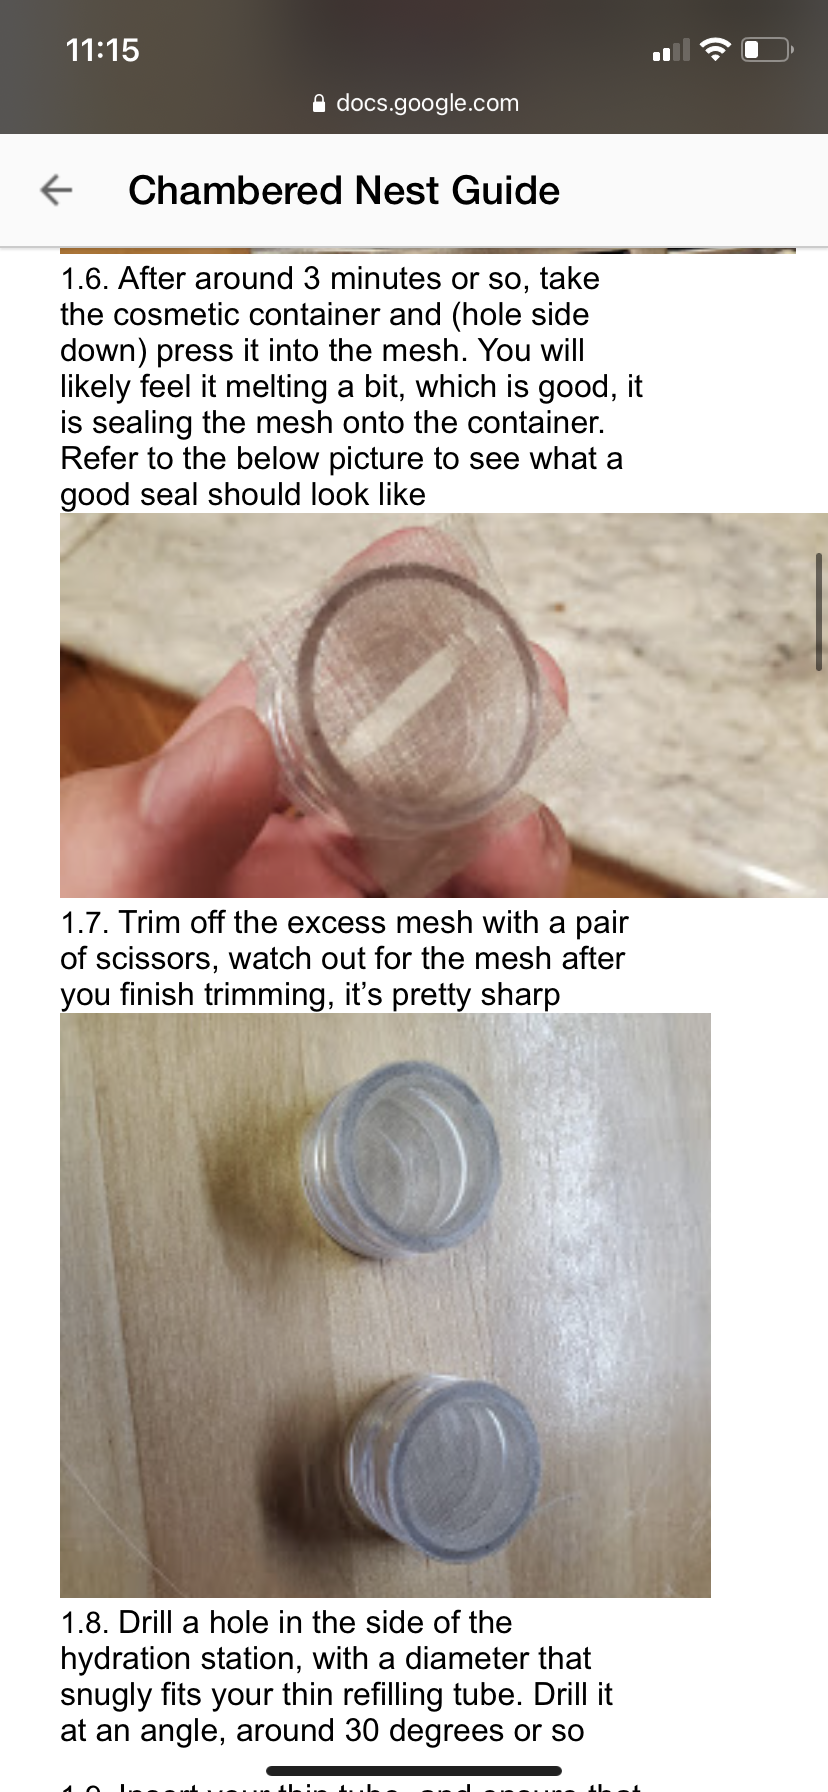
    1. After around 3 minutes or so, take the cosmetic container and (hole side down) press it into the mesh. You will likely feel it melting a bit, which is good, it is sealing the mesh onto the container. Refer to the below picture to see what a good seal should look like

7CNTSzSVgbFEidEYtpOk3gOT7KbAE3dtq3cRfmnc

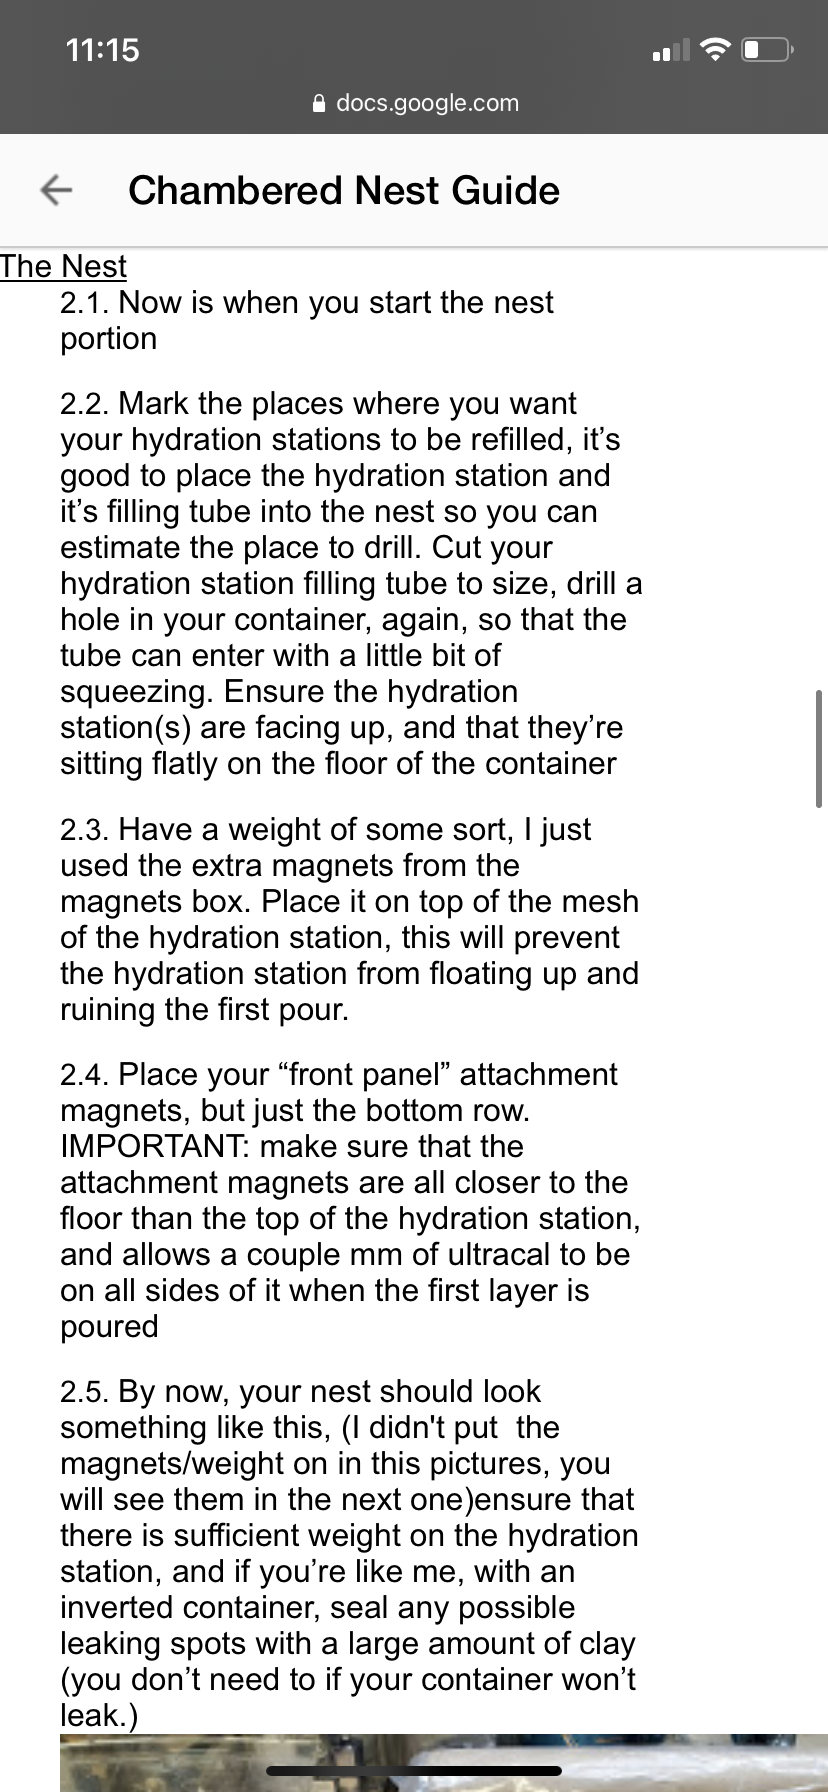
    1. Trim off the excess mesh with a pair of scissors, watch out for the mesh after you finish trimming, it’s pretty sharp

BXnUVMeMaLb5t7Xh0HHkJ-cLJsh9E-UAmGKEusuu

    1. Drill a hole in the side of the hydration station, with a diameter that snugly fits your thin refilling tube. Drill it at an angle, around 30 degrees or so


    1. Insert your thin tube, and ensure that water can pass through the inside of the tube, but not the outside. It should be hard to insert, so that the tube seals the hole by itself. The tube should be about half a centimeter within the hydration station.


    1. You can also put some sealant around it, but I have never done so, therefore I can’t give a recommendation. That’s something for you guys to try! Stay away from poisonous things, aquarium safe silicone would probably be your best bet.


  1. The Nest

    1. Now is when you start the nest portion


    1. Mark the places where you want your hydration stations to be refilled, it’s good to place the hydration station and it’s filling tube into the nest so you can estimate the place to drill. Cut your hydration station filling tube to size, drill a hole in your container, again, so that the tube can enter with a little bit of squeezing. Ensure the hydration station(s) are facing up, and that they’re sitting flatly on the floor of the container


  1. Have a weight of some sort, I just used the extra magnets from the magnets box. Place it on top of the mesh of the hydration station, this will prevent the hydration station from floating up and ruining the first pour.


    1. Place your “front panel” attachment magnets, but just the bottom row. IMPORTANT: make sure that the attachment magnets are all closer to the floor than the top of the hydration station, and allows a couple mm of ultracal to be on all sides of it when the first layer is poured


    1. By now, your nest should look something like this, (I didn't put  the magnets/weight on in this pictures, you will see them in the next one)ensure that there is sufficient weight on the hydration station, and if you’re like me, with an inverted container, seal any possible leaking spots with a large amount of clay (you don’t need to if your container won’t leak.)

ZFXmN5U0Xel7dzunnaWZD-uz5Kael1STvbvMuO6J

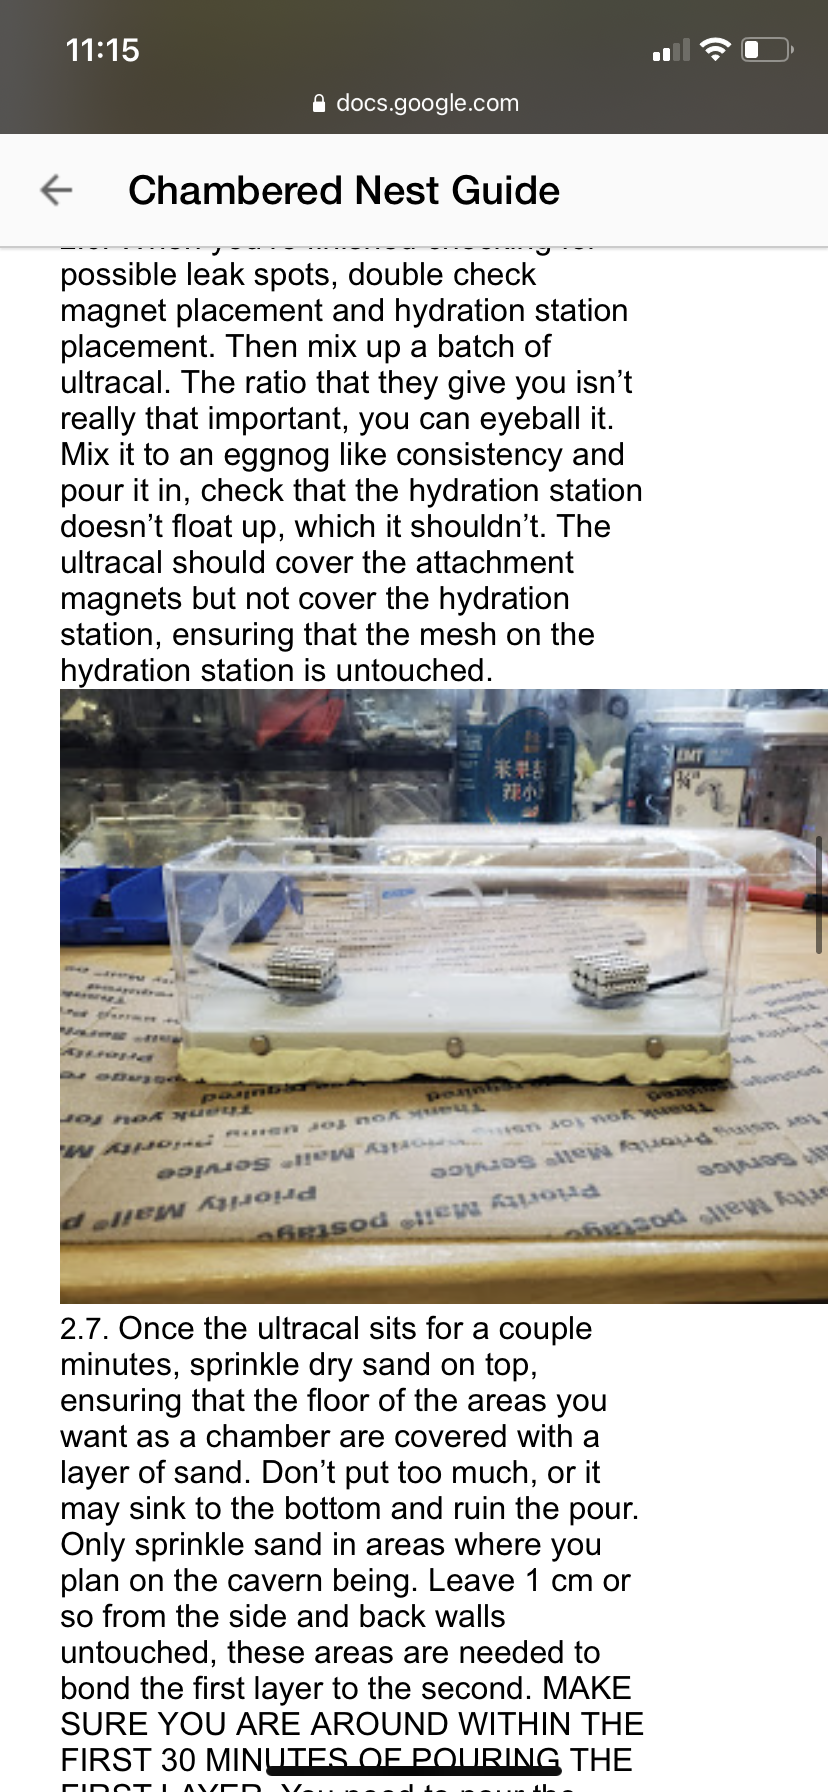
    1. When you’re finished checking for possible leak spots, double check magnet placement and hydration station placement. Then mix up a batch of ultracal. The ratio that they give you isn’t really that important, you can eyeball it. Mix it to an eggnog like consistency and pour it in, check that the hydration station doesn’t float up, which it shouldn’t. The ultracal should cover the attachment magnets but not cover the hydration station, ensuring that the mesh on the hydration station is untouched.

tFnqhKGH4unCf1X4mGkT1-8Y1i4QZDGADTlG7V-7

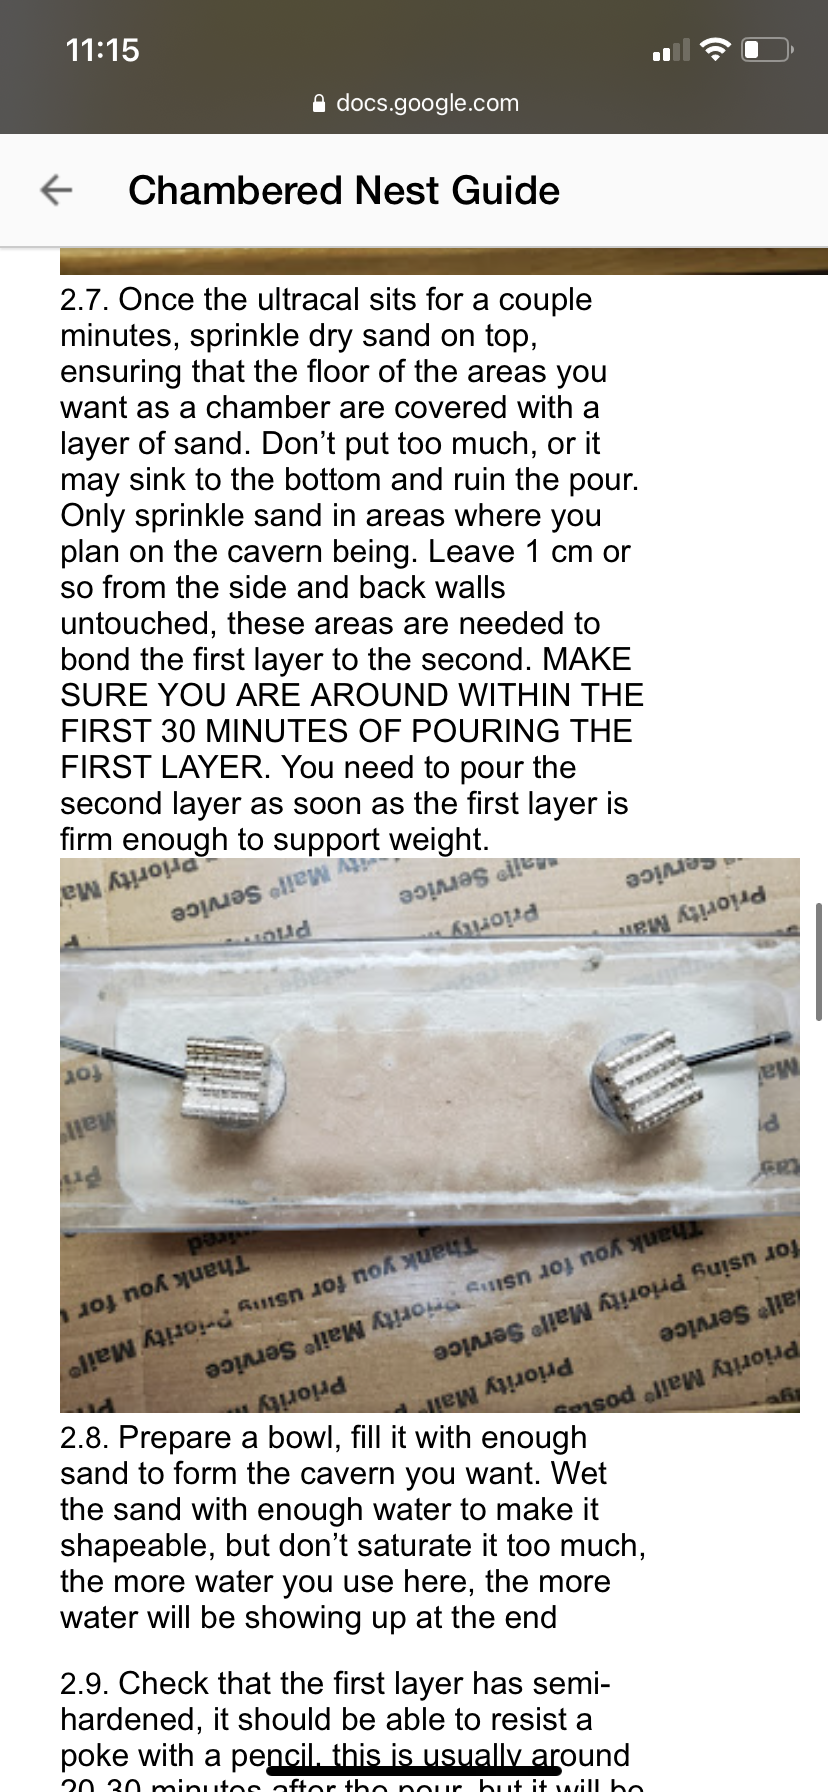
    1. Once the ultracal sits for a couple minutes, sprinkle dry sand on top, ensuring that the floor of the areas you want as a chamber are covered with a layer of sand. Don’t put too much, or it may sink to the bottom and ruin the pour. Only sprinkle sand in areas where you plan on the cavern being. Leave 1 cm or so from the side and back walls untouched, these areas are needed to bond the first layer to the second. MAKE SURE YOU ARE AROUND WITHIN THE FIRST 30 MINUTES OF POURING THE FIRST LAYER. You need to pour the second layer as soon as the first layer is firm enough to support weight.

94OrSFuHOC6BnIvUDKvdMgweP9HFjROwjsq5RxF9

    1. Prepare a bowl, fill it with enough sand to form the cavern you want. Wet the sand with enough water to make it shapeable, but don’t saturate it too much, the more water you use here, the more water will be showing up at the end


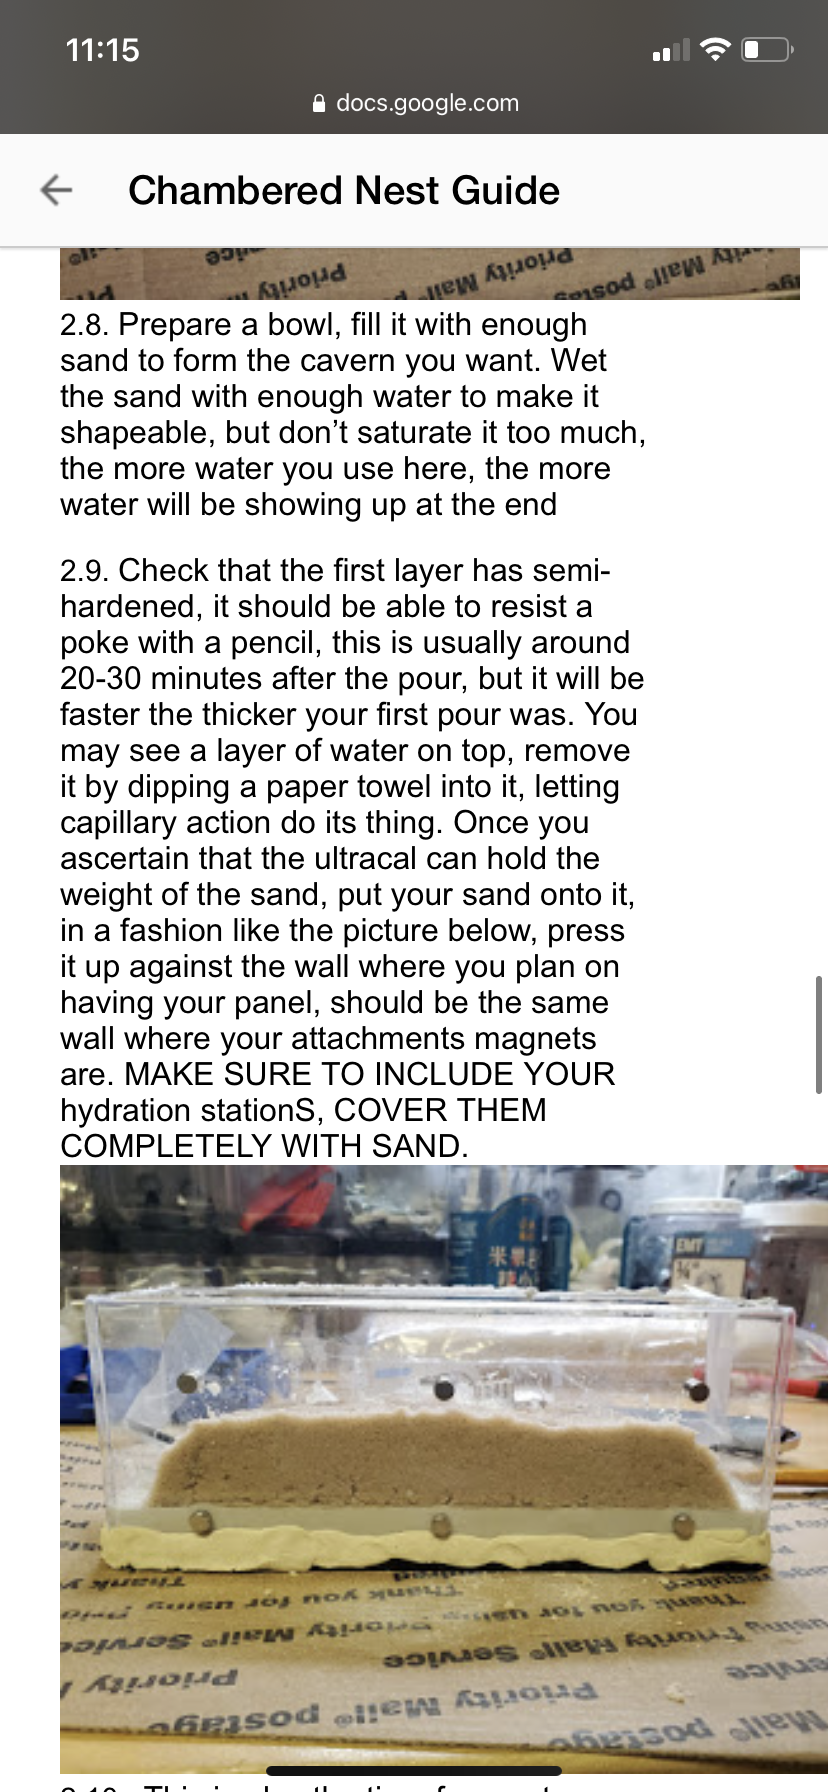
    1. Check that the first layer has semi-hardened, it should be able to resist a poke with a pencil, this is usually around 20-30 minutes after the pour, but it will be faster the thicker your first pour was. You may see a layer of water on top, remove it by dipping a paper towel into it, letting capillary action do its thing. Once you ascertain that the ultracal can hold the weight of the sand, put your sand onto it, in a fashion like the picture below, press it up against the wall where you plan on having your panel, should be the same wall where your attachments magnets are. MAKE SURE TO INCLUDE YOUR hydration stationS, COVER THEM COMPLETELY WITH SAND.

R2dVIE1aGbTt_y8DeDVPsHnqIah_DjvaeCFPbSMR

    1.  This is also the time for you to make stalactite holes, use a pencil or some other object to poke holes into the sand, don’t make them too deep. Avoid putting stalactites above the hydration stations

OkJJGepEmOURjclEsaIvFLFAHkVghA747WYfI0zg

    1. Place your second layer of attachment magnets a few mm above the sand chamber. 

tEJkpC0GOs_QPYVRQYhbw7uhcVDgVf58b7sVVwcL

    1. Prepare another batch of ultracal, you will likely need to do multiple pours, don’t worry about ratio, as long as they’re still liquid different batches can mix together. Pour on the side, not on the sand, as pouring on the sand will reshape it. Let it rise up and then fill in the stalactite holes and cover the tops of the attachment magnets. A more liquidish consistency would be better, so that the stalactites will be filled in. Pour so that the ultracal level is slightly taller than how tall you want it to be, as the ultracal precipitates, the excess water will rise to the top, so you may need to pour more just to make sure the attachment magnets are covered.

YweWo-J0bzf0S5rHNS8vdVn67pAVKp0hlpHQeoAz

    1. Let it cure for a couple hours, checking in to make sure the top attachment magnets are still covered with ultracal. If the ultracal is still liquid, and the magnets aren’t covered, pour some more, if it’s solid, then you can still try pouring more, but it may not bond.


    1. Once it’s dried, either smash it a couple times to remove it or just do what I did and use a dremel plastic cutter to cut the container open.


    1. Remove as much sand as you can for reuse, and then rinse out the rest

gJqm4Hv7swcbNaKHMxevIqjdksJ4PAC8PLuROhl9

  1. Finishing Touches and Outworld

    1. Prepare your outworld container, pour a thin layer of ultracal, no more than 1 cm tall, make this mixture a slightly thicker consistency than eggnog. Wait a couple minutes and sprinkle sand.xJo1G5Ce31-9Jw_DDCT7ixJmS-SWS60KckI5fro4dlYcuvdS6kI7p_KrbBLYaACojXPDO_isBvu9At5O


    1. Choose the spot where you want your entrance to be, make sure that the hole isn’t directly above the hydration station, as that would negate the purpose of the hydration station. Use a drill bit to drill a hole in the spot you chose, ensure that the vinyl tubing is a tight fit.

lVwX7vUroKMuvnEcZgADhm5eXJAm0Yn_I9adcAv2


    1. Place the outworld onto the nest, then drill a hole that matches with the outworld. Your vinyl tube should be able to pass through the two holes with some resistance. 


  1. Prepare your epoxy, cut your vinyl tubing to the length you desire, I prefer to cut it so that I can see 1-2 mm of the tubing poking out of the holes on both sides. Epoxy the outside of the tubing for the first half, and push it through the bottom of the outworld so that the epoxy will create a seal around the hole. Push until your preferred/marked position.


    1. Liberally apply epoxy to the bottom of your outworld container and the rest of the outside of the vinyl tube, guide the tube into the hole first, and (while ensuring the tube won't shift upwards, by pressing down on the other side) push the rest of the vinyl tube into the hole. Press all the way down until the outworld bottom is flat against the top of the nest, rearrange however you want. Wipe off excess epoxy.


    1. Last step, cut an acrylic or glass screen for your nest, I just use another container that is identical to the one that the nest was molded in, and cut off a wall. Make sure it fits, and is sanded down a bit on all sides. Place it against the face of the nest, and dab a tiny drop of epoxy on top of the spot where a magnet is, take its matching magnet and put it onto the epoxy, repeat this until all the magnets are paired. After a bit, remove the acrylic/glass panel and check that the magnets are still epoxied oniO7-iKBPurCk5AcbYCuKia_2oKUndBLFFX6i1w7B


  1. Congratulations, you are finished!

With the layering method that I used on this particular nest, there are many other nest designs you can contemplate and attempt. If you have time, try out new designs! Here are a couple of mine that I made. 

P0k0PQDf-cu7LUck_XkxoUOd8YPBsW3yyIPusJijQ7lpAT95JtMuYEtIyUCbOgglICQ7DgFSFC1OPQWc

t1IFWjLXVytzxQqnKQYxHDHIxHEKfaxlxaoNSf2j


If you got this far, thanks for reading!


  • Ants_Dakota and Locness like this


Also tagged with one or more of these keywords: build, formicariums, diy, nest

1 user(s) are reading this topic

0 members, 1 guests, 0 anonymous users