Jump to content

  • Chat
  •  
  •  

Welcome to Formiculture.com!

This is a website for anyone interested in Myrmecology and all aspects of finding, keeping, and studying ants. The site and forum are free to use. Register now to gain access to all of our features. Once registered and logged in, you will be able to create topics, post replies to existing threads, give reputation points to your fellow members, get your own private messenger, post status updates, manage your profile and so much more. If you already have an account, login here - otherwise create an account for free today!

Photo

Closed by owner.


  • Please log in to reply
2 replies to this topic

#1 Offline KitsAntVa - Posted October 27 2020 - 4:47 AM

KitsAntVa

    Advanced Member

  • Members
  • PipPipPip
  • 1,254 posts
  • LocationRichmond, Virginia
Personally I find building things to be a pain but still fun. I am making a nest looking kinda like this http://http://images (24).jpeg
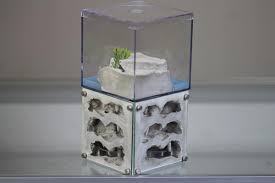
First this is what i bought to make it https://www.hobbylob...ll-Case/p/98588I don't reccomend these since they open sideways kinda disconnection wierdly, I made this mistake when buying them but i quickly realized a amazing idea! These things are easily disconnectable and are easy to use, FIrst I used grout (I used brownish grout) but you can use any type color or make, Leave it so sit at least 2-3 days before starting the other part, I dumped sand https://www.hobbylob...ng-Sand/p/98178 into the bottom of the nest that is covered on the sides where it disconnected with clay. pour your sand (optional) as soon as you put in the grout so it can take shape. I poured enough sand to make it tan. I carve out my firebrick accordingly to whichever nest shape you want it, which for me is the first picture. I carved the firebrick and done i made sure it fit perfectly in the nest so when i sell it the buyer can disconnect the outworld and nest easily and be able to clean it. I carved a rectangle whole down the nest with a little square on each floor connecting to that rectangle, I drilled the holes to connect to the out and watering system, next I placed in a long stripe of sponge that was super big so I wouldn't have cracks where the ants could escape. You could think of the sponge using capillary action and soaking up drinking water. I made the outworld to how i wanted it and done.
Extra steps. On each layer you can take epoxy and add sand to make stalactites hanging things from the ceiling of the nest and each layer, add decoration to you outworld to how you want it.


I will be selling this soon actually because all went well. I think I may sell for 50 because its almost the size of a casita but a little smaller. Currently I'm testing this on a tapinoma colony results will be shown soon.

Edited by KitsAntVa, October 27 2020 - 2:53 PM.

  • Ants_Dakota likes this
We don’t talk about that

#2 Offline Devi - Posted October 27 2020 - 7:29 AM

Devi

    Advanced Member

  • Members
  • PipPipPip
  • 602 posts
  • LocationDenver, Colorado

Interesting!  I would love to see an update and pictures if you can at some point soon!


#3 Offline Ants_Dakota - Posted October 27 2020 - 7:36 AM

Ants_Dakota

    Advanced Member

  • Members
  • PipPipPip
  • 2,388 posts
  • LocationSioux Falls, South Dakota

Personally I find building things to be a pain but still fun. I am making a nest looking kinda like this attachicon.gifimages (24).jpeg

First this is what i bought to make it https://www.hobbylob...ll-Case/p/98588I don't reccomend these since they open sideways kinda disconnection wierdly, I made this mistake when buying them but i quickly realized a amazing idea! These things are easily disconnectable and are easy to use, FIrst I used grout (I used brownish grout) but you can use any type color or make, Leave it so sit at least 2-3 days before starting the other part, I dumped sand https://www.hobbylobby.com/Crafts-Hobbies/Hobbies-Collecting/Diorama-Figurines/Landscaping-Sand/p/98178 into the bottom of the nest that is covered on the sides where it disconnected with clay. pour your sand (optional) as soon as you put in the grout so it can take shape. I poured enough sand to make it tan. I carve out my firebrick accordingly to whichever nest shape you want it, which for me is the first picture. I carved the firebrick and done i made sure it fit perfectly in the nest so when i sell it the buyer can disconnect the outworld and nest easily and be able to clean it. I carved a rectangle whole down the nest with a little square on each floor connecting to that rectangle, I drilled the holes to connect to the out and watering system, next I placed in a long stripe of sponge that was super big so I wouldn't have cracks where the ants could escape. You could think of the sponge using capillary action and soaking up drinking water. I made the outworld to how i wanted it and done.

Extra steps. On each layer you can take epoxy and add sand to make stalactites hanging things from the ceiling of the nest and each layer, add decoration to you outworld to how you want it. 


I will be selling this soon actually because all went well. I think I may sell for 50 because its almost the size of a casita but a little smaller. Currently I'm testing this on a tapinoma colony results will be shown soon.

looks great!(or what it sounds it will look like). can't wait to see it in our shop of for sale!


  • Devi likes this

Go to the ant, you sluggard; consider its ways and be wise! It has no commander, no overseer or ruler, yet it stores its provisions in summer and gathers its food at harvest. -Proverbs 6: 6-8

My Nationwide Ant Shop Here I have PPQ-526 permits to ship ants nationwide

Attention Ant-Keepers in South Dakota! Join the SoDak(Society Of Dakotan Ant Keepers)

My Formica sp. Journal

My Lasius sp. Journal

My Micro Ants Journal

My Pogonomyrmex occidentalis Journal


1 user(s) are reading this topic

0 members, 1 guests, 0 anonymous users