Jump to content

  • Chat
  •  
  •  

Welcome to Formiculture.com!

This is a website for anyone interested in Myrmecology and all aspects of finding, keeping, and studying ants. The site and forum are free to use. Register now to gain access to all of our features. Once registered and logged in, you will be able to create topics, post replies to existing threads, give reputation points to your fellow members, get your own private messenger, post status updates, manage your profile and so much more. If you already have an account, login here - otherwise create an account for free today!

Photo

Journey to build a founding nest


  • Please log in to reply
46 replies to this topic

#1 Offline Foogoo - Posted April 22 2015 - 11:19 AM

Foogoo

    Advanced Member

  • Members
  • PipPipPip
  • 1,161 posts
  • LocationLos Angeles, CA

Conclusion (for now) here


Instead of cluttering the formicarium how to thread, I've decided to create a new one to document my trials and tribulations as I try to create my test tube alternative.


My goal is to build a small formicarium, similar to these from Antsnational:

b57c64_3548a3f138c6493fa3230561f29bb345.

but are prohibitively expensive to ship to where I live. Or these made from mystery grout material, which isn't worth $18 IMO:
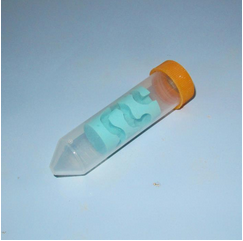
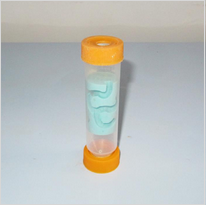
tube1 tube2

The idea is a small nest for founding queens to feel comfortable in where they can start their colony. My experience with test tubes is the queens don't feel comfortable without a ceiling and no substrate and problems with flooding. Similar nests exist but are made with grout or other unknown materials. I want to do it with Hydrostone. The footprint should also be small so they're manageable.


Ideally, I'd do it with clay and a release agent, however, the Hydrostone may be impossible to remove due to expansion. If that's the case no matter what release agent, I may have to use a soluble casting material in place of clay.


These are my ideas I'm going to try, I'll update on what works and what doesn't:


Containers

  • Polystyrene dram vials
  • Retail tubes (Uline)
  • Lcmlabs
  • Dollar store finds
  • Test tubes

Release agents

  • Saran wrap
  • Wax paper
  • Petroleum jelly
  • *Use an external mold

Mandrels

  • Aquacore
  • Water Glass
  • Wax
  • Soluble wax

Madrels don't go with the theme of this project to be easy and cheap, but may be an idea for more advanced formicaria.


Armchair construction is great  :D . Let's see how a weekend in the workshop goes. The Hydrostone I'll be using is the one from ebay others on here have used because I can't find it locally. According to the seller, it's exactly the same.


Edit #1: I've decided to stay on track of this being a direct replacement for test tubes, therefore cheap, small and simple.


Edited by Foogoo, June 14 2015 - 10:59 PM.

Camponotus vicinus, Crematogaster 1, Crematogaster 2, Formica francoeuri, *, *, Myrmecocystus testaceus, Novomessor cockerelli, Pheidole hyatti, Pogonomyrmex californicus, Pogonomyrmex rugosus, Solenopsis invicta


#2 Offline Crystals - Posted April 22 2015 - 11:32 AM

Crystals

    Advanced Member

  • Moderators
  • PipPipPip
  • 2,049 posts
  • LocationAthabasca, AB (Canada)

I posted a link to this on the my photo journey, so people following the conversation will be able to find it easily.


I look forward to seeing how this turns out.


Even if you post your mistakes, it is one less mistake someone else may make.  (Such as using regular river clay with grout, it often causes the grout to crack as it dries, while oiled clay does not do this).


"Always do right. This will gratify some people, and astound the rest." -- Samuel Clemens


List of Handy Links   (pinned in the General section)

My Colonies


#3 Offline Foogoo - Posted April 22 2015 - 12:38 PM

Foogoo

    Advanced Member

  • Members
  • PipPipPip
  • 1,161 posts
  • LocationLos Angeles, CA

I posted a link to this on the my photo journey, so people following the conversation will be able to find it easily.


I look forward to seeing how this turns out.


Even if you post your mistakes, it is one less mistake someone else may make.  (Such as using regular river clay with grout, it often causes the grout to crack as it dries, while oiled clay does not do this).

Great, thanks! Anyone and everyone please chime in with ideas and experiences too.


Camponotus vicinus, Crematogaster 1, Crematogaster 2, Formica francoeuri, *, *, Myrmecocystus testaceus, Novomessor cockerelli, Pheidole hyatti, Pogonomyrmex californicus, Pogonomyrmex rugosus, Solenopsis invicta


#4 Offline Crystals - Posted April 22 2015 - 1:18 PM

Crystals

    Advanced Member

  • Moderators
  • PipPipPip
  • 2,049 posts
  • LocationAthabasca, AB (Canada)

What are you using to form the tunnels?

If you are using oil based clay, heating it up makes it much easier to handle.  Whether forming the tunnels, or removing them.


Suran wrap can be evil in terms of unsightly wrinkles in the final product.  Use with care.  :D


A careful hunt through all the isles of the dollar store can reveal odd things in odd places.  Keep an open mind when looking.  I find the Dollarama has an excellent 2 part epoxy at a good price of $2.  The bathroom, kitchen, and office section sometimes has nice clear containers.  I once found some nice containers in the kid's toy isle, the makeup isle, and occasionally in various seasonal sections.


With containers like this, be careful about watering the top and letting it soak down.  Especially with smaller queens.  I usually drill a small hole beneath the tunnels into a seperate "water chamber" which is on the very bottom.  I water the bottom and let it soak up. I use a waterer on top to provide water 24/7 in case someone gets thirsty.  Mine are on heating cables, so condensation is usually sufficient.


  • UtahAnts likes this

"Always do right. This will gratify some people, and astound the rest." -- Samuel Clemens


List of Handy Links   (pinned in the General section)

My Colonies


#5 Offline Wamdar - Posted April 22 2015 - 2:37 PM

Wamdar

    Advanced Member

  • Members
  • PipPipPip
  • 123 posts

I thought about this today. Lets say you measure the tube and buy a core drill to that size. You can then chose a grout block and core away at the block. I noticed that his formicariums were not a perfect fit, some of the grit had shifted. Take the cores and carve your tunnels and whatnot which a dremel/foredom. To fit the unit, buy a sandpaper that's hardened for ceramics. while wearing a respirator or using a water system, shave the cylinder to fit! Good tip maybe to use olive oil to slide it in.


#6 Offline Crystals - Posted April 22 2015 - 6:39 PM

Crystals

    Advanced Member

  • Moderators
  • PipPipPip
  • 2,049 posts
  • LocationAthabasca, AB (Canada)

Interesting thought. Don't the core bits tend to crack whatever is inside of them though?  I am not sure how well a core bit would work with grout.  It may work with other materials though, like firebrick.

It would be hard to get it to fit perfectly, if you sanded it down you would almost be better off to use a lathe.


But if going to that length and effort, I would almost say that a laser cutter might be better.  And much cooler to show off. :D


I think pouring something like grout or hydrostone might be the easiest way.  Just cut a container in half so you can get it out easily.


"Always do right. This will gratify some people, and astound the rest." -- Samuel Clemens


List of Handy Links   (pinned in the General section)

My Colonies


#7 Offline dspdrew - Posted April 22 2015 - 6:57 PM

dspdrew
  • LocationSanta Ana, CA

I thought about this today. Lets say you measure the tube and buy a core drill to that size. You can then chose a grout block and core away at the block. I noticed that his formicariums were not a perfect fit, some of the grit had shifted. Take the cores and carve your tunnels and whatnot which a dremel/foredom. To fit the unit, buy a sandpaper thats hardened for ceramics. while wearing a respirator or using a water system, shave the cylinder to fit! Good tip maybe to use olive oil to slide it in.


Good idea, but the "shaving to fit" part I'm pretty sure will be one of those easily said things, that are a whole different story when it comes to actually doing it.


  • BugFinder likes this

#8 Offline Wamdar - Posted April 22 2015 - 7:41 PM

Wamdar

    Advanced Member

  • Members
  • PipPipPip
  • 123 posts

You're totally correct. I have barrel sanders though with diamond belts. 8" drum sanders  with a small amount of water would do the trick! I'd work with 1200 diamond grit to start, if we're talking silicon carbide or something not as hard as diamond, I'd go grittier. Diamond will take grout like butter.


#9 Offline Wamdar - Posted April 22 2015 - 7:49 PM

Wamdar

    Advanced Member

  • Members
  • PipPipPip
  • 123 posts

The tooling cost would be high for my idea which would limit its availability but its something you could do production with if you wanted to start a little collection for yourself. if you got a 6" drum, the belts are more economical


#10 Offline dspdrew - Posted April 22 2015 - 8:36 PM

dspdrew
  • LocationSanta Ana, CA

Wow. Diamond sand paper is not cheap.


#11 Offline Wamdar - Posted April 23 2015 - 4:18 AM

Wamdar

    Advanced Member

  • Members
  • PipPipPip
  • 123 posts

It's not but if you take care of it, it could last you years! Look up 3M diamond belts, they can run between 15-60 dollars depending on different sizes and grits. I love 3M


#12 Offline drtrmiller - Posted April 23 2015 - 6:15 AM

drtrmiller

    Vendor

  • Members
  • PipPipPip
  • 2,714 posts

There is no advantage to this design.  It is not worth the effort.  Judging by the direction of conversation, things will only get more complex to the point that you have defeated the purpose—like going around your elbow to get to your thumb.


If the simplicity of appearance and small bill of materials is what attracted you to it, I would urge you to focus on a horizontal founding nest similar to, but simpler than, the Tar Heel Ants Growth Chamber—an idea, I'd point out, which originated from labs worldwide who solved the issue of founding setups long ago.


Bill of Materials:


byFormica® is the manufacturer of the iconic nectar feeders and Sunburst Ant Nectar.
byFormica ant products always deliver consistent performance, convenience,
and reliability, making them among the most beloved ant foods and kit enjoyed by
ant keeping enthusiasts worldwide. For more information, visit www.byFormica.com.

#13 Offline Foogoo - Posted April 23 2015 - 6:28 AM

Foogoo

    Advanced Member

  • Members
  • PipPipPip
  • 1,161 posts
  • LocationLos Angeles, CA

.


Edited by Foogoo, April 23 2015 - 5:34 PM.

Camponotus vicinus, Crematogaster 1, Crematogaster 2, Formica francoeuri, *, *, Myrmecocystus testaceus, Novomessor cockerelli, Pheidole hyatti, Pogonomyrmex californicus, Pogonomyrmex rugosus, Solenopsis invicta


#14 Offline drtrmiller - Posted April 23 2015 - 6:40 AM

drtrmiller

    Vendor

  • Members
  • PipPipPip
  • 2,714 posts

Firstly, Mack's product is a variation of what's used in labs, and a poor one.  I can show you a proper way to do it that will absolutely solve your problem using nothing but the BOM I listed previously.  But any further creative will be detailed on the BF site.


I'll create a project page here today or tomorrow:


http://www.byformica...h_Founding_Nest


  • BugFinder likes this


byFormica® is the manufacturer of the iconic nectar feeders and Sunburst Ant Nectar.
byFormica ant products always deliver consistent performance, convenience,
and reliability, making them among the most beloved ant foods and kit enjoyed by
ant keeping enthusiasts worldwide. For more information, visit www.byFormica.com.

#15 Offline Foogoo - Posted April 23 2015 - 6:43 AM

Foogoo

    Advanced Member

  • Members
  • PipPipPip
  • 1,161 posts
  • LocationLos Angeles, CA

I'll create a project page here today or tomorrow:


http://www.byformica...h_Founding_Nest

Will be interested to see it!


Edited by Foogoo, April 23 2015 - 5:35 PM.

  • BugFinder likes this

Camponotus vicinus, Crematogaster 1, Crematogaster 2, Formica francoeuri, *, *, Myrmecocystus testaceus, Novomessor cockerelli, Pheidole hyatti, Pogonomyrmex californicus, Pogonomyrmex rugosus, Solenopsis invicta


#16 Offline Wamdar - Posted April 23 2015 - 6:51 AM

Wamdar

    Advanced Member

  • Members
  • PipPipPip
  • 123 posts

we're in it to reinvent the wheel here


#17 Offline Crystals - Posted April 23 2015 - 6:55 AM

Crystals

    Advanced Member

  • Moderators
  • PipPipPip
  • 2,049 posts
  • LocationAthabasca, AB (Canada)

I thinking buying the sandpaper alone would negate the "pricey" shipping cost.  :D


As my Father constantly told me - "Keep it simple". 

The more you complicate things, the more work you make for yourself, and it often isn't worth it in the end. 


I tend to over-think things and have to take a step back and look at the whole picture, what I want, what I have, what I can easily get, and sit down and think.  :D


  • Mercutia, BugFinder, Jonathan21700 and 4 others like this

"Always do right. This will gratify some people, and astound the rest." -- Samuel Clemens


List of Handy Links   (pinned in the General section)

My Colonies


#18 Offline Wamdar - Posted April 23 2015 - 7:37 AM

Wamdar

    Advanced Member

  • Members
  • PipPipPip
  • 123 posts

Lol, good comic!


#19 Offline Foogoo - Posted April 23 2015 - 3:23 PM

Foogoo

    Advanced Member

  • Members
  • PipPipPip
  • 1,161 posts
  • LocationLos Angeles, CA

That's probably what drtmiller is getting at, which btw, I'm quite curious to see what the Petri Dish Founding Nest consists of. I did some searching and couldn't find much more than a petri dish with water source (test tube + cotton) or same filled with plaster.


Camponotus vicinus, Crematogaster 1, Crematogaster 2, Formica francoeuri, *, *, Myrmecocystus testaceus, Novomessor cockerelli, Pheidole hyatti, Pogonomyrmex californicus, Pogonomyrmex rugosus, Solenopsis invicta


#20 Offline drtrmiller - Posted April 24 2015 - 3:00 PM

drtrmiller

    Vendor

  • Members
  • PipPipPip
  • 2,714 posts

I added a short presentation on the Petri Dish Founding Nest to the byFormica website.


The presentation is not intended to be a comprehensive guide.  For example, I did not have plastic petri dishes on hand, so I just used a container lid to illustrate the point.
 
There are many other ways to customize this setup to perform a specific task, but I believe using petri dishes will be the most economical and simple way to accomplish your goal of crafting a customizable living space for a founding queen.
 
If I were to create a product for customers, it would be a bit more thought out than the presentation describes, but probably not much more complex.  I tried to simplify things for the tutorial presentation as best I could.


Edited by drtrmiller, May 1 2015 - 9:58 AM.

  • BugFinder, Jonathan21700, Lamarr and 1 other like this


byFormica® is the manufacturer of the iconic nectar feeders and Sunburst Ant Nectar.
byFormica ant products always deliver consistent performance, convenience,
and reliability, making them among the most beloved ant foods and kit enjoyed by
ant keeping enthusiasts worldwide. For more information, visit www.byFormica.com.


2 user(s) are reading this topic

0 members, 2 guests, 0 anonymous users