Jump to content

  • Chat
  •  
  •  

Welcome to Formiculture.com!

This is a website for anyone interested in Myrmecology and all aspects of finding, keeping, and studying ants. The site and forum are free to use. Register now to gain access to all of our features. Once registered and logged in, you will be able to create topics, post replies to existing threads, give reputation points to your fellow members, get your own private messenger, post status updates, manage your profile and so much more. If you already have an account, login here - otherwise create an account for free today!

Photo

How to Culture Various Insects and Feeders

breeding culturing crystals feeders

  • Please log in to reply
38 replies to this topic

#21 Offline Crystals - Posted December 9 2014 - 10:27 AM

Crystals

    Advanced Member

  • Moderators
  • PipPipPip
  • 2,049 posts
  • LocationAthabasca, AB (Canada)

Gammarus (freshwater shrimp)

(easy)


Gammarus are a freshwater shrimp commonly found throughout North America.  They range in size from 3-8mm.  Some ant species really like them, other don’t.


You will need a container.  A vase, small aquarium, or a larger pail all work well.

Add water (use an aquarium declorinator to remove chlorine or chloramine from tap water).

Add some sort of rough substrate, like golf ball sized rough stones or that plastic grating used over fluorescent lights so they have something to grab onto.


Add your shrimp.  (Easily caught from most water bodies in the shallows, bought online, or from aquarium hobbyists).


They eat practically anything from fish food to blanched veggies.  They don’t eat much, so don't add too much food or it may spoil.

Change 1/3 of the water every 2-3 weeks.


These breed very fast between 71- 83F (22-28C).


If you add an air stone or a sponge filter, this will increase oxygen in the water allowing you to have a larger colony in a smaller container.  These actually like to pack themselves together, you can have 1000 or so happily living in a 5 gallon bucket


If you have light or a window sill, feel free to add aquarium plant clippings or duckweed to keep the water cleaner.


My niece loves to watch the gammarus swimming amongst the plants in the large vase I keep on the window sill. 


  • DJoseph98 and AntsBC like this

"Always do right. This will gratify some people, and astound the rest." -- Samuel Clemens


List of Handy Links   (pinned in the General section)

My Colonies


#22 Offline Crystals - Posted December 9 2014 - 10:30 AM

Crystals

    Advanced Member

  • Moderators
  • PipPipPip
  • 2,049 posts
  • LocationAthabasca, AB (Canada)

Stick Insects (or leaf insect)

(easy)


First check if they are legal to keep in your area.  Many places do not allow them due to risk of them escaping and causing massive crop damage.


Get a container, at least 3x the length of the adult (varies by species).  For small ones or hatchlings you can even start with a 32 ounce deli cup.  Adult require an extra large critter keeper or aquarium/vivarium.

Ensure you add several sticks to help them moult.


In many species the females do not require a male to breed…  Once the female reaches adulthood, she will start to produce eggs. She will lay one to seven eggs per day depending on her species. Most species will just drop the eggs to the ground, but other species will stick it in the ground or glue it to leaves or to the sides of the containe.  For those that do need to mate, once fertilized, a female does not need to mate again.


Taking care of the eggs is the hardest part of breeding stick insects. Eggs are vulnerable to adverse circumstances, like drought, extreme temperatures and fungi. Generally speaking, you need to keep the eggs a little bit more moist than the parents need to be kept.


Keep the eggs in a small box with proper ventilation, but make sure any newborn nymphs cannot escape this box. The substrate you put in the box depends on the way the female places the eggs; when the female puts the eggs into the ground you have to put the eggs into potting soil. When the female just drops the eggs to the floor, you can better use tissue paper as a substrate. Place the tissue paper in the box and put the eggs on top. Spray the eggs and the paper often, depending on the needs of your species. Make sure to let the paper dry completely for half a day before spraying again, as this is the best way to prevent mold. Mold is an absolute killer to your stick insect eggs.


You have to be patient to keep eggs of stick insects; it can take between 2 and 14 months before the eggs hatch depending on the species (usually about 12 weeks). In all this time you have to make sure the eggs do not dry out and do not mold. When you are successful, you will see tiny nymphs walking around in the box. If you see this, transfer them as soon as possible to a fit enclosure with fresh leaves. Tiny nymphs can have difficulty eating from undamaged leaves. To make sure they have no difficulties, you can cut off the edges of the leaves with a scissor or tear them by hand. Placing an older nymph with the younger ones will also fix this problem.


They can be fed various leaves or lettuce.  Many enjoy leaves from raspberries, privet, and almost any leafy green veggie in my garden.


These are very easy to handle and slower moving.  Kids love them.


Most species prefer a temperature of 71-79F (22-25C). 

The eggs of some species can withstand weeks of 14F (-10C) (do not count on frost to kill any escapees…).


  • AntsBC likes this

"Always do right. This will gratify some people, and astound the rest." -- Samuel Clemens


List of Handy Links   (pinned in the General section)

My Colonies


#23 Offline AntsAreUs - Posted December 9 2014 - 2:59 PM

AntsAreUs

    Advanced Member

  • Members
  • PipPipPip
  • 1,041 posts
  • LocationIndiana

Still having mealworm problems! :( Impossible doesn't seem very easy.


#24 Offline Crystals - Posted December 9 2014 - 3:01 PM

Crystals

    Advanced Member

  • Moderators
  • PipPipPip
  • 2,049 posts
  • LocationAthabasca, AB (Canada)

Still having mealworm problems! :( Impossible doesn't seem very easy.

Let's go back to your original thread, and keep looking.


"Always do right. This will gratify some people, and astound the rest." -- Samuel Clemens


List of Handy Links   (pinned in the General section)

My Colonies


#25 Offline Crystals - Posted December 23 2014 - 12:15 PM

Crystals

    Advanced Member

  • Moderators
  • PipPipPip
  • 2,049 posts
  • LocationAthabasca, AB (Canada)

Phoenix worms (aka Black Soldier flies)

(Medium)


How to culture Black Soldier Flies (Phoenix worms) in an indoor setup.


This will be a 2 stage setup, with two different containers.  One is the adult/egg container and the other is the rearing bin. (see pictures of my setup below)


Adult setup:

The adult Black Soldier Flies mate in flight and require a container at least 24"H x 18"W x 16"L (Even a large clear rubbermaid container will work, some people use old aquariums put on their side, some use a large encloseure made from door screen or a small greenhouse).

In this container will be 2 smaller containers, a water dish on a wick/cotton ball system, and some "perches" on the side of the container.  For the two smaller containers, one will hold pupae waiting to eclose, and the other is an egglaying dish.  The pupae dish just needs a skiff of oats or bran for bedding.  The egg dish will have a 1cm layer of instant mashed potatoes, moist oats, or some pieces of moist brown bread.  Adult flies often lay eggs just above the food source, so find some corrugated cardboard and put small strips vertically in the egg dish.  The adults flies will often lay their eggs in the small gaps in the sides of the corrugated cardboard.

Every week or so, move the small larvae/eggs to the rearing bin. Just dump all of food source in the rearing bin, it is the easiest way to move them.  Wash the dish and refill with food and put it back in the adults setup.


Rearing Bin: 

The rearing bin holds the larvae until they are ready to pupate.  In the mature stage the larvae have only one purpose; trying to migrate away from the food source in search of a pupation site which makes collecting them easy.

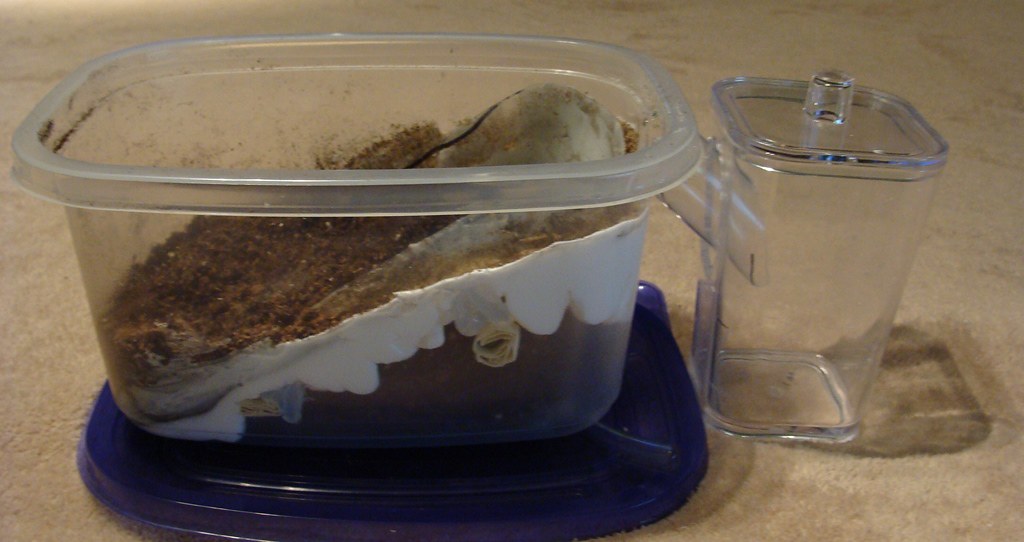
The rearing bin has 2-4" of peat or very poor black soil.  This bin will also have a small drain on the bottom and a "ramp" for the larvae to leave the bin to pupate.  There are many ideas out there on how to build or add a ramp.  Some people cut a pvc pipe lengthwise and put it on the sides, others just use a 5 galon pail and tilt it to a 40 degree angle and let the larvae crawl out the opening.  They can climb a 40 degree angle with no problems, and steeper angles if they have lots of traction (ex. a smear of silcione covered with sand or door screen mesh).

Have another container under the opening to catch the larvae.  Have a skif of oatmeal or bran for them to dry off and hide in.  Once they pupate, move them to the adult enclose to the pupae tray.


Every couple generations, add new larvae eggs to another bin and let all larvae in the original bin grow out.  This makes it easier to remove the old bedding and put fresh bedding in.


Larvae do very well on grain, fruit, and veggie diets, they can eat meat, but they do better if it makes a maximum of 10% of their diet.  Larvae can operate up to 6-8" deep. They rarely consumed food deeper than this in the Biosystems Design Study.


Larvae, pupae and adults do best at 27-30C (80.6-86F) and 70% humidity.


To drain excess "tea" - have a drain and silicone/epoxy a couple layers of door screen, have something to catch it, or feed drier foods to absorb it.  A drier food source also reduces any odours.


Notes from research papers and other sources:


Life cycle-

eggs- 4-6 days to hatch
larvae- 14-20 days (depending on temp)
pupae- 14-20 days (depending on temp - prefer temps over 25C to pupate)
Adults- 5-8 days
~43 days from egg to adult at 27C.
 
Females lay one clutch and die shortly afterwards.
 
Temperatures-
Recommended temperature is 27-30C (Do not go above 35C).
At 27C - larvae 19-24 days; pupae 16-19 days; adults 12-14 days.
At 25C activity lowered considerably. At 15C activity more or less stopped.
 
Humidity-
65-90% humidity, maximum development rates were at 70.5% (Biosystems Design Study), for mating anything between 30-90% was sufficient.
 
Adults-
Adults require heat and light to trigger mating. Flourscents rated 6500-10,000K right above the setup have been shown to be sufficient.  Adding UV light to the existing light setup has been shown to help stimulate the adults to fly and mate.
Adults mate in flight and need some room to fly. Minimum space was 24"H x 18"W x 20"L. Perches on the side of the tank provided males a better viewing spot and areas at different temperatures.  Taping or glueing bits of cardboard or fake plants to the walls worked well. 
To work inside of the adults setup, simply turn off the lights. They are very lazy fliers.
Adults do need to drink water, but they drown very easy.  Use a container and pack it with cotton balls, or use a piece of cloth as a wick.
 
Optimal egg laying environment-
Eggs were often laid 1-4" above the food source, or within the food source if it was drier. The wetter the substrate, the less attractive it was to adult flies. Moist food sources had the best egg laying rates.
 
If there is condensation on the side of a plastic container, the larvae can climb vertically. 
There are pictures of people using a margarine container inside of an ice cream pail for the rearing bin.
 
Rearing bins should have little odour, and it is an earthy smell, a bit like wet straw.
 
To force move all larvae, slowly flood the nest.  They will try to climb out.
 
How to build a Black Soldier Fly setup (LINK to thread I will make)
Also link in pvc frame with organza mesh.
 
Various rearing bins:
 
 
Interesting design out of cloroplast (plastic cardboard) - http://gourmetbugs.b...fly-larvae.html
 
 
Simple concrete ramp in a pail - http://img.youtube.c...NiqHzKBvA/0.jpg


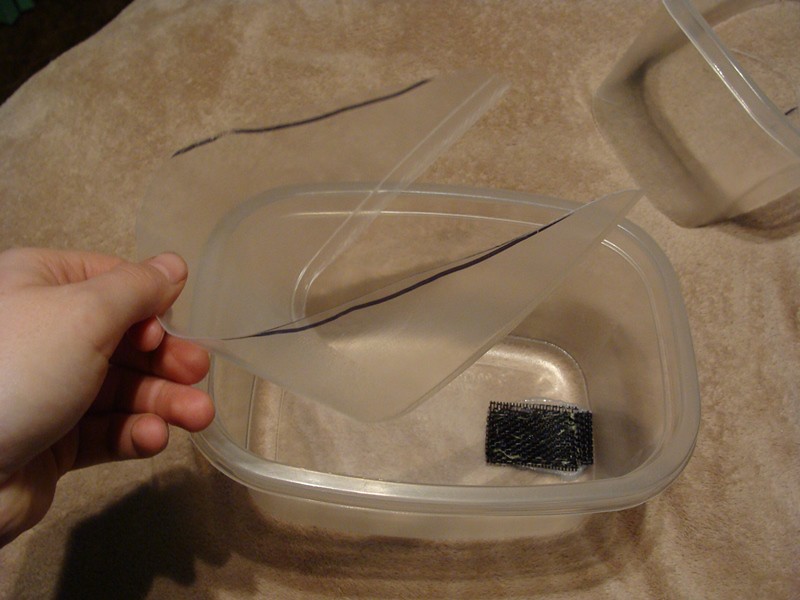
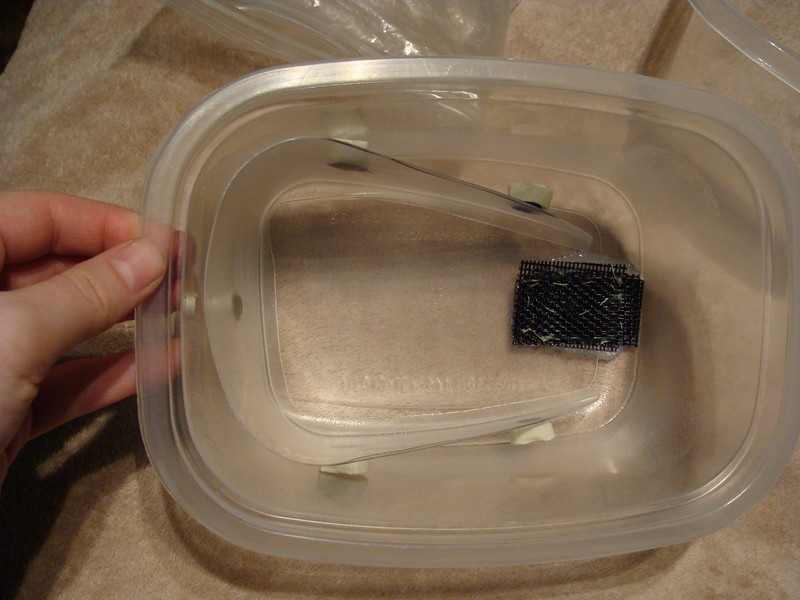
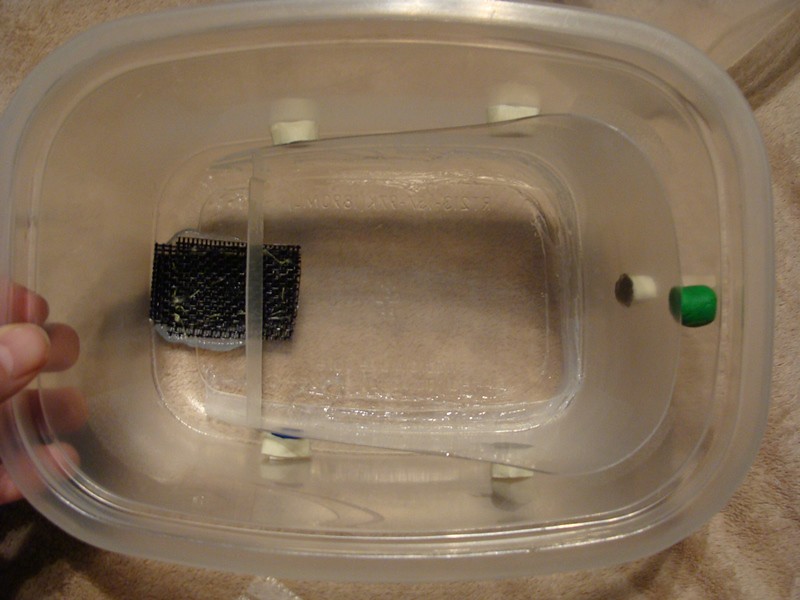
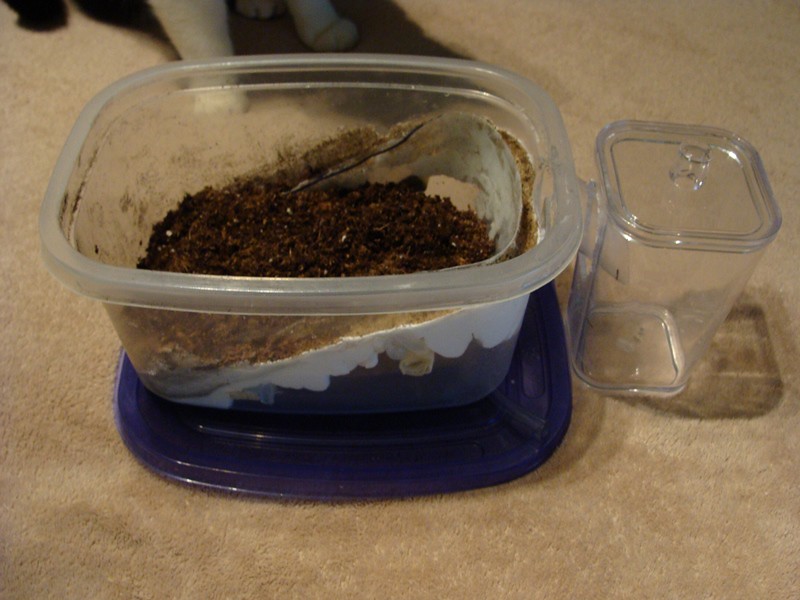
Pictures of how I built my Rearing Bin Setup:
 
1. Start off with 2 identical containers that stack
35078501053_f6857085be_b.jpg
 
 
2. Draw a Ramp-like line on one container and cut it out.  In the other container, cut out a small drainage hole and cover it with mesh (even several layers of door screen mesh work).
35718534172_4095393c0a_b.jpg
35048135894_f3e20feeda_b.jpg
 
 
3. Use spacers to keep it the inner cutout from touching the walls, then silicone the base down.  Let it dry.
35887702095_3d18714fe9_b.jpg


 4. Use silicone to make a ramp between the cutout and the main container.  Ensure that the ramp is about 1cm below the cutout, to create a wall.  I put some sand on mine while it was drying and it works really well.  Let it dry.

Cut out a hole at the top of the ramp and silicone some tubing onto it.  This "slide" will dump all larvae into a second container.  I just used a large plastic tube that some super glue came came.

Add the soil/substrate.

35048137334_2cd2e61fbc_b.jpg

35887702825_d8daf9e727_b.jpg


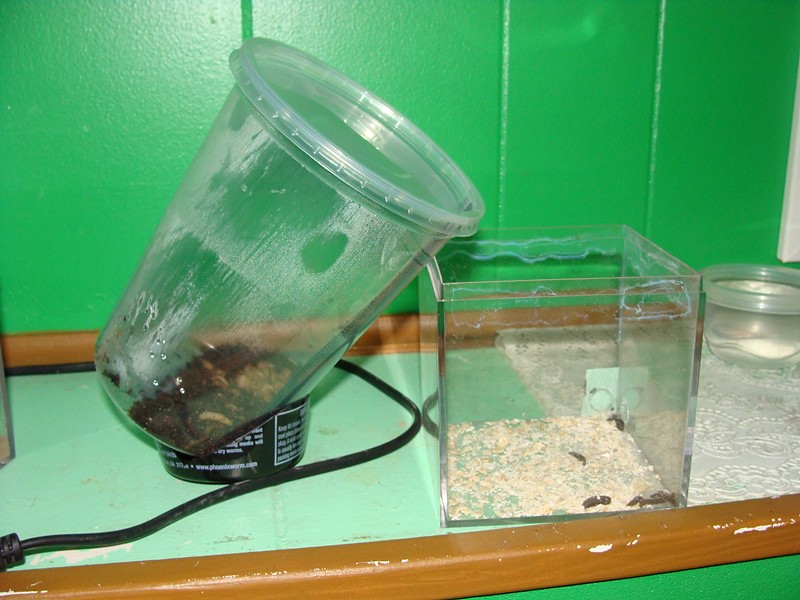
Here is an alternative setup, it worked for me, but since I have to use a heating cable some larvae would overheat and crawl out before they were ready to pupate.  Just a 32 ounce deli container on a 45 degree angle, with some door screen siliconed to the side so the larvae can crawl out.

35048136614_12f805e979_b.jpg


Edited by Crystals, December 28 2017 - 3:23 PM.

  • Herdo and AntsBC like this

"Always do right. This will gratify some people, and astound the rest." -- Samuel Clemens


List of Handy Links   (pinned in the General section)

My Colonies


#26 Offline dermy - Posted December 24 2014 - 9:34 AM

dermy

    Advanced Member

  • Members
  • PipPipPip
  • 1,392 posts
  • LocationCanada

Nice Thread Crystals very Helpful!


#27 Offline dean_k - Posted January 3 2015 - 7:35 PM

dean_k

    Advanced Member

  • Members
  • PipPipPip
  • 845 posts
  • LocationWaterown, Ontario, Canada

I got interested in Gammarus for a bit until I saw their size. Too big I'd say. I know you need to cut them up but I favor just throwing an entire thing into the outworld and watch ants go nuts over it.


#28 Offline Crystals - Posted January 3 2015 - 7:48 PM

Crystals

    Advanced Member

  • Moderators
  • PipPipPip
  • 2,049 posts
  • LocationAthabasca, AB (Canada)

I had some gammarus for a bit.  Some like Camponotus have no issues, but smaller ants need them cut in half, just like mealworms or crickets.


"Always do right. This will gratify some people, and astound the rest." -- Samuel Clemens


List of Handy Links   (pinned in the General section)

My Colonies


#29 Offline dean_k - Posted January 3 2015 - 10:08 PM

dean_k

    Advanced Member

  • Members
  • PipPipPip
  • 845 posts
  • LocationWaterown, Ontario, Canada

Where would you even get the shrimps? I googled around and found nothing. Found some suppliers in US but obviously cannot be shipped here. There are some suggestions to catch one's own by heading over to a lake which I ain't gonna do obviously.


#30 Offline Mads - Posted January 3 2015 - 11:13 PM

Mads

    Advanced Member

  • Members
  • PipPipPip
  • 84 posts
  • LocationInnisfail, Alberta, Canada
Once in a while you find them in local pet shops. Usually if you ask they can source them out for you. The cheapest, of course, is to catch them yourself. They are quite easy to find in the summertime here in Canada inist bodies of water.

Mads

#31 Offline Crystals - Posted January 4 2015 - 7:09 AM

Crystals

    Advanced Member

  • Moderators
  • PipPipPip
  • 2,049 posts
  • LocationAthabasca, AB (Canada)

Where would you even get the shrimps? I googled around and found nothing. Found some suppliers in US but obviously cannot be shipped here. There are some suggestions to catch one's own by heading over to a lake which I ain't gonna do obviously.

Lots of pet stores or aquarium hobbyists have them.  Ask around on some aquarium forums and you will likely find them and they will also likely ship to you.

Catching them is very easy, especially with sand or clay bottom.  They prefer to stay in less than 3 feet of water, you can often see big clumps of them in bits of weed in little dips of the lake shore, or dragging a net along weeds in a river/creek can yield them also.


Know anyone who ice fishes?  I can never seem to drill a hole without getting at least 1 or 2, and if I drill in a shallow area I can get millions of them.


If you want some come summer, let me know and I can even ship a batch down to you.


"Always do right. This will gratify some people, and astound the rest." -- Samuel Clemens


List of Handy Links   (pinned in the General section)

My Colonies


#32 Offline dean_k - Posted January 25 2015 - 8:51 AM

dean_k

    Advanced Member

  • Members
  • PipPipPip
  • 845 posts
  • LocationWaterown, Ontario, Canada

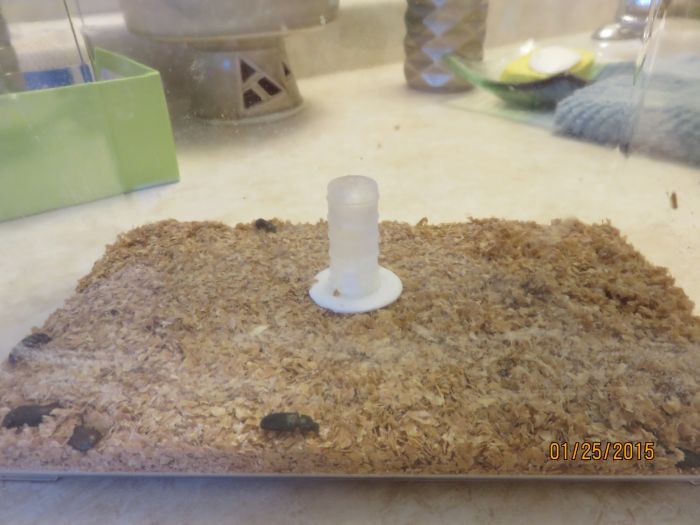
My mealworm beetle setup. Believe or not, that's Byformica liquid feeder right in middle. It has water in it and I've seen beetles drink from that. I felt it was better than having a carrot that will rot.


#33 Offline drtrmiller - Posted January 25 2015 - 11:45 AM

drtrmiller

    Vendor

  • Members
  • PipPipPip
  • 2,714 posts

My mealworm beetle setup. Believe or not, that's Byformica liquid feeder right in middle. It has water in it and I've seen beetles drink from that. I felt it was better than having a carrot that will rot.


I use the LIGHTYEAR Liquid Feeder to feed roaches and crickets.


Edited by drtrmiller, January 25 2015 - 11:45 AM.


byFormica® is the manufacturer of the iconic nectar feeders and Sunburst Ant Nectar.
byFormica ant products always deliver consistent performance, convenience,
and reliability, making them among the most beloved ant foods and kit enjoyed by
ant keeping enthusiasts worldwide. For more information, visit www.byFormica.com.

#34 Offline AntsTexas - Posted February 26 2015 - 5:54 PM

AntsTexas

    Advanced Member

  • Members
  • PipPipPip
  • 340 posts
  • LocationLubbock, Texas

Aphids 

(Medium difficulty due to routine bi-weekly upkeep)


Green pea aphids are generally easy to culture and are easily obtained from reptile and frog forums/groups.


These need a steady supply of new pea-plants.  Start the peas every week.

Place dried pea's under water for 6-8 hours until they are completely soaked in water. You'll see them swell up.


Place them on wet paper or another thin wet soil inside of a super tall sandwich container or 32 ounce deli cup. 
The pea's need to be kept moist, but not wet or they'll mold.  Keep the paper towel or dirt damp.


A lid is advised at this point

Place them under light for 5-6 days until the peas have roots and have a stalk about 1-2cm.


Now you can seed your culture and remove the lid.  Just keep the paper towel or dirt damp.  In 1-2 weeks the culture will mature. 


An easy way to harvest is to cut off a stem and put it in the outworld.  If using a deli cup, it is possible to use it like a salt shaker – simply hold it upside down and tap any “loose” aphids into the outworld.  Or you can use a soft brush to brush them into the outworld.


These are species specific and usually go after peas, beans, and clover.  So they won’t infest your house plants.  :D


i grow cotton plants every season, if u can get your hands on some cotton seed, i see lots of Aphids on them all the time with lots of ants over them too


i live in west texas


Ant Queens found:


Solenopsis Invicta,  Solenopsis xyloni,  Brachymyrmex depilis/Sp,  Myrmecocystus Mimicus,  Pogonomyrmex barbatus,

Forelius pruinosus,  Camponotus sayi, Dorymyrmex insanus, crematogaster ashmeadi,


----------------------------------------

Ant Queens i have going right now:


camponotus sayi, solenopsis invicta, Myrmecocystus Mimicus, Forelius pruinosus

Pogonomyrmex barbatus, and some others (no i.d.)

---------------------------------------

YouTube:  AntsTexas


Facebook:  https://www.facebook.com/cdockray1


Facebook page:  AntsTexas


#35 Offline Crystals - Posted October 22 2015 - 11:47 AM

Crystals

    Advanced Member

  • Moderators
  • PipPipPip
  • 2,049 posts
  • LocationAthabasca, AB (Canada)

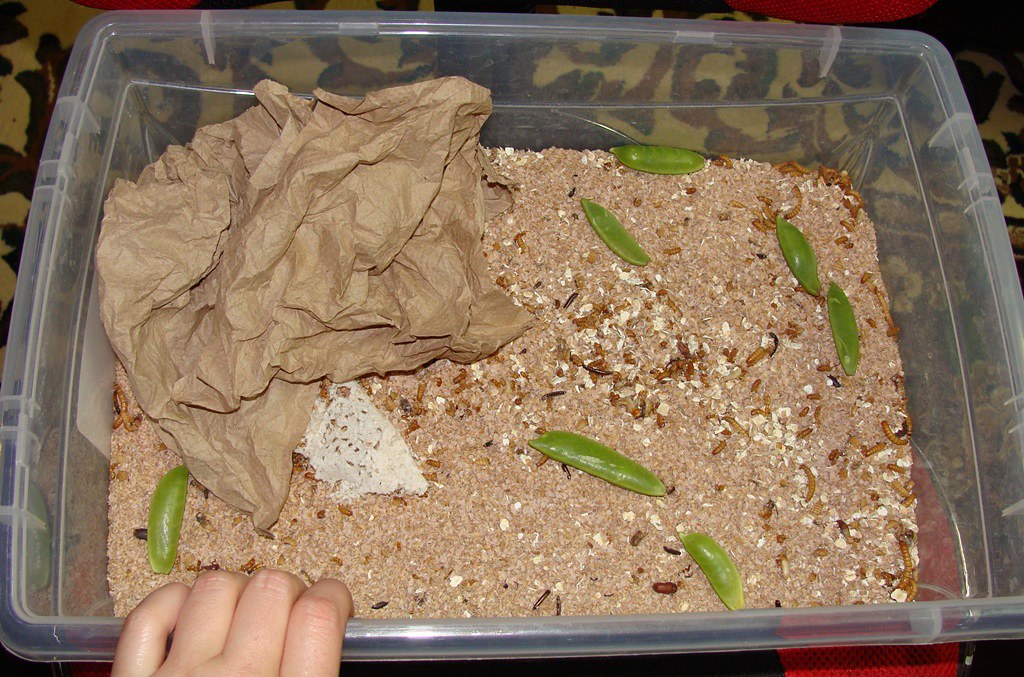
My Mealworm Setup:

I have had several people ask how I have my mealworm culture set up.  So here it is.


By the time I move my mealworms to a bin with fresh bedding I get at least 2 cups full of squirming mealworms.  This is despite feeding numerous colonies and them being at low temperature (about 18C / 64F).


Materials:

Large plastic shoe box (24" x 14" x 10")

5-6" of bran bedding (I have had much better success after going 100% bran bedding and completely skipping oats)

Egg carton pieces or crumpled up paper towel in one corner


The beetles hang out in the carton or in the paper towel, and usually only venture out to lay eggs or to explore a bit.  This helps keep the eggs from being eaten.  Beetles love to eat the eggs and young larvae, which is why it is good to have a large container and several inches of bedding.  I never move my pupae or beetles unless I am starting a second culture, with all that bedding, most of the pupae survive to eclosing with no issues.


I occasionally toss in an apple core or carrot.  If I don't add any fruit/veggies then I will lightly mist the bin once every 2 weeks (I have a fairly tight lid).  If I start to see condensation, I open the lid and let it air out until I no longer see condensation when it has been closed. 


I have noticed that oats are much more prone to mold than bran is, another reason to avoid oats altogether and go with straight bran.


Once the bran is over 90% consumed I set up a new container and use a kitchen seive to move the mealworms, pupae, and live beetles (I remove the ones who died from age).  I put the old container aside for a month or so to let any small mealworms grow to a size where I can seive them out (they are almost always in the top layer close to the last remaining skifs of bran).


A kitchen seive works wonders, but wear a dust mask.  I also advise fully enclosed safety glasses or ski/swim goggles if you have them, to keep the dust out of your eyes.


Here are some pictures of my setup:  there are about 500 mealworms somewhere in that container...

35846927676_f7569ce7ab_b.jpg


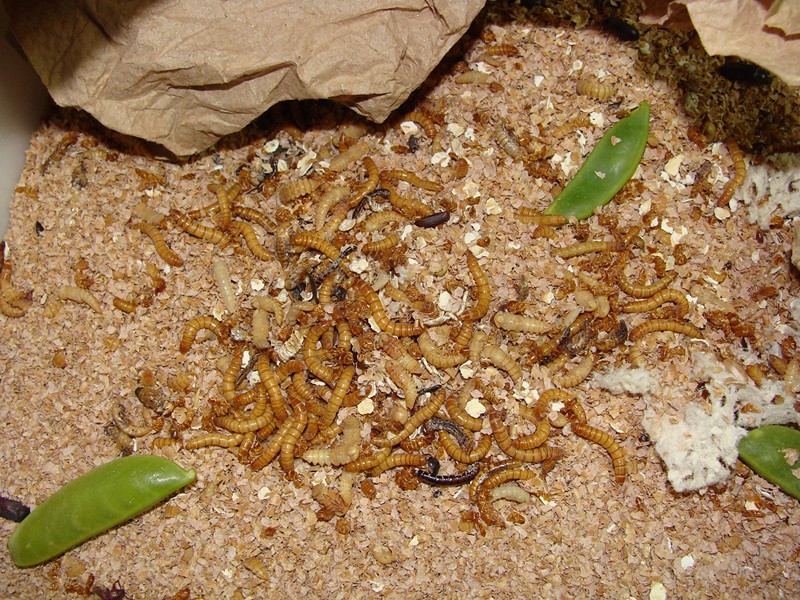
Many mealworms and pupae under the paper towel:
35887714105_2f532572f2_b.jpg


If you see beetles like this, or pupae who are all dried up, it means your humidity is too low.

35846927906_4367f8b657_b.jpg


Edited by Crystals, December 28 2017 - 3:26 PM.

  • dermy likes this

"Always do right. This will gratify some people, and astound the rest." -- Samuel Clemens


List of Handy Links   (pinned in the General section)

My Colonies


#36 Offline EmberMyAnts - Posted May 3 2019 - 7:58 AM

EmberMyAnts

    Advanced Member

  • Members
  • PipPipPip
  • 53 posts
  • LocationIndiana, Bloomington
I find the fruit fly farm quite confusing. Can you explain it a little? I have a worm farm, but, my tiny ten ant colony didn’t seem to like the tail I gave them. Also, if I got some mealworms, how do you kill them? With a knife or scissors?

#37 Offline TennesseeAnts - Posted May 3 2019 - 8:07 AM

TennesseeAnts

    Advanced Member

  • Members
  • PipPipPip
  • 4,925 posts
  • LocationNashville, Tennessee
Crush their head, and cut it up into segments for your ants.

#38 Offline EmberMyAnts - Posted May 3 2019 - 8:08 AM

EmberMyAnts

    Advanced Member

  • Members
  • PipPipPip
  • 53 posts
  • LocationIndiana, Bloomington
Thanks!

#39 Offline ponerinecat - Posted May 3 2019 - 2:00 PM

ponerinecat

    Advanced Member

  • Members
  • PipPipPip
  • 2,650 posts
  • LocationCalifornia

Where would you even get the shrimps? I googled around and found nothing. Found some suppliers in US but obviously cannot be shipped here. There are some suggestions to catch one's own by heading over to a lake which I ain't gonna do obviously.

I find related species in roadside pools and ponds.


Also tagged with one or more of these keywords: breeding, culturing, crystals, feeders

0 user(s) are reading this topic

0 members, 0 guests, 0 anonymous users