Jump to content

  • Chat
  •  
  •  

Welcome to Formiculture.com!

This is a website for anyone interested in Myrmecology and all aspects of finding, keeping, and studying ants. The site and forum are free to use. Register now to gain access to all of our features. Once registered and logged in, you will be able to create topics, post replies to existing threads, give reputation points to your fellow members, get your own private messenger, post status updates, manage your profile and so much more. If you already have an account, login here - otherwise create an account for free today!

Photo

How to Culture Various Insects and Feeders

breeding culturing crystals feeders

  • Please log in to reply
38 replies to this topic

#1 Offline Crystals - Posted December 9 2014 - 9:05 AM

Crystals

    Advanced Member

  • Moderators
  • PipPipPip
  • 2,049 posts
  • LocationAthabasca, AB (Canada)

Here is a thread about culturing various feeders for ants (or other pets).

Some species may devour a certain feeder, while other species ignore it. 

Preferred food by species:   http://forum.formicu...ood-by-species/


Fruit flies

Mealworms

Superworms

Springtails

Wax worms

Silk worms

Termites

Aphids

Blue bottle flies

Flour beetles/larder beetles

Isopods  (Sowbug, Pillbug)

Roaches

Firebrat (silverfish)

Bean beetles

Cricket

Locust

Freshwater snails

Microworms

Whiteworms

Earthworms

Gammarus
Stick insects

Phoenix Worms (Black Solider fly)


I have kept a number of these species over the years, and still keep some.  Others I have never tried. 

Some of the explanations came from Lucian, as well as a number of other sources.


  • LC3, Herdo, TennesseeAnts and 2 others like this

"Always do right. This will gratify some people, and astound the rest." -- Samuel Clemens


List of Handy Links   (pinned in the General section)

My Colonies


#2 Offline Crystals - Posted December 9 2014 - 9:09 AM

Crystals

    Advanced Member

  • Moderators
  • PipPipPip
  • 2,049 posts
  • LocationAthabasca, AB (Canada)

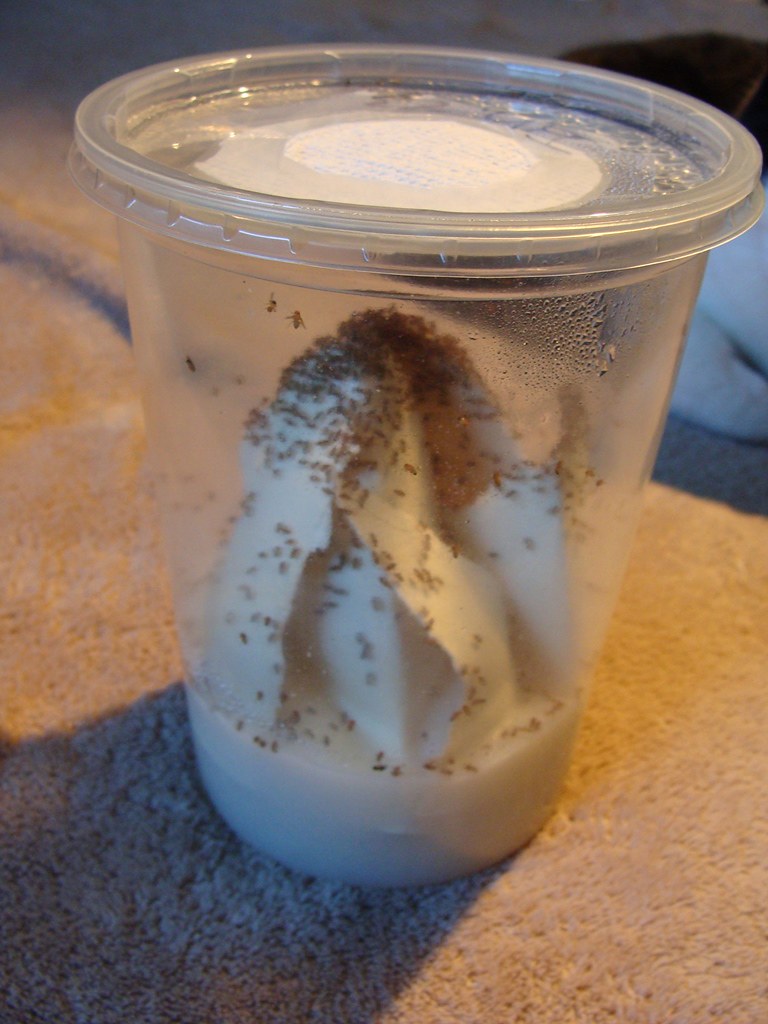
Flightless Fruit Flies 

(easy)


Flightless or wingless fruit flies are often cultured for small animals like frogs, newts, and ants.

There are dozens of ways to raise fruit flies, this is just one way.


Medium:

½ cup Potato flakes

1 TBSP white vinegar (this will help control the smell of the culture as it ages).

1 TBSP honey

A pinch of yeast


Mini paper plates (desert plates)


You can use disposable cups, plastic deli containers, or washable jars/containers.  I prefer the plastic 32 ounce deli cups.


Add holes to the container lid and stuff them with cotton to prevent escapees.  Or you can cut a hole and tape paper towel for ventilation.

Add about 1” of medium to your container.  Mix the medium together and add as much water is needed to make it slightly sloppy.  Microwave for at least 20-40 seconds to kill some of the microbes, this will also thicken the potatoes until they don't run.  You want a consistency of mashed potatoes, thick but damp.


Tear two paper plates up into quarters and fifths, poke them into the medium and arrange them like a tee-pee. 

Add 40-60 flies.  Start a new culture every week.


An easy way to collect the flies is to dangle a pipe cleaner onto the paper plates and the flies will climb up.  Shake them off into a bag or container.


Additional Notes:

Recently one of my fruit fly cultures was sitting on my 15 watt heating cable and I had at least 5x more flies than usual.  This may help people in colder locations.


Here is a video that shows an easy way to prevent tons of escapees.  Flies can't climb when there is calcium dust on their feet.

www.youtube.com/watch?v=WYwivySo6jk


I just tried it and it worked exceptionally well.

My flies don't pour like that as my medium gets too runny, so I powdered a 5 gallon rubbermaid container, put an established fruit fly culture in the tub and removed the lid.  I waited until enough flies climbed out of the culture cup and replaced the lid.  I then shook the jumpers in some powder (they really can't climb once powdered) and dumped them into a new culture.  Not one escapee, despite my cat helping me.


If mold becomes a big problem, considering adding microworms as soon as you make the culture.  They will stir up the medium to prevent mold until the maggots are big enough to stir it up.

If the medium gets too runny, add some dry potato flakes in one corner to absorb excess moisture.


35500022620_8eee5116bf_b.jpg


Edited by Crystals, December 28 2017 - 3:18 PM.

  • AntsBC and DDD101DDD like this

"Always do right. This will gratify some people, and astound the rest." -- Samuel Clemens


List of Handy Links   (pinned in the General section)

My Colonies


#3 Offline Crystals - Posted December 9 2014 - 9:15 AM

Crystals

    Advanced Member

  • Moderators
  • PipPipPip
  • 2,049 posts
  • LocationAthabasca, AB (Canada)

Mealworms  

(easy)


Mealworms are easy to care for, produce no odours and cannot climb plastic.  Enjoyed by small pets like hamsters, wild birds, and, of course, ants.


There are two easy methods to culturing mealworms.


Bedding:  (the bedding is the mealworms primary food source)

bran  (can mix in some oatmeal)


Mealworms have very efficient digestive systems and are able to obtain almost all of their water through their food (their bedding).  A slice of apple or potato every week or so is welcome, but remove the leftovers within 12 hours to avoid mold.


Mealworms are actually beetle larvae, one adult beetle can lay 300 eggs.  The life cycle takes about 2-3 months depending on the temperature.


Mealworm pupae are often removed from the main container as the mealworms themselves may eat the pupae looking for moisture.


Method One:

You will need a large plastic container, about twice the size of a shoebox.  Place 4-6” of bedding in the container.  Add 3-4 layers of crumpled up cheap brown paper towel on top of the bedding in one corner (cheap brown coffee filters work as well).  Dampen the paper towel once a week, this provides all of the moisture the mealworms could ever want.  If it starts to mold, replace the paper towel and water less.


Because of the added moisture and large space, there is no need to seperate the pupae or beetles.  They will readily breed. 

If you want a higher survival rate, place pupae in a new container.  This will also negate the need to try to separate 8mm long mealworm babies when the old medium is expired.


I like to put a small lid on a small container inside of the mealworm container. I put the pupae on the lid and once the beetles emerge they crawl off of the lid and fall to the bedding below, and the remaining pupae are still safe from the odd cannibalistic mealworm or beetle.


Replace the bedding when the mealworms consume 90% of it.  If the container is clear, you can see their droppings on the wall as a grey dust/pellets.  The dropping sink and the bran rises to the top.


Tip: A kitchen seive works well to strain out beetles, pupae, and all but the smallest mealworms. I strongly advise wearing a dust mask, and possibly fully enclosed safety glasses.


Method Two:

Any size of container, even a small sandwich container will work.  Add 1-2 inches of bedding.  Whenever you see any pupae, move them to a separate container because in confined spaces mealworms will likely eat the pupae. 

Once the beetles emerge, add them back to the container for the cycle to continue.  Or you can add them to a new container.


The old bedding is mostly droppings, and is a grey color.  Very different in appearance from the fresh bran.


Note: there have been some reports of pupae having problems eclosing where the bedding is more than half oatmeal.


My Setup:  I go over my setup at the bottom of this link.


  • AntsMAN and AntsBC like this

"Always do right. This will gratify some people, and astound the rest." -- Samuel Clemens


List of Handy Links   (pinned in the General section)

My Colonies


#4 Offline Crystals - Posted December 9 2014 - 9:18 AM

Crystals

    Advanced Member

  • Moderators
  • PipPipPip
  • 2,049 posts
  • LocationAthabasca, AB (Canada)

Super worms 

(easy, but slow)


Care and bedding is the same as mealworms, but they will not pupate unless they are isolated.

Choose the largest superworms possible and place a single worm into an empty container.  I have found bead storage containers to be space efficient and cheap.  Add a skiff of bedding to the chamber, it will help maintain the humidity.


After several days the worms will become dormant and begin curling to a letter “c” or “e”. This is the start of the morphing process. Any superworms that are straight looking, hard or black are probably dead. The process from larva to pupae takes 1 to 2 weeks.
 

Superworm pupa
Once the worm has pupated it will look like a white or cream colored “alien” as most people call them. This is their third stage of life. You can either leave them in the container or place them all in a separate container. I remove mine and place them in a separate container as it saves space and then you can start another larva in the chamber. When their legs turn darker in color you’ll know a beetle is about to emerge. The process from pupae to beetle takes about 2 weeks.


Ensure you put the pupae/beetles in a new container.  About every 4 weeks move them to a new container, this will let the eggs hatch and the young super worms grow with worry of predation.

Be sure to have some source of moisture, piece of potato or carrot works great.  I very lightly water the bedding (about 8ml once a month for a 24” x 18” box).

Add a small piece of egg crate in a corner, as the beetles will hide under it, and not go about digging up the bedding (and eggs). Adult beetles can live up to 5 months with a female laying nearly 500 eggs in her lifetime.

These seem to prefer a temperature around 78F (25.5C).


  • AntsBC likes this

"Always do right. This will gratify some people, and astound the rest." -- Samuel Clemens


List of Handy Links   (pinned in the General section)

My Colonies


#5 Offline Crystals - Posted December 9 2014 - 9:23 AM

Crystals

    Advanced Member

  • Moderators
  • PipPipPip
  • 2,049 posts
  • LocationAthabasca, AB (Canada)

Springtails

(easy)


Springtails are a good food source for small frogs and ants.
Springtails live in damp leaf litter in nature, and feed upon fungii found there.

Get a container, a larger jar works great or one of those plastic cylinder ones meant for storing dry foods.   32 ounce plastic deli cups or even plastic shoeboxes work.


Medium:   3 commonly used options

Fine/medium grade charcoal

coconut fibre soil

sphagnum moss inside


The choice of medium is more about what you can find in your location.  Charcoal has no chance of mold, but may be difficult to find.  Coconut fibre is the next best (check the plant section).  If all else fails, sphagnum moss is common and easy to locate.

Place about 2 inches of medium inside the container.  Some people microwave or bake the media to prevent any other organisms from appearing out of hiding later.

Make sure to moisten with spring or distilled water, being sure it is wet through and through, but not dripping. 

Add the springtails and sprinkle some brewers yeast or  flake fish food on the surface. Now add the lid.  Small air holes, you want high humidity and condensation on the sides.

Every week or so, remove the lid and add some new fish food to the surface, and lightly mist the top using a spray bottle. If you see some white fuzzy fungus stuff growing in the culture jar, just spray it flat.

To later feed to your ants:

Charcoal – just shake them into the outworld, or put a larger piece into a bowl of water (spring tails float). 

Or grab a handful of coconut husks or peat moss and also put in a bowl of water.

The peat or coconut husks and springtails will separate, and the springtails will float to the surface. Scoop them out with a fish-net and add to the outworld.  Replenish the springtail culture by adding more media to the culture jar.


The key to keeping the colony heathy is preventing mites.  There is no cure short of restarting once you get them.  Using just brewers yeast minimizes the risk of mites finding your culture.


Ideally you want temperatures to be between 65F-80F (18C-27C)


  • AntsBC likes this

"Always do right. This will gratify some people, and astound the rest." -- Samuel Clemens


List of Handy Links   (pinned in the General section)

My Colonies


#6 Offline Crystals - Posted December 9 2014 - 9:28 AM

Crystals

    Advanced Member

  • Moderators
  • PipPipPip
  • 2,049 posts
  • LocationAthabasca, AB (Canada)

Wax Worms 

(easy)


Use glass or thick plastic containers, the larvae can chew threw wood and soft plastic.  Critter keepers or large jars work.


For a screen, use metal mesh (size 20 is fine).

Bedding:

You can use bran flour mixed with whole oats and a drizzle of honey. Stir the honey into the dry bedding. Crumble any globs and stir until your bedding is a dry mixture.

You can also use one box Gerber mixed cereal, 7 Tbsp of honey, 7 Tbsp of glycerin and 7 tbsp of boiling water. Mix the honey, glycerin and water, and pour into the cereal. Mix until the cereal is moist. Allow to stand one day before using.


You will need about a 1cm layer of bedding.  The worms will mostly remain in the bedding while eating.


Choose at least 50 large and fat worms.


Before the mature larvae pupate, they crawl into a crevice or hollow place. In this type of substrate, they will burrow into the bedding.

If any of the worms turn black and are soft, remove them. This means they are dead.

The waxworm pupa is hard and has a deep redish-brown color. The worms remain in their pupal state for about ten - sixteen days.


Keep at a bout 86F (30C). It takes 6 – 7 weeks to complete the cycle from egg to adult.


To reduce further development, you can keep the pupae in a cool area for up to two months. A temperature no lower than 60F (15.5).
 

Moth stage:
Once the worms have pupated, crumple several pieces of waxed paper and place them into your container.


The moths will emerge after 10-16 days. They will mate and live about a week, feasting on the wax from the wax paper.

The female moth will lay her eggs in the folds of the wax paper. Two days after she has laid them, you can collect them by placing a razor blade under one side of each egg and lifting. You can now put the eggs in a jar and keep them cool to hatch at a later time.


When you are ready to hatch the eggs, place them in an escape-proof container with a layer of the edible bedding underneath the eggs. Your worms should hatch within two weeks and will grow fast kept at room temperature and the honey/bran mixture as a substrate.

Once the worms hatch, place a very small orange slice in the container for them to drink from. Leave it in the container for about a week, then replace it. Then start replacing it every three days. Take care that you do not get any runaways when you take the lid off.

Once the new worms are big enough to be feeders, you can choose to refrigerate them or being the “Breeding Cycle” again.


  • AntsBC likes this

"Always do right. This will gratify some people, and astound the rest." -- Samuel Clemens


List of Handy Links   (pinned in the General section)

My Colonies


#7 Offline Crystals - Posted December 9 2014 - 9:32 AM

Crystals

    Advanced Member

  • Moderators
  • PipPipPip
  • 2,049 posts
  • LocationAthabasca, AB (Canada)

Termites

(Easy, but patience is required)


There are 2 main types of termites, damp wood and dry wood.  Both require slightly different care.


Dampwood Termites:  (this also works for subterranean termites)


The materials
A medium and small sterlite type container - the small container needs to fit easily inside of the larger.
Two or more thin bricks.
Unbleached, brown paper toweling (the cheap kind you find at gas stations and in the office bathroom).
Large Popsicle or craft sticks

Vermiculite – can substitute with soil or peat
Softwood board


Stack the wood so that it is a square with a hole in the centre.  Best way is to do 3 layers, 2 big ones for the top and bottom, with 2 smaller pieces in between.  If possible cut, chisel, or scrape gouges/grooves into the underside of the top layer.  This will allow termite to hang out here for easier collection.  They only need about 1/8” to easily maneuver.


Soak the wood in water for a day so it is damp, along with some popsicle sticks.


Stuff the hole with damp paper towel.  Termites love damp locations.  This is the only part you will water.  As they eat it, replace it.  Water it as often as needed to keep it damp.

Put the stack at one end of the smaller container and add a thin layer of vermiculite.  Layer the wet popsicle sticks on top of the vermiculite.  Then add another light (and patchy) payer of damp vermiculite over the popsicle sticks.

Add your termites.


Place the tow bricks in the larger container and put your small container on top of them.  You will now create a moat.  Add a couple inches of water in the large container.

Termites need about 100% RH to thrive, this will help maintain this.

Second, this will prevent escapees.  They love to build dirt tubes up the sides of the container.


If they consume most of the wood, add more popsicle sticks or wood pieces.

Warning: many cardboards are treated with glues that slowly kill termites, please avoid using cardboard.


The interesting part about dampwood termites is that if you collect a  number of workers, they will develop into secondary reproductive and lay eggs.  It does take time, so ensure you collect a larger number of termites if possible.


Remember that top wood piece above the damp paper towel?  If you lift it, there should be termites clinging to the underside of it – easy to shake into an outworld.


Dry wood termites:   

http://forum.formicu...ny/?hl=termites


These are slower growing than dampwood termites.


You will need a large glass jar and 1” wide wood dowels cut into 3-4” sections.

Place 3-4 wood dowels in the jar and add the termites.


They will eventually eat the edible parts of the dowel and move on to the next one.  Keep adding more dowels.


Once the jar is full of dowels, get a slightly larger jar.

Move each dowel to the new jar – let the top ones go the bottom.

Many of the bottom ones should be hollow with no one home – as they are hollow they are easily broken open to check.


  • AntsBC likes this

"Always do right. This will gratify some people, and astound the rest." -- Samuel Clemens


List of Handy Links   (pinned in the General section)

My Colonies


#8 Offline Crystals - Posted December 9 2014 - 9:36 AM

Crystals

    Advanced Member

  • Moderators
  • PipPipPip
  • 2,049 posts
  • LocationAthabasca, AB (Canada)

Aphids 

(Medium difficulty due to routine bi-weekly upkeep)


Green pea aphids are generally easy to culture and are easily obtained from reptile and frog forums/groups.


These need a steady supply of new pea-plants.  Start the peas every week.

Place dried pea's under water for 6-8 hours until they are completely soaked in water. You'll see them swell up.


Place them on wet paper or another thin wet soil inside of a super tall sandwich container or 32 ounce deli cup. 
The pea's need to be kept moist, but not wet or they'll mold.  Keep the paper towel or dirt damp.


A lid is advised at this point

Place them under light for 5-6 days until the peas have roots and have a stalk about 1-2cm.


Now you can seed your culture and remove the lid.  Just keep the paper towel or dirt damp.  In 1-2 weeks the culture will mature. 


An easy way to harvest is to cut off a stem and put it in the outworld.  If using a deli cup, it is possible to use it like a salt shaker – simply hold it upside down and tap any “loose” aphids into the outworld.  Or you can use a soft brush to brush them into the outworld.


These are species specific and usually go after peas, beans, and clover.  So they won’t infest your house plants.  :D


  • ctantkeeper and AntsBC like this

"Always do right. This will gratify some people, and astound the rest." -- Samuel Clemens


List of Handy Links   (pinned in the General section)

My Colonies


#9 Offline Crystals - Posted December 9 2014 - 9:40 AM

Crystals

    Advanced Member

  • Moderators
  • PipPipPip
  • 2,049 posts
  • LocationAthabasca, AB (Canada)

Blue bottle flies

(easy, but messy and potentially smelly)


Blue bottle flies (also known as blow flies) are a common house fly.

Materials
Blue bottle fly pupae (If you cannot get any pupae then place a bottle of your mix outside for a day to two and wild ones will lay eggs in it.)
1 cup dry dog food
1 cup milk
2 plastic containers with lids that have tiny holes
Coir (coconut husk fiber – plant or reptile section)
Sand (Reptile sand, play box sand, etc.)
Tweezers


Culturing Eggs:
Order blue bottle fly pupae from a local pet store or online pet supply website. This will get you a starter culture to breed them at home. 

Or place a cup of medium outside to collect eggs from wild ones (you can also get other species like this for variety).

Allow the pupae culture to hatch according to the pet store instructions. Typically, this means you store the pupae in a warm area in the container they arrived in, and within 24 hours they will begin to hatch. There will be hundreds of flies once they hatch.

Prepare a mixture of 1 cup dry dog food and 1 cup milk. Allow it to sit out for a day to sour. Flies need the smell of rotten meat to lay eggs. Dog food allows you to obtain that odor without using actual rotten meat.

Put the container of hatched flies in the refrigerator to put them in a hibernation state. You can move them easily to the dog food container this way. Once they are still, pour them into the dog food container and allow them to lay eggs. The flies lay eggs almost immediately once they have a food source. Once you see eggs, put the container in the refrigerator again to put the flies into hibernation.

Replace the adult flies in their original container for use as feeders or put into another culture.

Pupae Stage:
Allow the eggs to hatch into maggots. The eggs hatch within 24 hours, and the maggots will feed on the dog food for about a week. Once they are finished eating, they will begin to crawl around looking for a place to pupate.  (You can try feeding some maggots to your ants, some species are more accepting of them than others).

Mix your coir and sand together (3 parts sand to 1 part coir by volume).

Fill the second plastic container about 3/4th of the way with your soil mixture. The maggots need a place to burrow down in order to pupate. Move the maggots to the dirt using tweezers or carefully dump them in.

Give the pupae about two to three weeks to hatch into blue bottle flies. Repeat the process to culture more flies.


I advise to be outside or in the garage when dumping them as some may recover faster and fly off.


  • AntsBC likes this

"Always do right. This will gratify some people, and astound the rest." -- Samuel Clemens


List of Handy Links   (pinned in the General section)

My Colonies


#10 Offline Crystals - Posted December 9 2014 - 9:45 AM

Crystals

    Advanced Member

  • Moderators
  • PipPipPip
  • 2,049 posts
  • LocationAthabasca, AB (Canada)

Flour beetles (larder beetles)

(easy, but slow)


Use any size container, a sandwich container or small shoebox work well.

Use dog food or dog biscuits for medium.

Add the beetles.

You can add a piece of potato or carrot for moisture.

Other than that, they will happily eat, lay eggs, and grow.


Simply tapping a dog biscuit over the outworld should drop several beetles in.  Or you can use tweezers.


  • AntsBC likes this

"Always do right. This will gratify some people, and astound the rest." -- Samuel Clemens


List of Handy Links   (pinned in the General section)

My Colonies


#11 Offline Crystals - Posted December 9 2014 - 9:48 AM

Crystals

    Advanced Member

  • Moderators
  • PipPipPip
  • 2,049 posts
  • LocationAthabasca, AB (Canada)

Isopods  (Sowbug, Pillbug)

(easy)


Materials
2.5 gal. tank (with a slide off lid) or 2-5L Sterilite container.
Box cutter.
Small piece of metal screen.
Hot glue gun.
Fish food flakes.
Shallow dish (Deli cup lid works).
Spray bottle.
1 Popsickle stick


Medium:

A small bag of peat moss.
A small piece or rotting wood
Rotting/Decaying leaf litter

How to set up the container:
If using a 2.5 gal tank with a slide off lid.
First you will want to slide the lid off. Now open the bag of peat moss and add about 1 1/2-2 inches of peat moss to the bottom. on top of that add 1/2-1 inch of rotting/decaying leaf litter. Now add the small piece of rotting wood (about 1/4 the length and width of the tank) to one side in the middle. On the other side place the deli cup lid down and place some fish flakes in it. Mist everything down including the fish flakes (if mold forms on the flakes that fine that's what they eat). Now all you have to do is collect some Isopods and add them.

If using a 2-5L Sterilite tub take the lid off. Grab the box cutter and cut a 2 x 4 inch hole in the center of the lid. Now take the piece of the screen and place it over the hole and hold it in place. Grab your hot glue gun and glue the screen down. Grab the pop sickle stick and smooth the glue down and cover all the edges of the screen that way it does not poke you later. Set the lid to the side.  Now add the medium and the critters.


  • AntsBC likes this

"Always do right. This will gratify some people, and astound the rest." -- Samuel Clemens


List of Handy Links   (pinned in the General section)

My Colonies


#12 Offline Crystals - Posted December 9 2014 - 9:52 AM

Crystals

    Advanced Member

  • Moderators
  • PipPipPip
  • 2,049 posts
  • LocationAthabasca, AB (Canada)

Feeder Roaches

(easy)


Some common species are Dubai roach (live bearing, unable to climb plastic or glass) and the Turkistan roach (unable to climb smooth surfaces). These are often considered a prime feeder, no noise, almost no odor (unless humidity gets too high and the cardboard gets damp), as well as being easy to raise/breed.


Any size of container, Rubbermaid containers work very well.  Cut a hole in the lid and glue mesh on (hot glue gun works well).


Add egg crates standing vertically on one side (vertically so frass falls down).

Add two small dishes on the other side.  One for food, and one for water crystals.

It is possible to cheat and use 1” wide test tubes for water – keep the cotton nearly level with outside of the container and try to keep anything from touching it as it may cause the water to leach out.

Ensure the colony is between 73-82F(23-28C).  Use a heating cable on the one side with the egg crates.


The colony can vary between a dozen individuals to hundreds, depending on your feeding need.


  • Scherme and AntsBC like this

"Always do right. This will gratify some people, and astound the rest." -- Samuel Clemens


List of Handy Links   (pinned in the General section)

My Colonies


#13 Offline Crystals - Posted December 9 2014 - 9:56 AM

Crystals

    Advanced Member

  • Moderators
  • PipPipPip
  • 2,049 posts
  • LocationAthabasca, AB (Canada)

Firebrat (silverfish)

(easy)


Food:

Fish flakes

Bran

Powdered sugar


Get a 2-5L sterlite or Rubbermaid container.  A large plastic shoebox will also work. Cut a 2 x 4 inch hole in the center of the lid. Use a hot glue gun to glue the screen over the hole.

Use a popsickle stick and smooth the glue down and cover all the edges of the screen that way it does not poke you later.

Place egg crate on one side and mist everything down. Once misted down place a low dish like a deli cup lid down on the other side and add some food (fish food flakes, bran, and a teaspoon of powdered sugar).

Now you can add the firebrats and place the lid back on. Once you start to see new babies it is best to remove the adults (if you collected them yourself). Put them in a new container to start a new culture. This can be redone as many times as you want.


Care and Breeding:

Silverfish can climb rough surfaces such as cardboard but are unable to climb glass or smooth plastic. Thus, a starting colony of 100-150 individuals can safely be stored in a cubic 10” plastic or glass container with ventilation at the top.

Do not feed your ants ones that you have collected.  Only feed the new ones that you raised. Silverfish concentrate toxic substances from paint and other materials in their metabolism. You can buy a starter colony from an insect retailer on the Internet or at your local reptile store.


They shun bright lights and have to be kept in a dark area. Like crickets, they will need egg crates for hiding, and they will also use egg crates as food. It takes about 3 months for them to start having young, which look like small duplicates of adults; there is no larval stage.


Keep at 82- 85°F (27-29C).

They are sensitive to dehydration and need a relative humidity of 70 to 85%. Misting them twice a week works well. They do not attack or prey on each other, so population isn’t an issue.


  • AntsBC likes this

"Always do right. This will gratify some people, and astound the rest." -- Samuel Clemens


List of Handy Links   (pinned in the General section)

My Colonies


#14 Offline Crystals - Posted December 9 2014 - 9:59 AM

Crystals

    Advanced Member

  • Moderators
  • PipPipPip
  • 2,049 posts
  • LocationAthabasca, AB (Canada)

Bean beetles (cowpea weevil)
(easy, but slow)


Sandwich containers or deli cups work well. 

Add 1-2” of black eyed peas and your beetles and away you go.  They will lay eggs on the beans and the larvae will burrow into them to eat and pupate.  Generations are quite spread out.  It can take 1-2 months for new beetles to emerge.

They are a very sporadic “flood and famine” feeder.  You can have no beetles one week, and 200 the next week.


They do well around 80F (26.5C).  Mine have done ok around 68F (20C), but were much slower.   


  • AntsBC likes this

"Always do right. This will gratify some people, and astound the rest." -- Samuel Clemens


List of Handy Links   (pinned in the General section)

My Colonies


#15 Offline Crystals - Posted December 9 2014 - 10:03 AM

Crystals

    Advanced Member

  • Moderators
  • PipPipPip
  • 2,049 posts
  • LocationAthabasca, AB (Canada)

Cricket

(Medium difficulty, smelly)


It's easiest to have at least 2 containers, one for breeding adults and one for maturing young crickets. Decide how many crickets you want to raise and purchase a container(s) of suitable size.

Purchase a clear tote bin with a secure lid to keep the crickets in. High-sided plastic storage boxes are a common choice. A 14 gallon (53 L) container can hold a colony of over 500 crickets with sufficient cardboard or egg crates to climb on. Smooth-surfaced totes will reduce the number of escapes.

Cut one or two 6 inch (15.25 cm) holes in lid of the tote bin for ventilation. Cover the top with a metal mosquito screen to prevent escapes (crickets can chew through plastic screen). Try a hot glue gun to secure the screen. You can experiment with variable vents if you want additional control over the heat.

Place 1-2 inch of vermiculite in the bottom of the tote bin (dry, do not add wet). This will give the crickets something to walk on that will keep the container dry to prevent bacteria and reduce the smell. Especially with denser colonies, this will need to be replaced every 1-6 months, so get extra.

Place a disposable plastic container filled with very damp loose top soil in the tote bin. Try to make it just slightly higher than the vermiculite so the crickets can get in the container. The females need this to lay their eggs in. Make sure your top soil is fertilizer and pesticide free. You can put screen on the surface of the soil to prevent crickets from digging or eating the eggs. Females can deposit eggs through screen using their egg laying spike (ovipositor).

Buy 50 or more crickets. Make sure you have enough crickets to feed your pet with 30-50 extra to breed. It's important to have a mix of male and female crickets but preferably, more females than males.

Female crickets have three long extrusions on their behind with the main one (called ovipositor) that it uses to deposit the eggs in the ground. Female crickets will also grow fully developed wings.
Male crickets have two extrusions. They have short under-developed wings that they use to produce the familiar cricket call we hear at night.

Assemble your colony. Place all your crickets in your completed cricket container. Place 1 or 2 paper plates with chick mash on the egg crates so it’s away from the soil. Place an inverted bottle reptile water dispenser with a sponge in the reservoir to prevent drowning in the tote bin. A dish of water gel (also sold as soil substitute; polyacrylamide), or unflavoured jello will also suffice. You can treat the colony to fruit, potato slices, greens, and other vegetable matter to supplement their diet. Be sure to remove unfinished fresh foods before they mold.

Heat your crickets. Crickets need to be kept warm to promote breeding and incubation for their eggs. Heat can be provided by various methods such as a reptile heater, a heat pad, or a light bulb. Placing a space heater in a walk-in closet will heat the entire closet, providing heat for your crickets and incubating their eggs. Crickets do best when kept on the warmer side of 80-90F (26-32C)

Allow your crickets to breed. Give them about two weeks to breed and lay the eggs in the soil. Then replace the container with a fresh container of top soil. This is how you get a steady supply of young crickets. This also helps you divide the crickets based on their ages.

Incubate the eggs. The crickets need heat to incubate the eggs until they hatch. Place the disposable container in a larger container that can be sealed tightly and place it where the temperature is 85-90F (29-32 C). After about two weeks (longer at lower temps), the eggs will start hatching and pinhead crickets the size of a grain of sand will emerge by the hundreds daily for about two weeks. Collect them and place them in a container with food and water to grow until they are an appropriate size for your pet. Keep some set aside from every batch to replace your breeding crickets as they die off.


Crickets are known for being smelly.  It may be best to keep them in the garage or just buy and freeze them until you need them. 


  • AntsBC likes this

"Always do right. This will gratify some people, and astound the rest." -- Samuel Clemens


List of Handy Links   (pinned in the General section)

My Colonies


#16 Offline Crystals - Posted December 9 2014 - 10:06 AM

Crystals

    Advanced Member

  • Moderators
  • PipPipPip
  • 2,049 posts
  • LocationAthabasca, AB (Canada)

Locust

(medium difficulty)


What you need:
1 ) 3 x 60 gal. plastic tote's.
2 ) Metal screen (yes metal not plastic or fiber screen unless you want a mass breakout)
3 ) Hot glue gun.
4 ) A lot of thin brantches.
5 ) 1-2 1L plastic tubs (ice cream tubs work well).
6 ) 2-3 shallow dish (for water).
7 ) Enough cottonballs to fit in the shallow dishes.
8 ) 3 reptial heat pads and or heat lights ( they need to be kept at 85-90F).
9 ) Lots and lots of leaf matter. (I can't stress this enough as they eat A LOT).
10 ) Paper towels or newspapers.
11 ) Play sand/reptial sand (enough to fill the 1L tubs 3/4's of the way full).
12 ) 1 Razorblade (to cut the holes in the lids).
13 ) Last but not least, you will need 30-50 locusts.

Once you have all the materials above (minus the locusts). You will need to cut out a hole in the lid (make sure that the hole is not too close to the edges). Now that the hole is cut out, cut the screen and put a dot of glue on the lid at one of the corners.  As you place the glue down you will need to push the screen into it (Caution, it will be hot, perhaps use a popsicle stick).

Place a beadline of glue connecting each dot of glue around the edge of the mesh so the mesh is firmly in place.  Now repeat for the other tub/s.

Place the lids to the side.

Place the paper towels/newspapers on the floor of each of the totes. Fill one of the 1L tubs 3/4's of the way full of moist sand. Moist, not soaking wet. Grab a handful of sand and squeeze it.  If water drips, it’s too wet. Open your hand - you should have a pressed form of the inside pf your hand made out of sand. If you don’t then it’s too dry and you will need to add some more water.


Now that you have the “laying” tubs done you will need to place them into the tote. Now add some branches into the one tote that the adult locusts will be going into.

Now place the heat pad under the tote. Let the heatpad run for 24 hours and check the temperature in the tote (remember to have the lid on during this time). If the heat is not high enough you will need to add the heat light as well. If this is what is needed let it run again for 24 hours and check the temperature again. Once you have the temperature set between 85-90F (29-32C) you can get your locusts and add them to your adult tote.

Please remember they can jump really well and actually fly.  


  • AntsBC likes this

"Always do right. This will gratify some people, and astound the rest." -- Samuel Clemens


List of Handy Links   (pinned in the General section)

My Colonies


#17 Offline Crystals - Posted December 9 2014 - 10:10 AM

Crystals

    Advanced Member

  • Moderators
  • PipPipPip
  • 2,049 posts
  • LocationAthabasca, AB (Canada)

Freshwater snails

(easy)


A container – almost anything will work from a large vase, plastic shoebox, aquarium, etc.  Fill it with water (add an aquarium conditioner to remove chlorine/chloramine from the tap water).

Add snails - the pest kind are what you are after – there are several types that work well.  Red/brown Ramshorn snails or pond snails.  Easily obtained from most people with aquariums or online.  (wild ones reproduce differently - not what you want)

You can also add an aquatic stem plant clipping or duckweed, these will help keep the water clean (optional).  Place in a window sill or under a light if adding plants.


Change 1/3 of the water every 2-3 weeks.


Feed small amounts of fish flakes, cucumber, or zuchinni.  (use a fork or nail to make the veggies sink).  They don’t eat much and can go days without food.


They lay eggs and breed very quickly.  Most of my ant colonies quite enjoyed a snail snack.  (I froze the snails before feeding)


Room temperature works perfectly. 


  • AntsBC likes this

"Always do right. This will gratify some people, and astound the rest." -- Samuel Clemens


List of Handy Links   (pinned in the General section)

My Colonies


#18 Offline Crystals - Posted December 9 2014 - 10:14 AM

Crystals

    Advanced Member

  • Moderators
  • PipPipPip
  • 2,049 posts
  • LocationAthabasca, AB (Canada)

Microworms

(Easy)


Find a container, a sandwich container or a wide deli cup works well.

Medium is oatmeal or potato flakes, mixed with enough water to make them wet with a pinch of yeast.

Add microworms and you are good to go.

Start a new culture every 1-2 weeks.


They quickly swarm up the sides and are easy to scrape off.


Despite their small size, a few of my colonies really enjoyed them.  (serve on tinfoil or on a pop bottle lid insert)


Easily obtained online or from aquarium forums/groups.


They do well at room temperature.


I have had various fly species happily invade the cultures when the cotton plug in the ventilation hole came loose.  The larger maggots made a free ant snack.


  • AntsBC likes this

"Always do right. This will gratify some people, and astound the rest." -- Samuel Clemens


List of Handy Links   (pinned in the General section)

My Colonies


#19 Offline Crystals - Posted December 9 2014 - 10:18 AM

Crystals

    Advanced Member

  • Moderators
  • PipPipPip
  • 2,049 posts
  • LocationAthabasca, AB (Canada)

White worms

(easy)


White worms are about the size of a grain of rice, but thinner.  Easy for ants to man handle around.

You will need a plastic container, a plastic shoebox or ice cream pail works well.  Add some airholes to the lid.  Plug them with cotton or cover with fine mesh to keep gnats out.

Fill half way with a peat/soil mixture.  Add water until damp.  If you squeeze a handful and get one drop of water, it is close to perfect.

Add a starter culture (obtained online or from aquarium forums).


Feed them some food (dry cat food works well, oats work too, but if they mold they are harder to remove).


Once the colony is established (about a month) you can start feeding them to your ants.  Some species prefer them over others.

To make harvesting easy, use one side of an old CD case (clear plastic), place it over the food, and press gently.  When you harvest you just need to lift the plastic up, and the worms will be stuck to it.


They like it pretty dark, and will dig down the instant light hits them.  They are pretty hardy and can go a week or so without food.  Just don’t let them dry out.


They do very well at 70F (21C)     


  • AntsBC likes this

"Always do right. This will gratify some people, and astound the rest." -- Samuel Clemens


List of Handy Links   (pinned in the General section)

My Colonies


#20 Offline Crystals - Posted December 9 2014 - 10:23 AM

Crystals

    Advanced Member

  • Moderators
  • PipPipPip
  • 2,049 posts
  • LocationAthabasca, AB (Canada)

Earthworms

(easy)


Get a container at least the size of a large shoebox, larger if possible.  Drill about 15-20 ¼” holes in the bottom (Or use a lighter/candle to heat up a nail to melt through).  This will provide drainage – it will be needed honest.

Add 40-80 small ventilation holes in the lid or on the side near the top.


Get some bedding – this can vary by personal preference.

Possibilities include:

Shredded newspaper mixxed with some peat/old leaves.  (I have heard of lots of people using this with success)

¾ peat and ¼ soil with perlite and vermiculite added


Cut a piece of cardboard that fits nicely on top of the bedding – this will help retain moisture – keep it slightly damp.  Don’t surprised when the worms eat it, they seem to love cardboard.


Place bin on top of a couple of bricks or something to allow easy drainage.  Also add something to catch the “worm tea” (you plants will love it).  Sometimes just using a second container works excellent.


Add worms.  Add some food (not much the first few days).  Bury the food a bit in the paper in one spot, next day check if it is gone and add food to a nearby spot.


An earthworm can consume about half of its own weight each day, they also breed fairly quickly.

Put damp cardboard on the grass after a rain for easy worm catching (you could get various species this way).  Many towns give them away free for composting.  Many bird shops also sell them.  Or you can buy them online.


Worms love: breads, grains, cereal, coffee grounds (and the filter…), fruits and veggies, tea bags, any plant clippings, leaves, etc.

Worms do NOT like: diary products, fats, meats, or any oily food.


When the bin is full of compost, place new bedding in a second container and add some food.  Place the original bin directly on top of the new bedding – the worms will migrate over 1-2 months as it dries out and in search of food.  They usually only travel in the top 3” of soil, so don’t let the level get too high.   


  • AntsBC likes this

"Always do right. This will gratify some people, and astound the rest." -- Samuel Clemens


List of Handy Links   (pinned in the General section)

My Colonies


Also tagged with one or more of these keywords: breeding, culturing, crystals, feeders

0 user(s) are reading this topic

0 members, 0 guests, 0 anonymous users